
Tested on Project Operations on Dataverse version 4.25.0.91 (October 2021)
In part I we looked at creating invoice attachments based on an invoice’s Invoice Line Details. In part II the focus shifts from a granular invoice level to a more high-level approach, focusing on projects and approved time entries. The approach in part II is significantly simpler as only approved time is regarded, and Fixed Price billing milestones are not taken into consideration at all. The use case is simple: Create an invoice attachment for approved time entries based on a project, start date, and end date. As there’s no OOTB UI to meet the use case, a Custom Page is used as the UI for creating attachments. The approach and the UI both work for this use case but if you’re hoping to see design tips and a stellar Custom Page visual, I might need to manage your expectations, and point you to one of the several canvas apps MVPs.
Important considerations
Before we dive into the technical bits and pieces of the flow that creates attachments, it’s important to understand the target table that serves as the basis of the created attachments. Theoretically, we have a few different tables that we could use as the basis for listing approved time entries as invoice attachments. In reality, none of the different options are perfect, as you can see from the pros and cons columns in the tables immediately below.
There’s only a single partial winner and that’s the Project Approvals table. Why? Well because Time Entries don’t have a concept for chargeability, and because Actuals and Invoice Line Details don’t work with Fixed Price. If you’re wondering what I mean by them not working with FP, the answer is simple: An Unbilled Sales Actual isn’t created for FP, and FP doesn’t have any ILDs with a Transaction Class of Time. This all means that the Project Approval table is the best bet, despite the fact that changes made to eventual Invoice Line Details are not reflected back on the original Project Approvals.
| TIME ENTRIES PROS | TIME ENTRIES CONS |
| Possible to filter based on Submitted, Approved, etc. | Corrections and changes down the line are not reflected in original time entries |
| Works for both T&M and FP | Doesn’t hold a sales price |
| Not possible to set chargeability | |
| Unreliable source of truth before a time entry is approved | |
| Quantity is based on submitter’s discretion |
| PROJECT APPROVALS PROS | PROJECT APPROVALS CONS |
| Possible to filter based on Submitted, Approved, etc. | Corrections and changes down the line are not reflected in original project approvals |
| Works for both T&M and FP | |
| Possible to set chargeability | |
| Holds a sales price | |
| Quantity for both submitted qty and billable qty |
| ACTUALS PROS | ACTUALS CONS |
| Rows are based on approved time | Only works for T&M |
| Chargeability inherited from Project Approval | |
| Holds a sales price | |
| Corrections and changes down the line are reflected in Actuals | |
| Quantity available on Actual rows |
| INVOICE LINE DETAILS PROS | INVOICE LINE DETAILS CONS |
| Rows are based on approved time | Only works for T&M |
| Possible to set chargeability | |
| Holds a sales price | |
| Quantity can be adjusted | |
| Corrections and changes are reflected in ILDs |
The UI for creating invoice attachments
Now that we’re set on using Project Approvals as the basis of listing approved time entries, it’s time to look at the UI that enables a user to select a project, a from date, and a to date for creating invoice attachments. As modern commanding is in preview, I naturally had to consider a custom command bar button with a Custom Page. It didn’t work to my advantage so I went with a smart button from the Ribbon Workbench instead. As a second option, I simply created a Custom Page and added it to my custom model-driven app’s sitemap. Let’s briefly look at the UI choices.
Custom Page in a project’s context from a ribbon smart button
Like I mentioned, I wasn’t able to get modern commanding to work for navigating from a custom command bar button to a Custom Page, so I decided to use a smart button with my Custom Page instead. MVP Scott Durow has a really good post about such an approach here. The smart button calls a Custom Page and a user can then insert a project, a from date, and a to date to create an invoice attachment based on Project Approvals. Image 1 below shows what the simple Custom Page looks like, and how error messages are displayed at the top of the page.

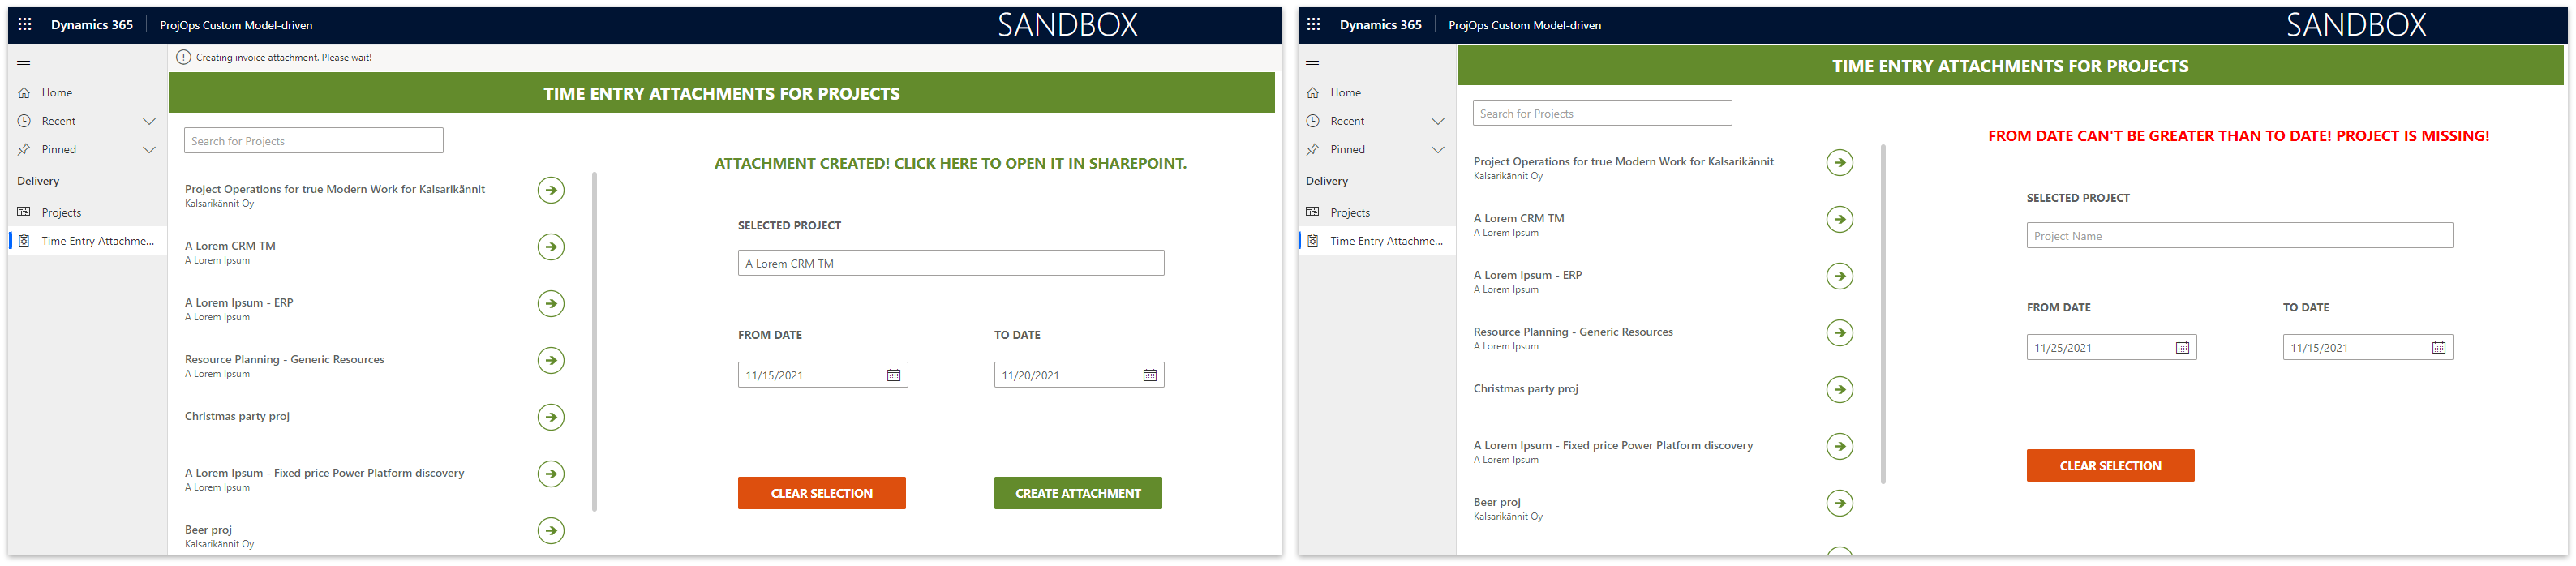
Custom Page in a model-driven app’s sitemap
An alternative approach is to have a Custom Page in a model-driven app’s sitemap and create the attachments from there. In this approach, a gallery is used to select a project, and date pickers are used for selecting the from date and to date values. If the inputs for a project and for the dates are missing, the button for creating attachments is hidden. The button is also hidden if the from date is greater than the to date. After all, that would be a funny attachment. Image 2 below shows a Custom Page in sitemap with error and success messages.
Word template for invoice attachments
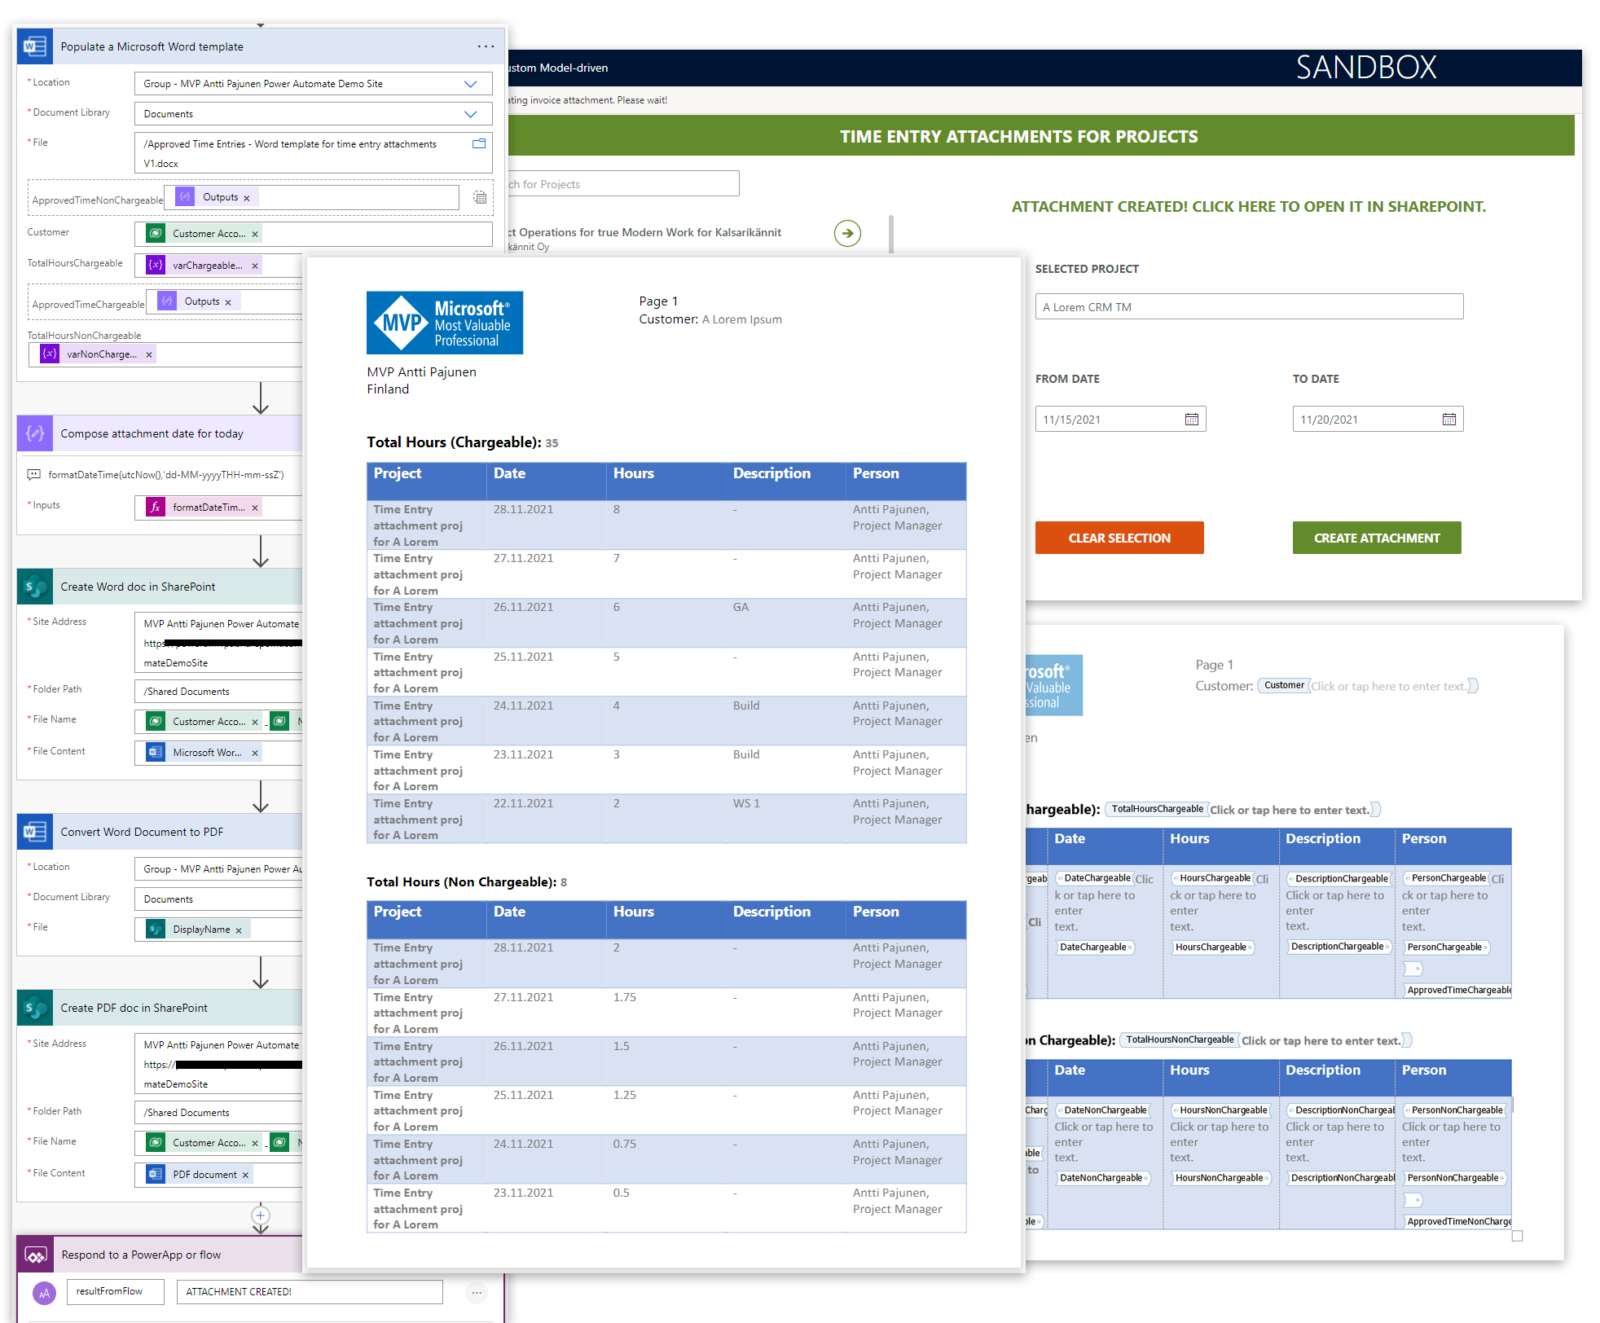
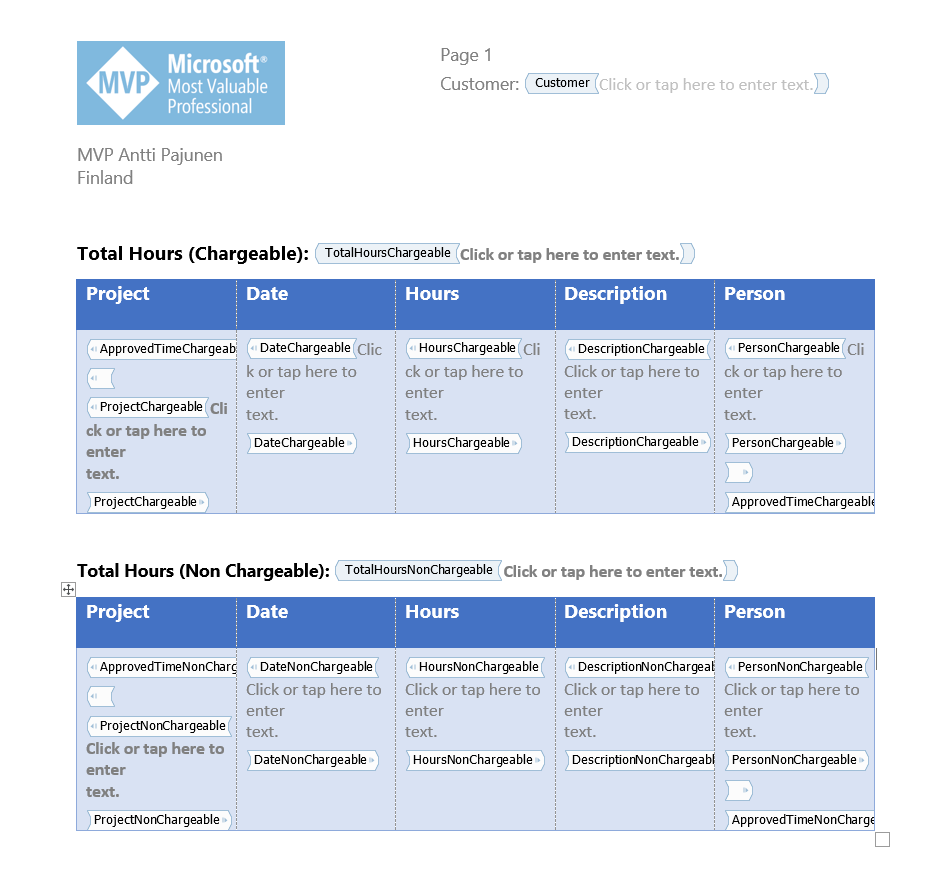
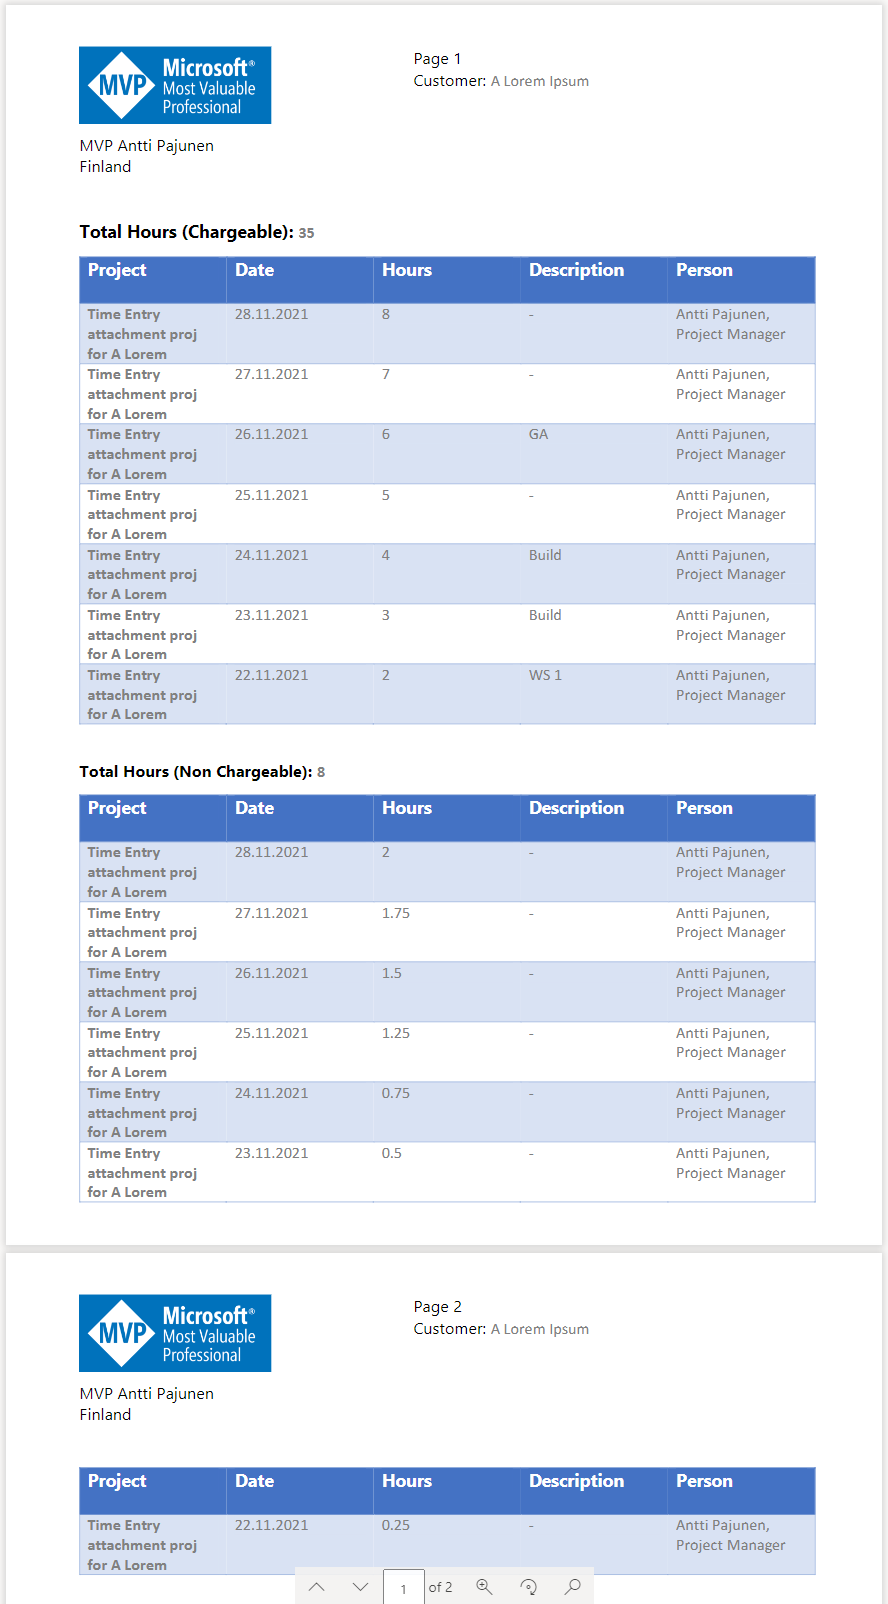
Word templates were discussed in part I so if you’re new to using them, I recommend checking out part I here first. The template I’ve used in this blog post is almost identical to the one used earlier. The only major difference is the tables for milestones, which are not needed when creating attachments based on Project Approvals. For the sake of brevity, I’ve only created tables for Chargeable and Non Chargeable hours. A table for Complimentary hours could easily be added in. Image 3 below shows the revised Word template in design mode.
The invoice attachment flow
Let’s dissect the flow that creates invoice attachments next. The UI for creating attachments was already covered so there’s no need to think of a way to fire off the attachment creation. The flow’s idea is quite similar to the one covered in part I, however, it’s considerably more simple to build.
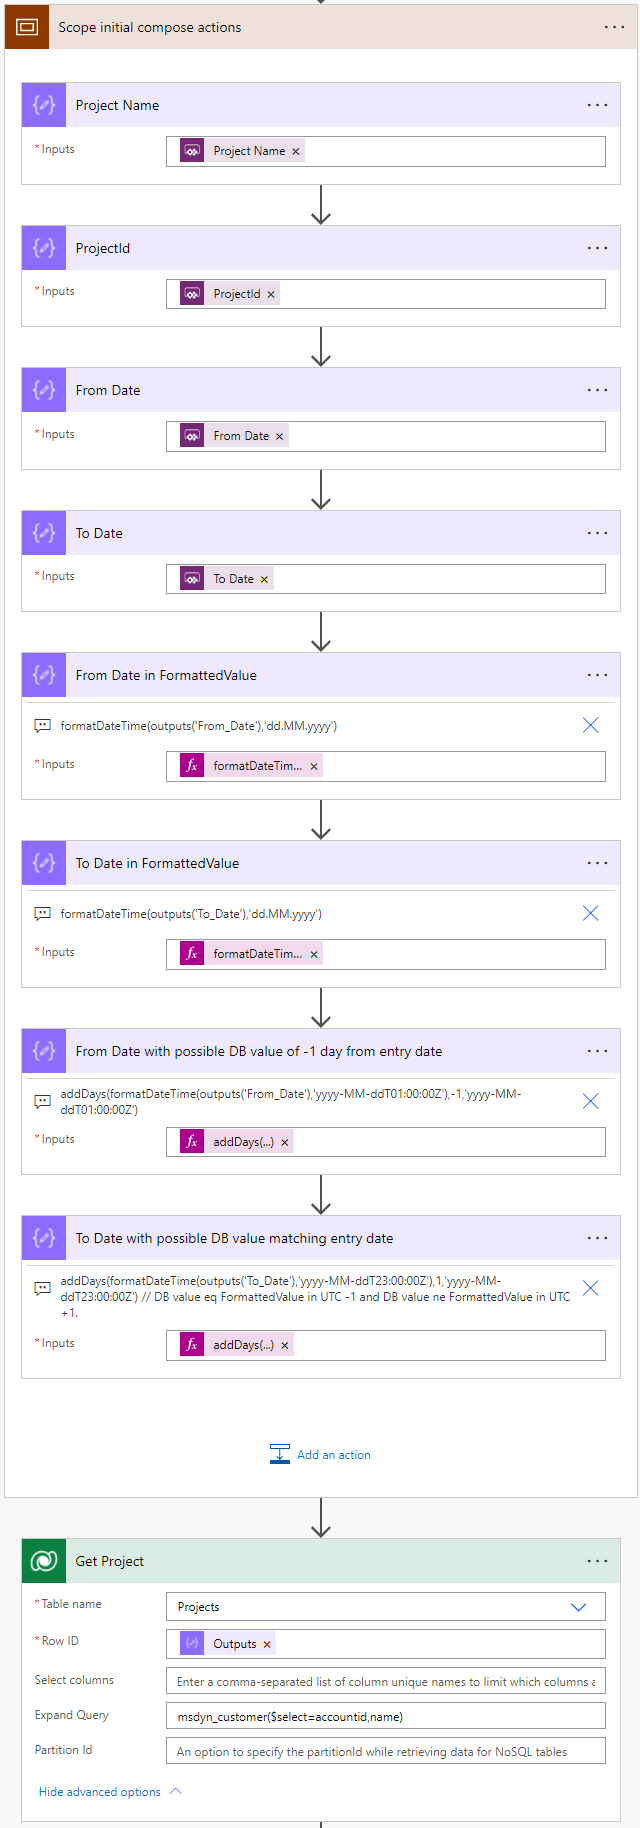
Initial actions
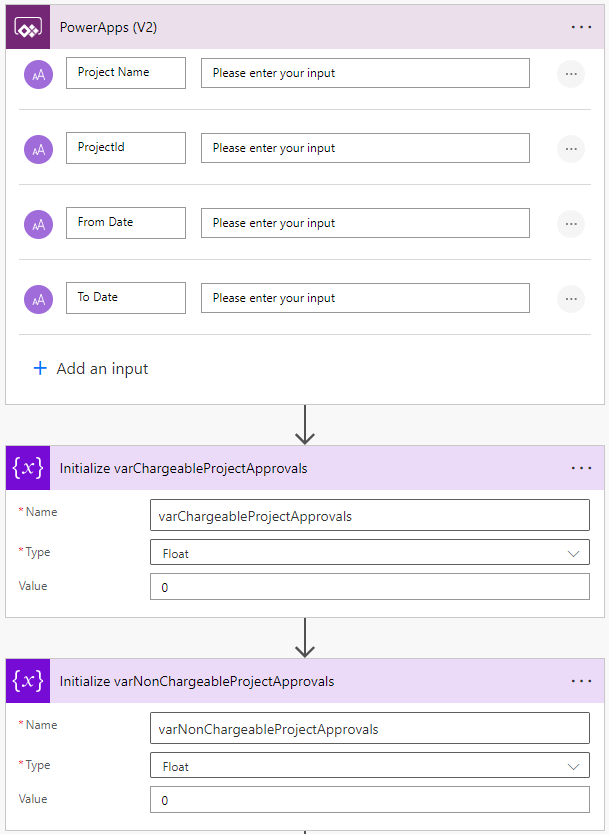
The flow fires off from one of the Custom Pages covered earlier. The input parameters are project name, project GUID, from date, and to date. I originally had the from and to dates as date inputs in the trigger but that completely broke the Custom Page and the flow’s trigger upon a revisit to the Power Apps Studio. Instead of fighting it, I decided to use string values for the dates. Problem solved. The next steps are to initialize variables so that the sum total of Chargeable and Non Chargeable hours can be calculated. What about variables for the arrays that are used to store properties and values for the Word template? Those aren’t needed because this time Pieter’s method is used for the arrays. Check out this blog post by MVP Elaiza Benitez for a short intro to it.
Next up is the biggest headache of working with the Time Entry and Project Approval tables: Database values vs. UI values. I’ve mentioned the difference in several blog posts before but let’s cover the issue once more: The DB value of msdyn_date is stored as user local. This means that when I create a time entry for today, the UI value in the Time Entry Grid and in the OData property for msdyn_date@OData.Community.Display.V1.FormattedValue will display today’s date, however, the DB value will be -1 day as I’m in UTC +2. Setting the time zone in Personalization Settings will affect the value so the results differ depending on geography.

A user creating an invoice attachment can be in UTC -10 while the BD value of a Time Entry/Project Approval row might be based on UTC +5. The invoice attachment is naturally time zone agnostic so the FormattedValue for msdyn_date is to be used. This requires some groundwork on the from and to dates.
The values in From Date and To Date need to be formatted to match the format of the msdyn_date@OData.Community.Display.V1.FormattedValue property’s value. This is done with the following simple expressions:formatDateTime(outputs('From_Date'),'dd.MM.yyyy')
formatDateTime(outputs('To_Date'),'dd.MM.yyyy')
The last compose actions in the initial scope are used to format the To Date and From Date values that the trigger provides to match a possible DB value of a Project Approval. The DB value can be -1 day from the FormattedValue or it can match the FormattedValue. As we can’t filer rows based on a value in FormattedValue, we need to filter based on msdyn_date with a DB value of -1 day at 01:00:00 from a Form Date and +1 day 23:00:00 from a To Date. This way all possible DB values from different time zone options are factored in. The expressions for these compose actions are:
addDays(formatDateTime(outputs('From_Date'),'yyyy-MM-ddT01:00:00Z'),-1,'yyyy-MM-ddT01:00:00Z')
addDays(formatDateTime(outputs('To_Date'),'yyyy-MM-ddT23:00:00Z'),1,'yyyy-MM-ddT23:00:00Z')
A get rows action at the end of the initial actions is used to get the project defined in the trigger. An expand query then gets the account related to the project so that it can be referenced in the Word template.
Chargeable and Non Chargeable parallel branches
Similar to the flow in part I, the next step lists Project Approval rows that are Chargable or Non Chargeable in parallel branches. Let’s look at the list rows and filter array actions for both sides.
List rows and filter array for Chargeable Project Approvals
Since it’s not possible to list rows based on the FormattedValue property, Project Approvals are filtered based on the outputs of compose actions From Date with possible DB value of -1 day from entry date and To Date with possible DB value matching entry date. The project has to match the GUID from the trigger, Record Stage has to be Approved (2), Billing Type has to be Chargeable (192350001), Entry Type has to be Time (0), and Date as to be greater than or equal to the aforementioned From Date, and less than or equal to the aforementioned To Date. The entire filter query is:
_msdyn_project_value eq @{outputs('ProjectId')} and msdyn_recordstage eq 2 and msdyn_billingtype eq 192350001 and msdyn_entrytype eq 0 and msdyn_date ge @{outputs('From_Date_with_possible_DB_value_of_-1_day_from_entry_date')} and msdyn_date le @{outputs('To_Date_with_possible_DB_value_matching_entry_date')}The list rows action is expanded so that it’s possible to display a related project task (out of scope for this blog post), the Bookable Resource in question, and the role of the resource. The expand query used is:
msdyn_ProjectTask($select=msdyn_projecttaskid,msdyn_subject),msdyn_bookableresource($select=bookableresourceid,name),msdyn_ResourceCategory($select=bookableresourcecategoryid,name)Now that we’ve narrowed down Project Approvals, the returned rows must be filtered based on msdyn_date@OData.Community.Display.V1.FormattedValue. As we’ve listed Project Approval rows, we’re now able to access their FormattedValue property. We’re looking for rows where a row’s FormattedValue is greater than or equal to the From Date that a user inserted in the Custom Page UI and where a row’s FormattedValue is less than or equal to the To Date that a user inserted in the Custom Page UI. The expression for the filer array is:
@and(greaterOrEquals(item()?['msdyn_date@OData.Community.Display.V1.FormattedValue'], outputs('From_Date_in_FormattedValue')), lessOrEquals(item()?['msdyn_date@OData.Community.Display.V1.FormattedValue'], outputs('To_Date_in_FormattedValue')))List rows and filter array for Non Chargeable Project Approvals
Now let’s look at the Non Chargeable side of the branches. This is actually pretty much a rinse and repeat of the Chargreable branch. The only difference is in the filter rows action. Instead of looking at Chargeable Project Approvals, we’re looking for Project Approvals with a Billing Type of Non Chargeable (192350000), Complimentary (192350002), or Not Available (192350000). Why Not Available? Good question! Fixed Price Order Lines will produce an N/A Billing Type so those need to be taken into account. The filer query for this side of the branches is:
_msdyn_project_value eq @{outputs('ProjectId')} and msdyn_recordstage eq 2 and (msdyn_billingtype eq 192350000 or msdyn_billingtype eq 192350002 or msdyn_billingtype eq 192350003) and msdyn_entrytype eq 0 and msdyn_date ge @{outputs('From_Date_with_possible_DB_value_of_-1_day_from_entry_date')} and msdyn_date le @{outputs('To_Date_with_possible_DB_value_matching_entry_date')}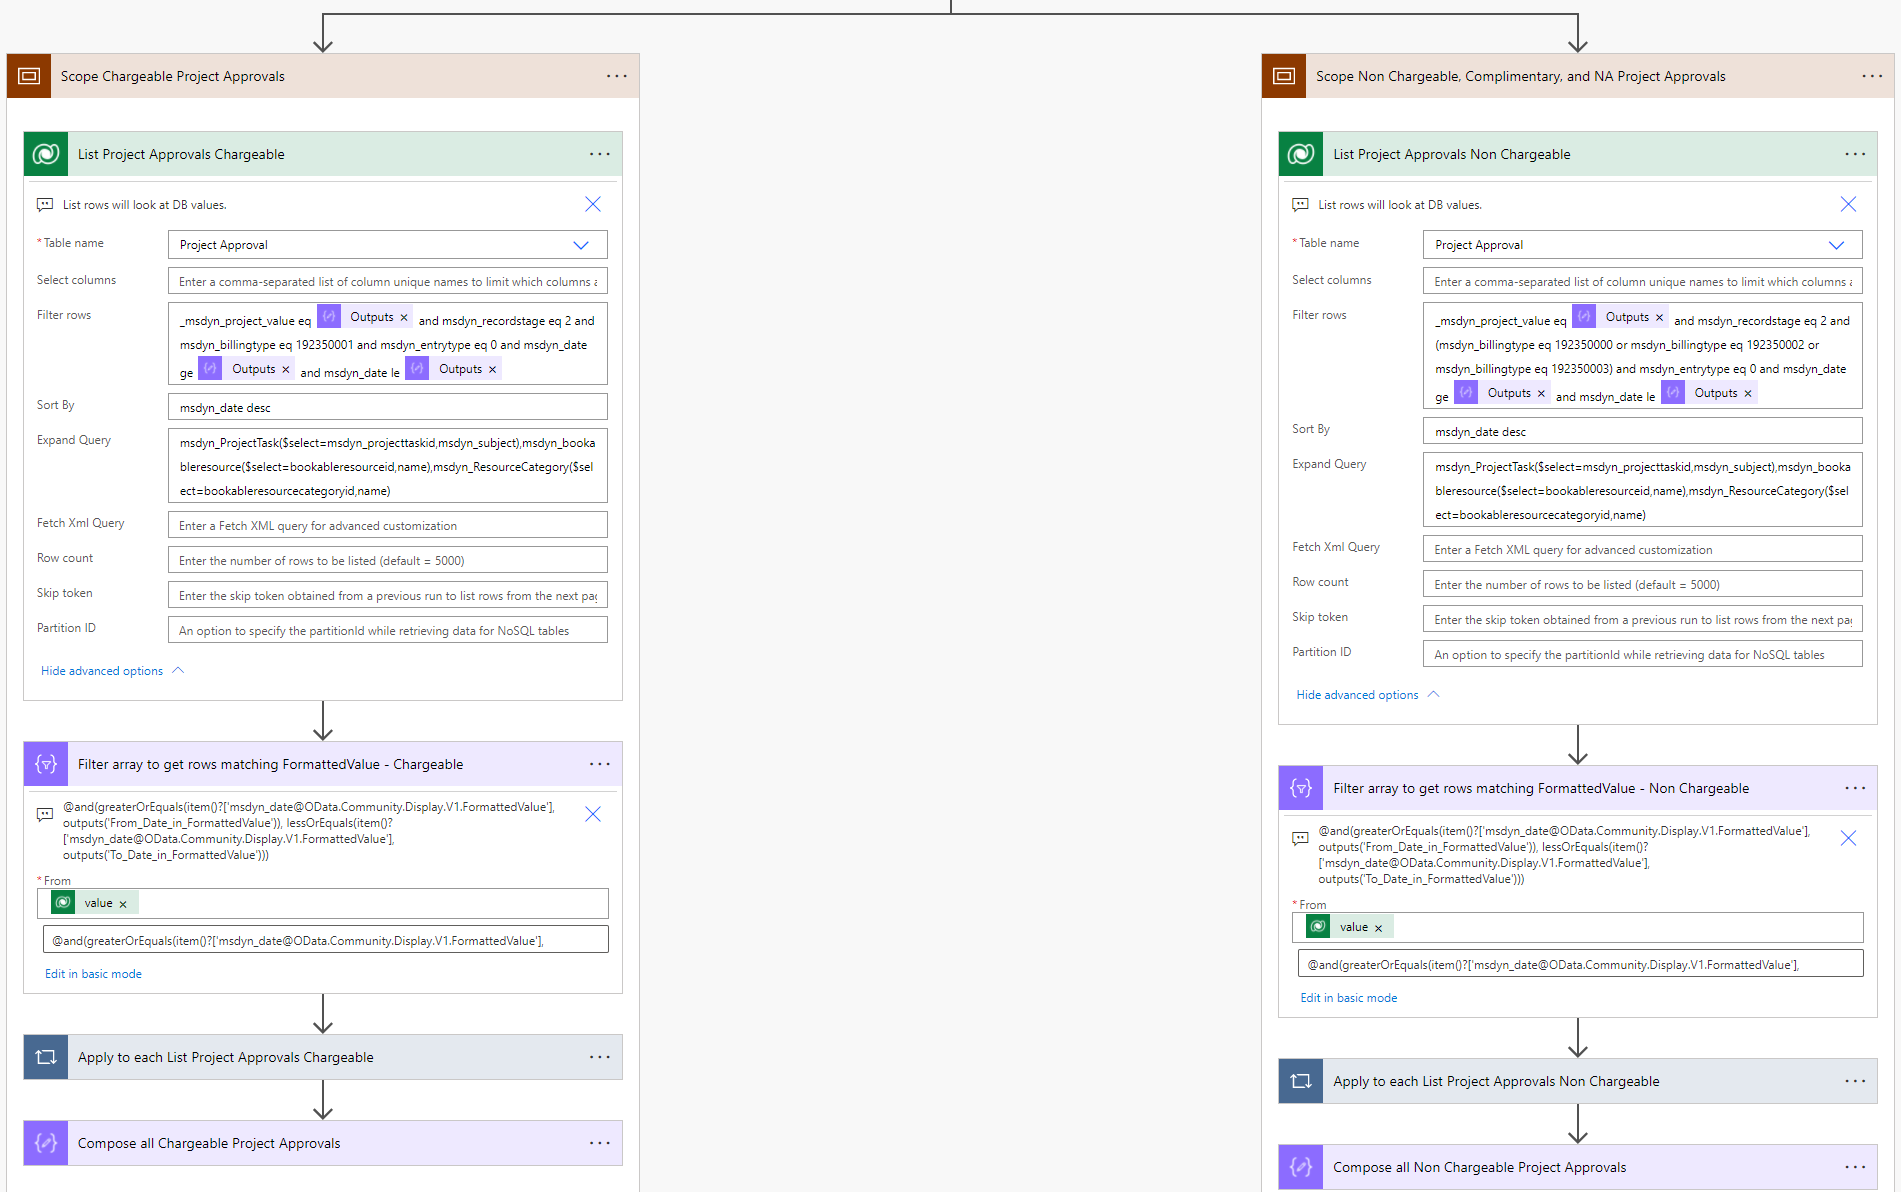
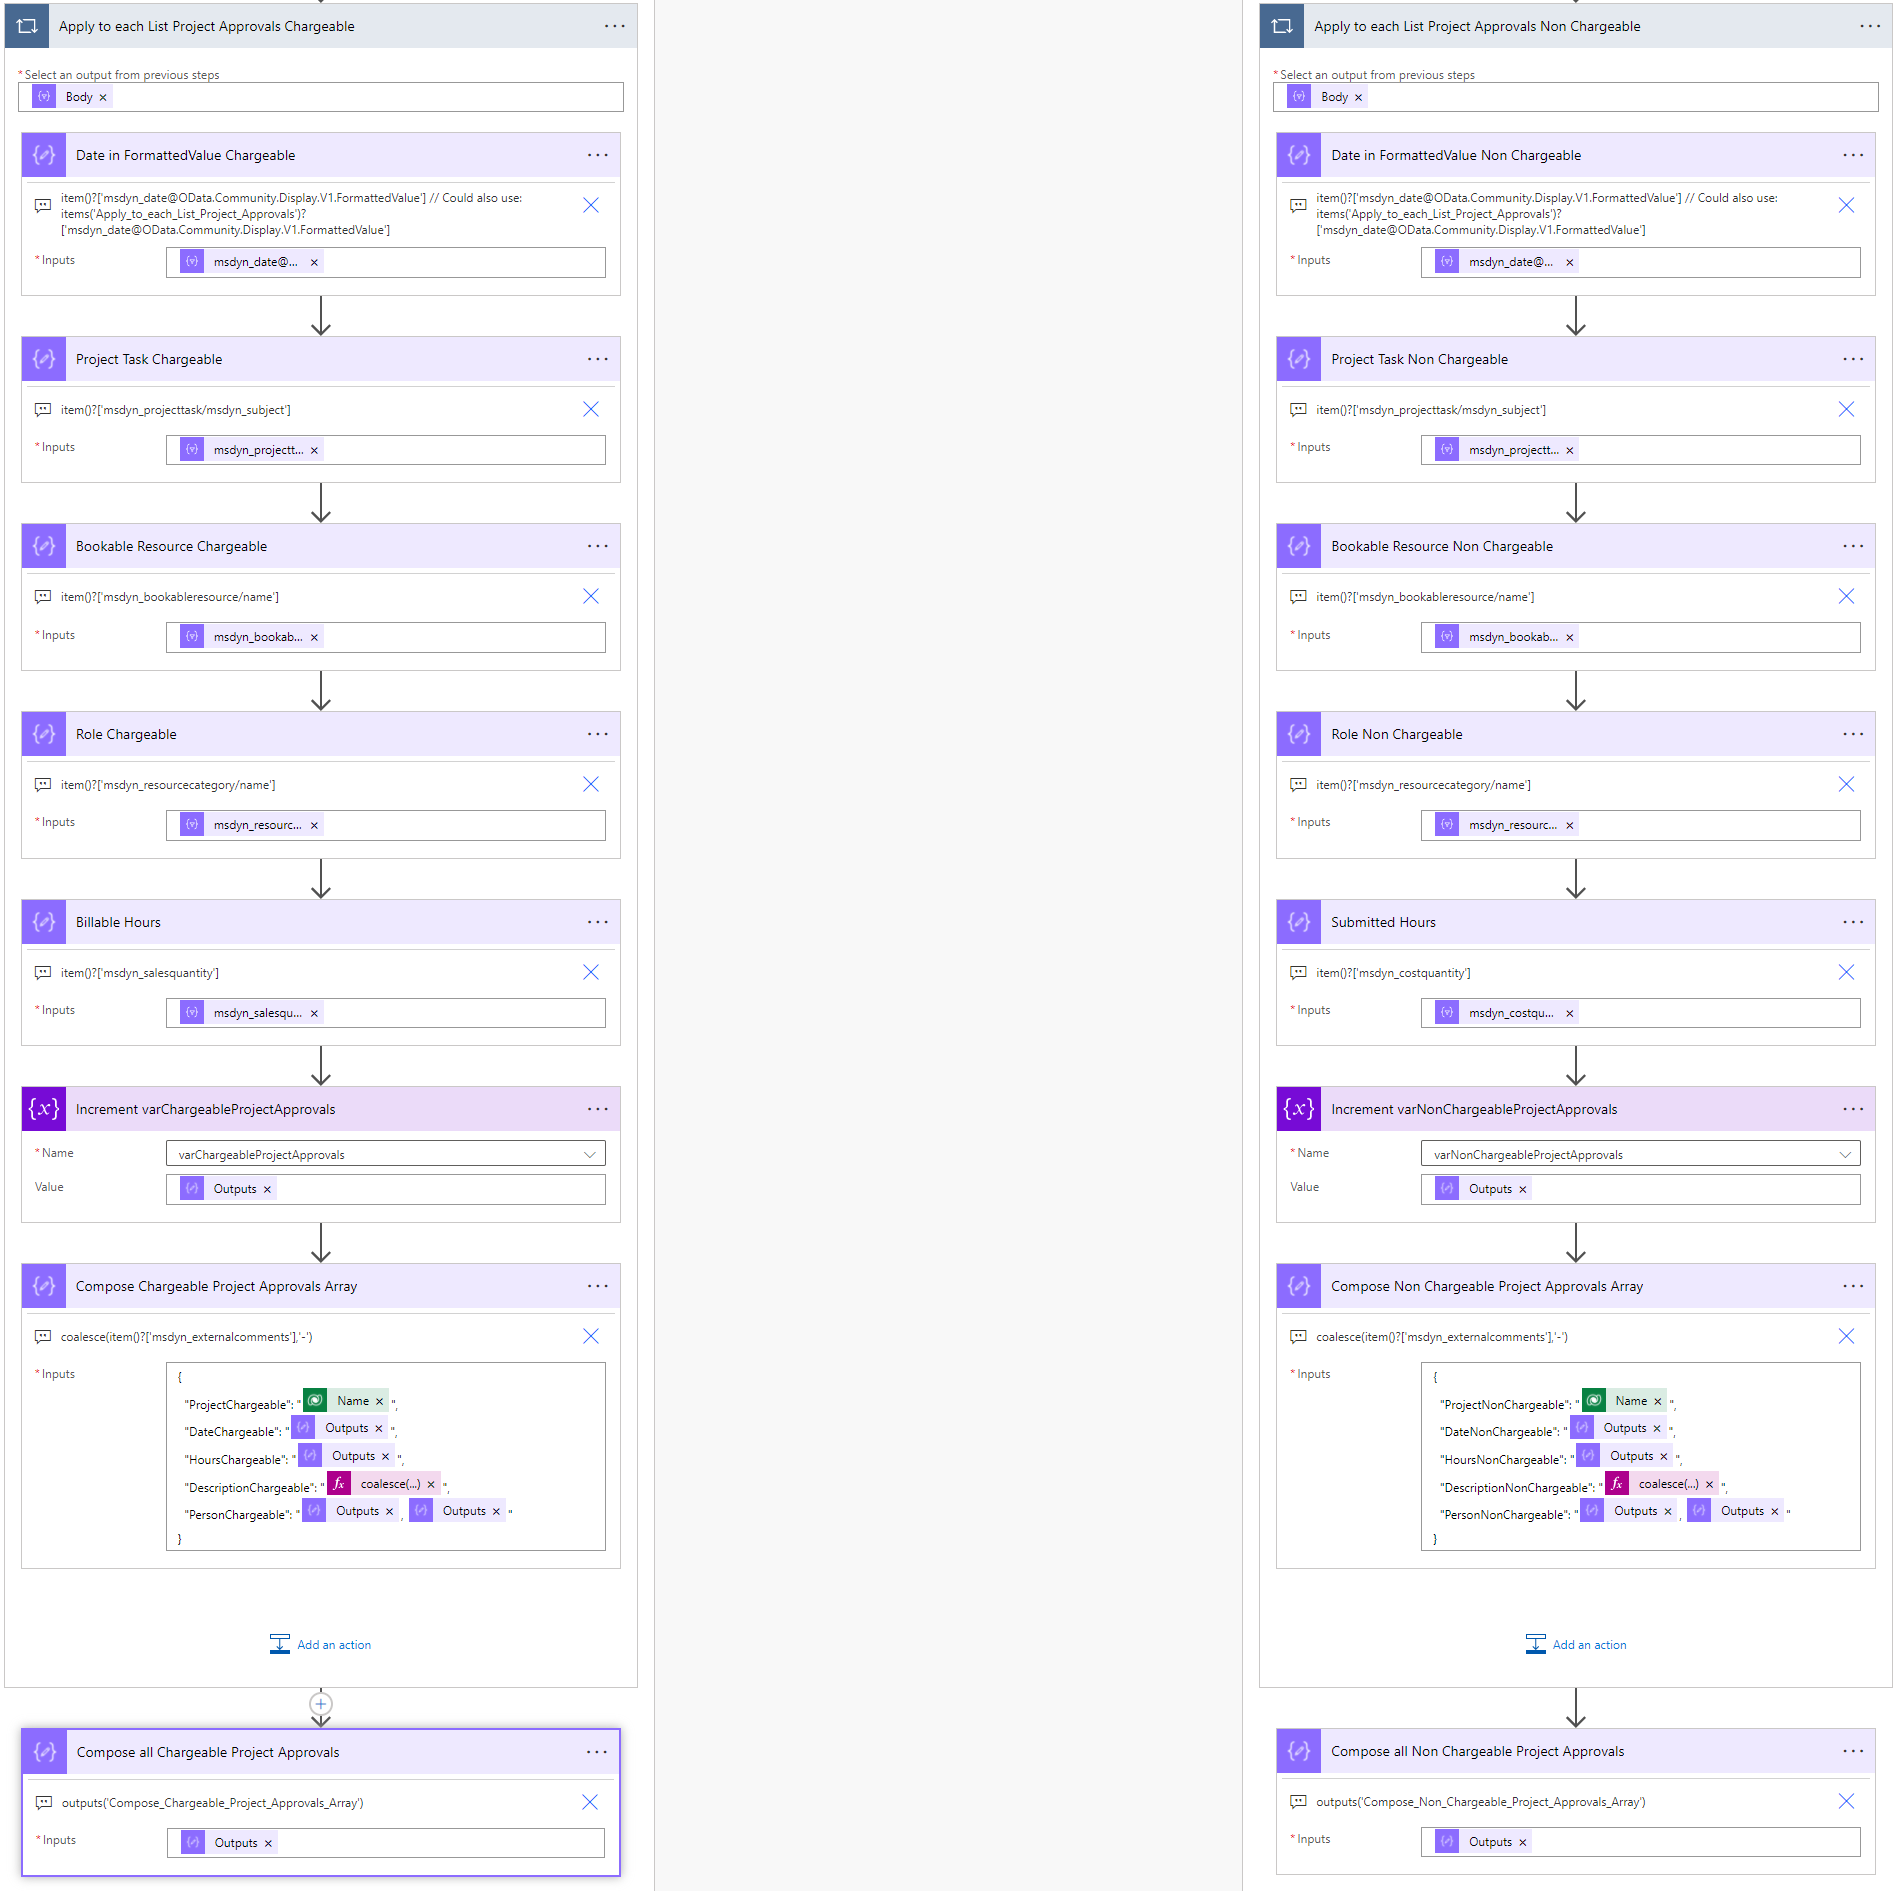
Apply to each actions in both branches
Time to look at the apply to each actions. For the sake of example, I’ve used compose actions to store values from the filter array outputs inside the apply to each loops. These naturally consume more API calls and should be typed in as expressions in the loop’s final compose action that holds the Project Approvals array. In the end, it’s up to you to consider the impact on performance and API calls.
The incremented variable stores Billable Hours in the Chargeable branch and Submitted Hours in the Non Chargeable branch. A compose action inside the loop is used to store the JSON array for each iteration, and the action is then referenced outside the loop in another compose. This compose will combine all the arrays from the loop, and is known as Pieter’s method. An example of the JSON schema for the Chargeable branch is as follows:
{
  "ProjectChargeable": "@{outputs('Get_Project')?['body/msdyn_subject']}",
  "DateChargeable": "@{outputs('Date_in_FormattedValue_Chargeable')}",
  "HoursChargeable": "@{outputs('Billable_Hours')}",
  "DescriptionChargeable": "@{coalesce(item()?['msdyn_externalcomments'],'-')}",
  "PersonChargeable": "@{outputs('Bookable_Resource_Chargeable')}, @{outputs('Role_Chargeable')}"
}
Creating the invoice attachment documents
The final actions are all about creating an invoice attachment as a Word document and then as a PDF. The process is the same as in part I except for the final action, which replies “ATTACHMENT CREATED!” back to Power Apps. This way a user knows an attachment has been created.
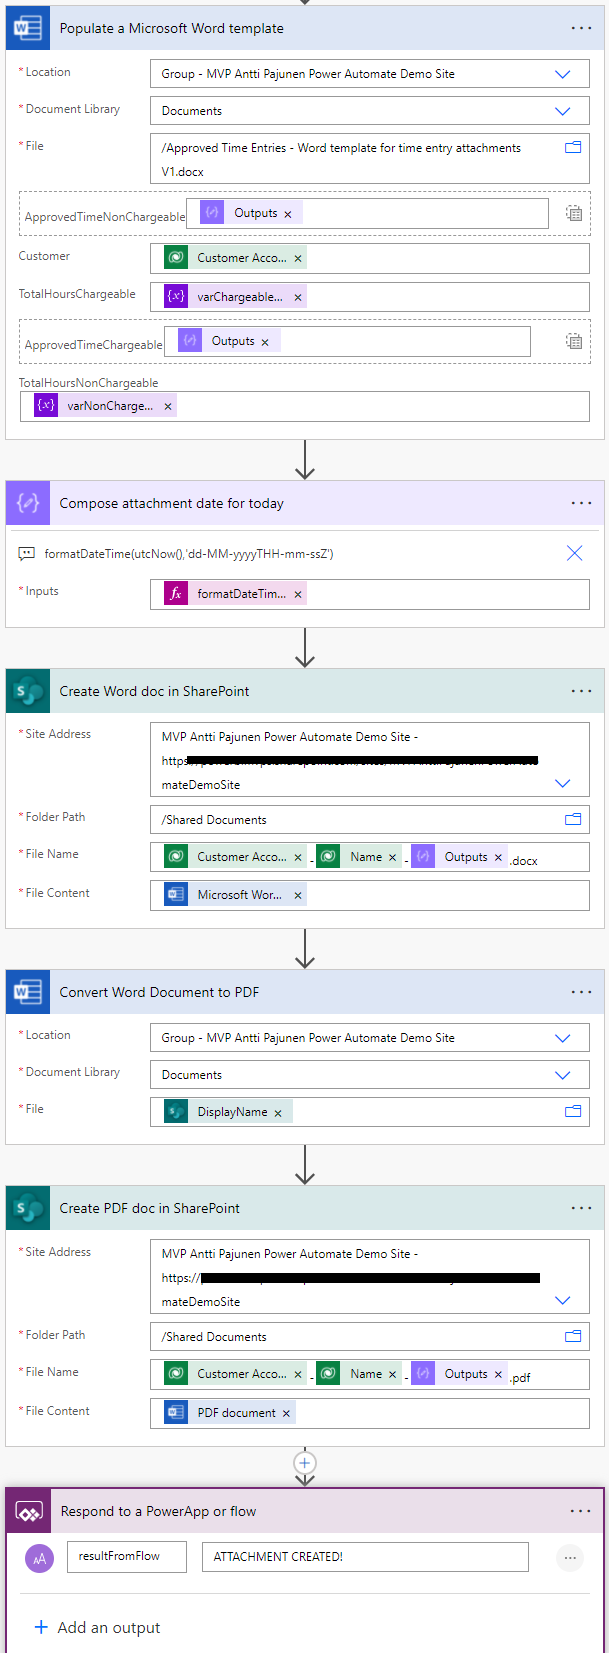
The end result looks much like the attachment from part I. Milestones are naturally missing and no monetary values are displayed as in this approach we’re only interested in hours and total hours.
Disclaimer:
All my blog posts reflect my personal opinions and findings unless otherwise stated.