
Tested on Project Operations on Dataverse version 4.26.0.155 (November 2021)
Perhaps one of the most frequent requests I see in Dynamics 365 Project Operations projects is the ability to create and process change requests (later CRs). As of December 2021, such a feature is still missing from ProjOps, but that doesn’t mean we can’t make them happen with a bit of creativity. I recently played around with Lobe, and because I can’t let Daniel Laskewitz have all the AI fun, I thought I’d finally make my first form processing model a reality.
So what are we trying to do here? The idea is simple and sweet: Process CR documents with AI builder, create a CR in Dataverse and append it to an existing Order and an existing Project in ProjOps. This blog post is part I of a two-part series and focuses on creating a CR in a custom table in Dataverse. Part II focuses on appending a CR to an existing Order and Project.
The reason I’m processing documents is not that I wanted to play around with AI Builder (which is not far from the truth either) but the fact that many organizations still process CR documents manually. This takes time and is in all honesty a bit ridiculous to do manually in this day and age. A custom form processing model in AI Builder is a means of alleviating pain in a process that revolves around passing documents back and forth. AI Builder extracts key information and creates all the necessary rows and columns in Dataverse based on the extracted information. AI Builder isn’t a silver bullet but it can definitely make things easier.
Processing CRs with AI Builder and Power Automate
Let’s get started! The flow of work is as follows:
- A CR document is uploaded to a document library in SharePoint.
- Column formatting is used so that the CR can be processed from SharePoint.
- CR processing status is displayed in the document library in a custom column.
- Successful processing leads to a new CR row in Dataverse.
- The CR can be appended to an Order and Project (covered in part II).
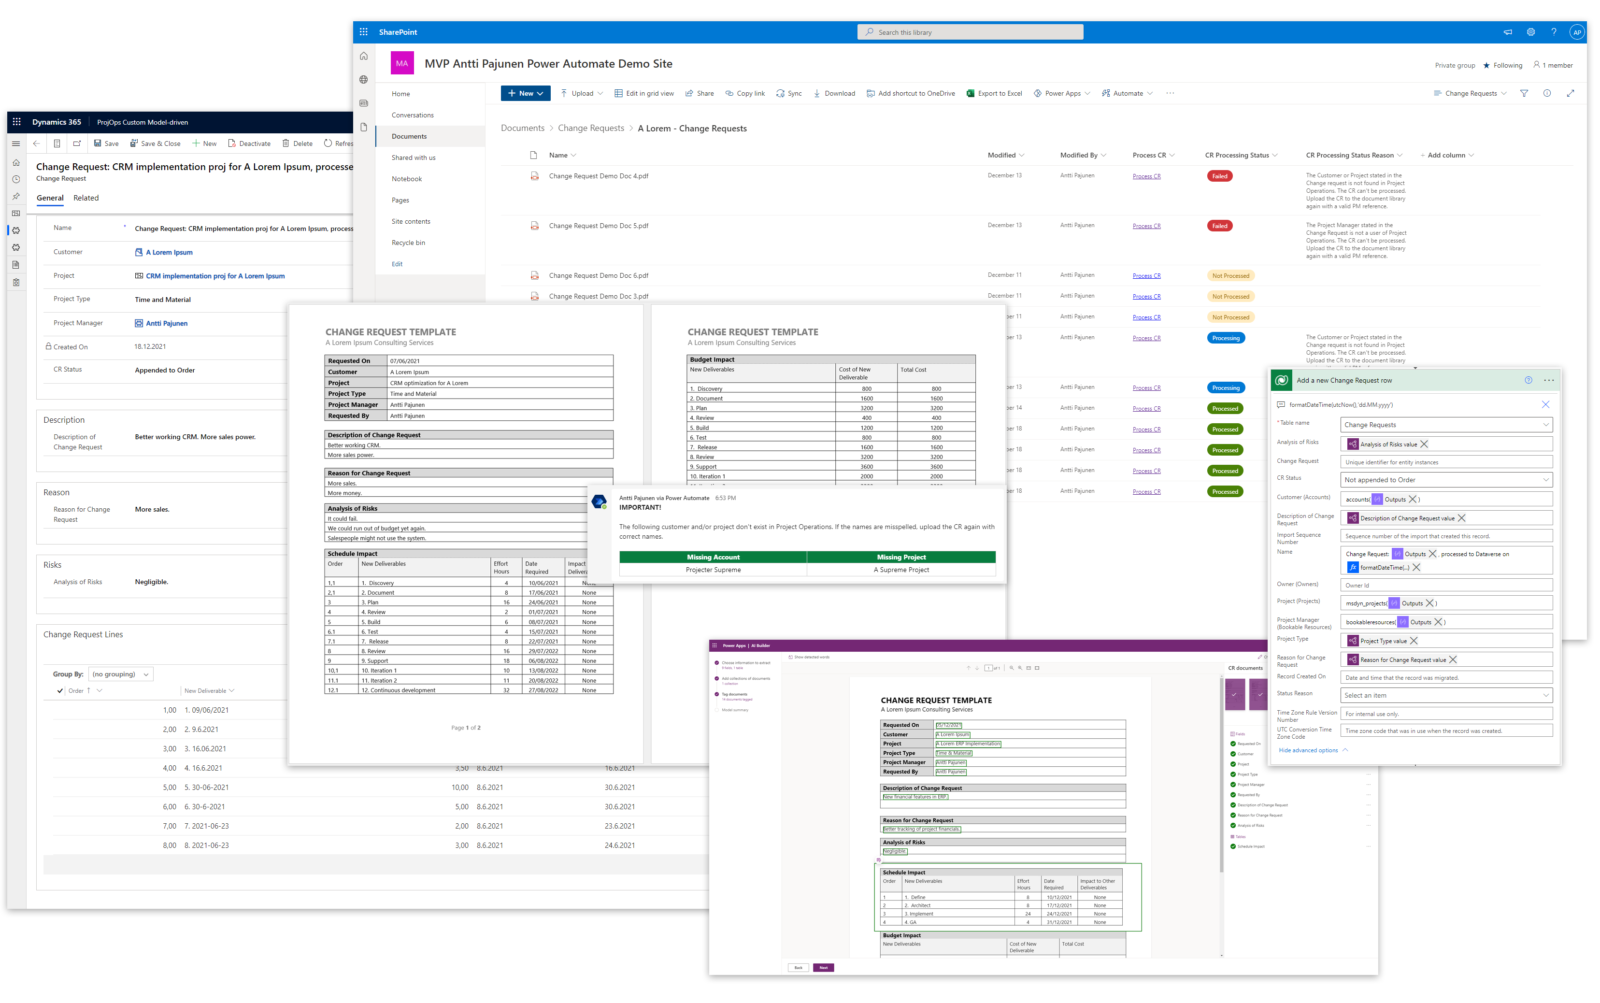
CRs in SharePoint
Nothing like a document in a document library in SharePoint. For a simple CRM guy, the most challenging part of this article series was deciding where I’d store my CR documents. I naturally considered Teams and customer-specific Teams teams but that led to a challenge I just couldn’t crack to my liking: How can I fire off a single, specific flow when I interact with a document? I’d need to get file content from the file I’m processing and there can’t be more than a single flow that does all the magic. I don’t actually have the answer to this question so feel free to educate me. I decided to take the easy way out and used the document library I use for demos to fire off my flow. SharePoint 1, simple CRM MVP 0.
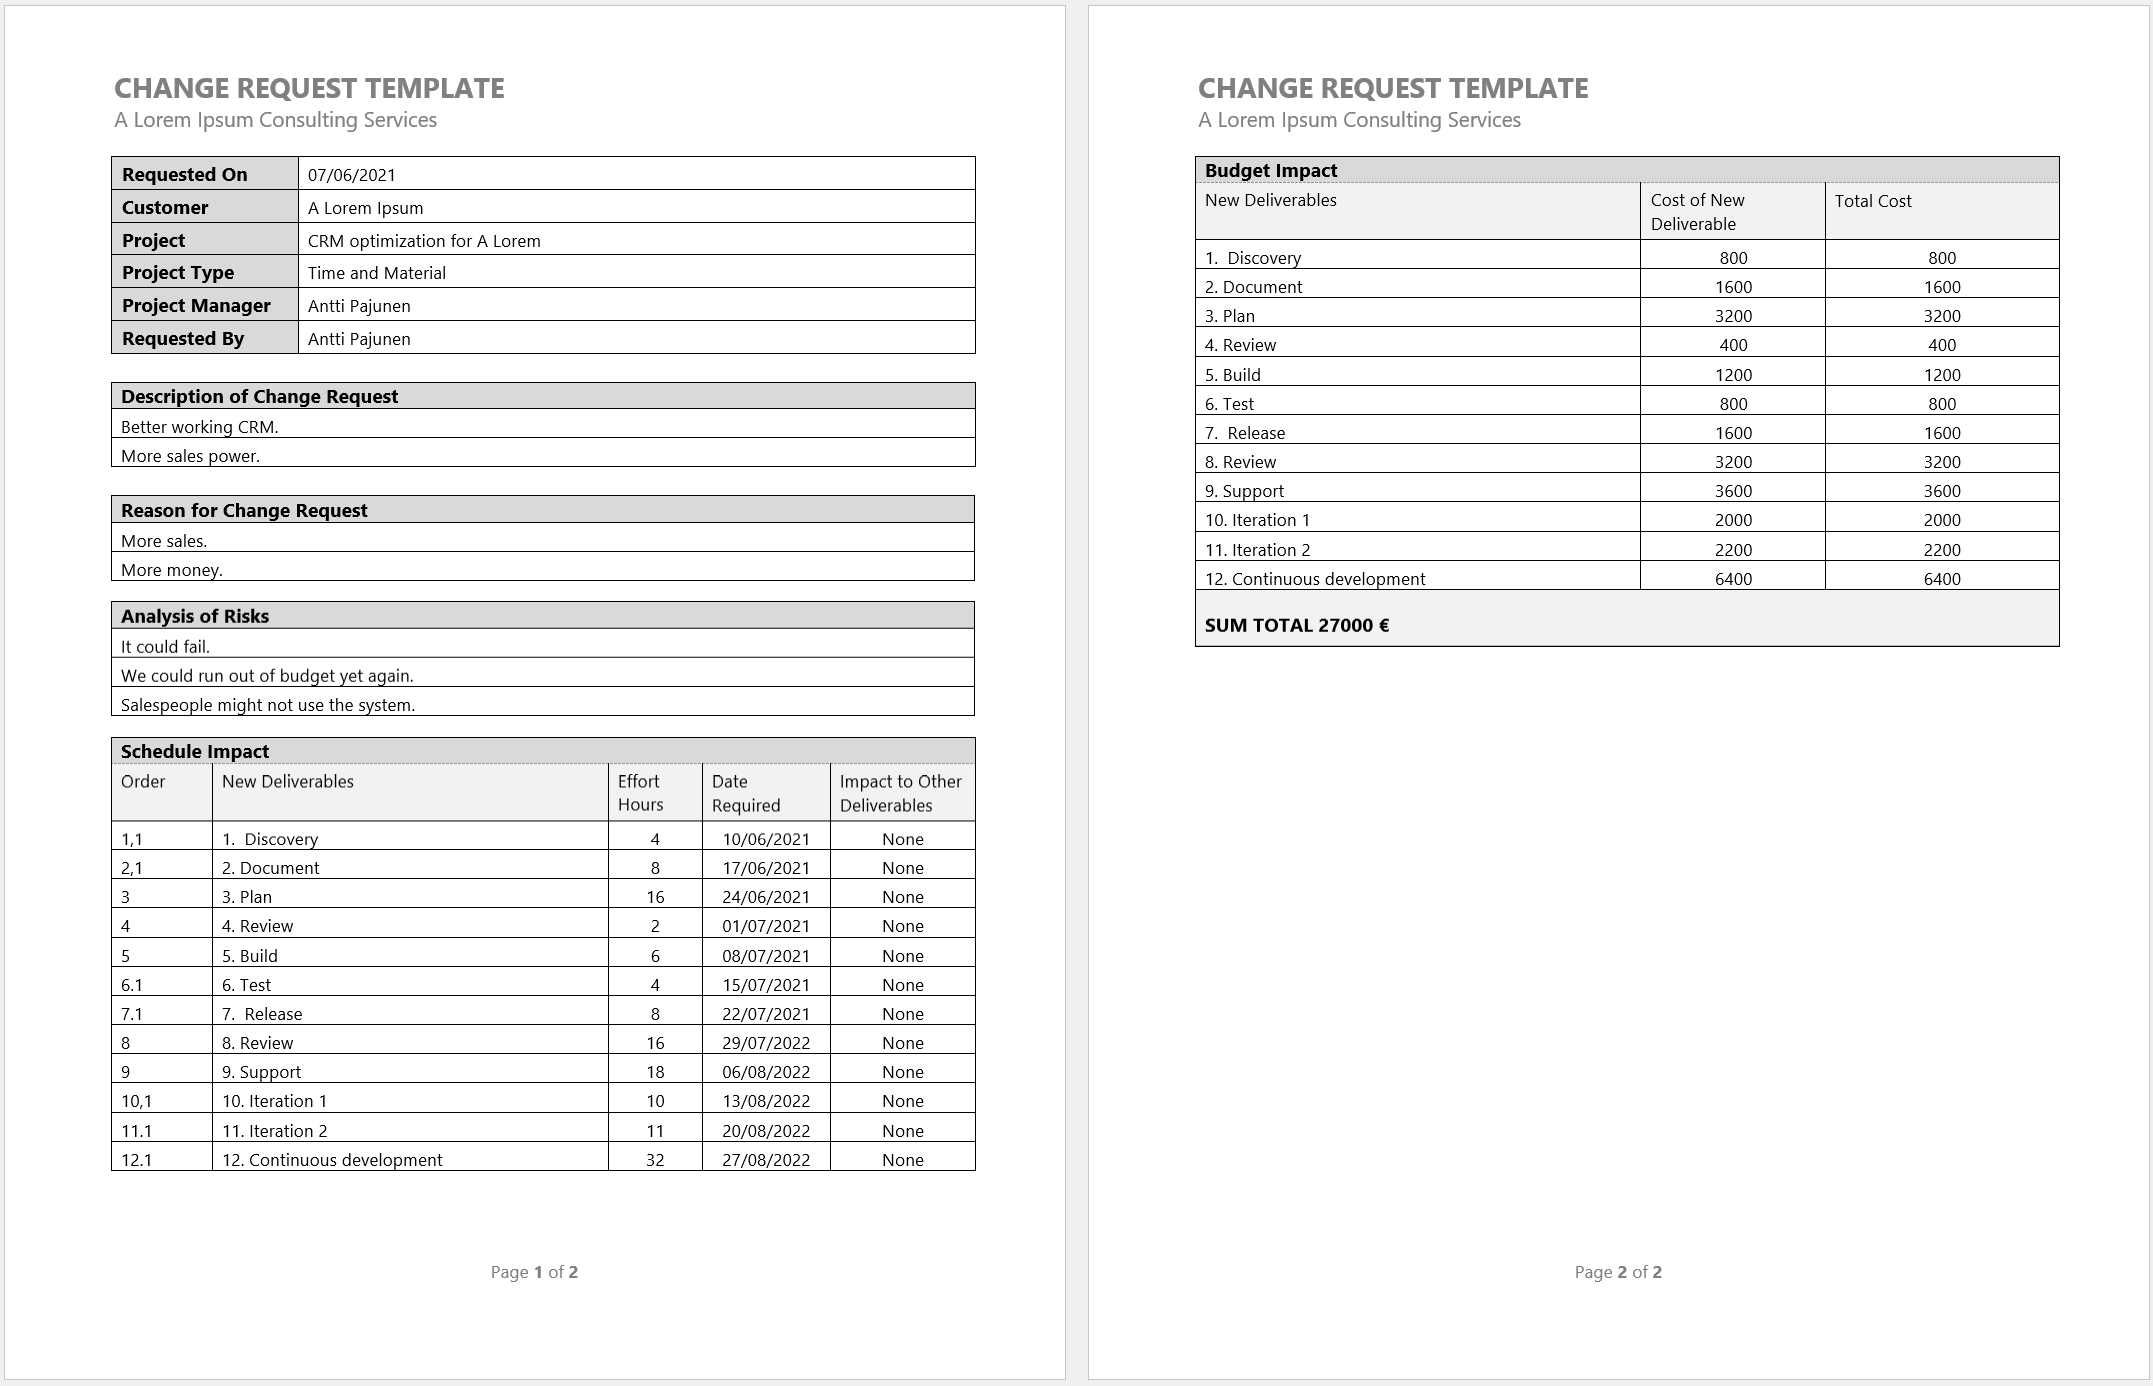
The CR template
I’ve created a basic CR template that is filled, saved as a PDF, and then uploaded to SharePoint. In this example, the budget impact table isn’t processed in any way but that doesn’t mean you couldn’t factor something similar in when processing CRs.
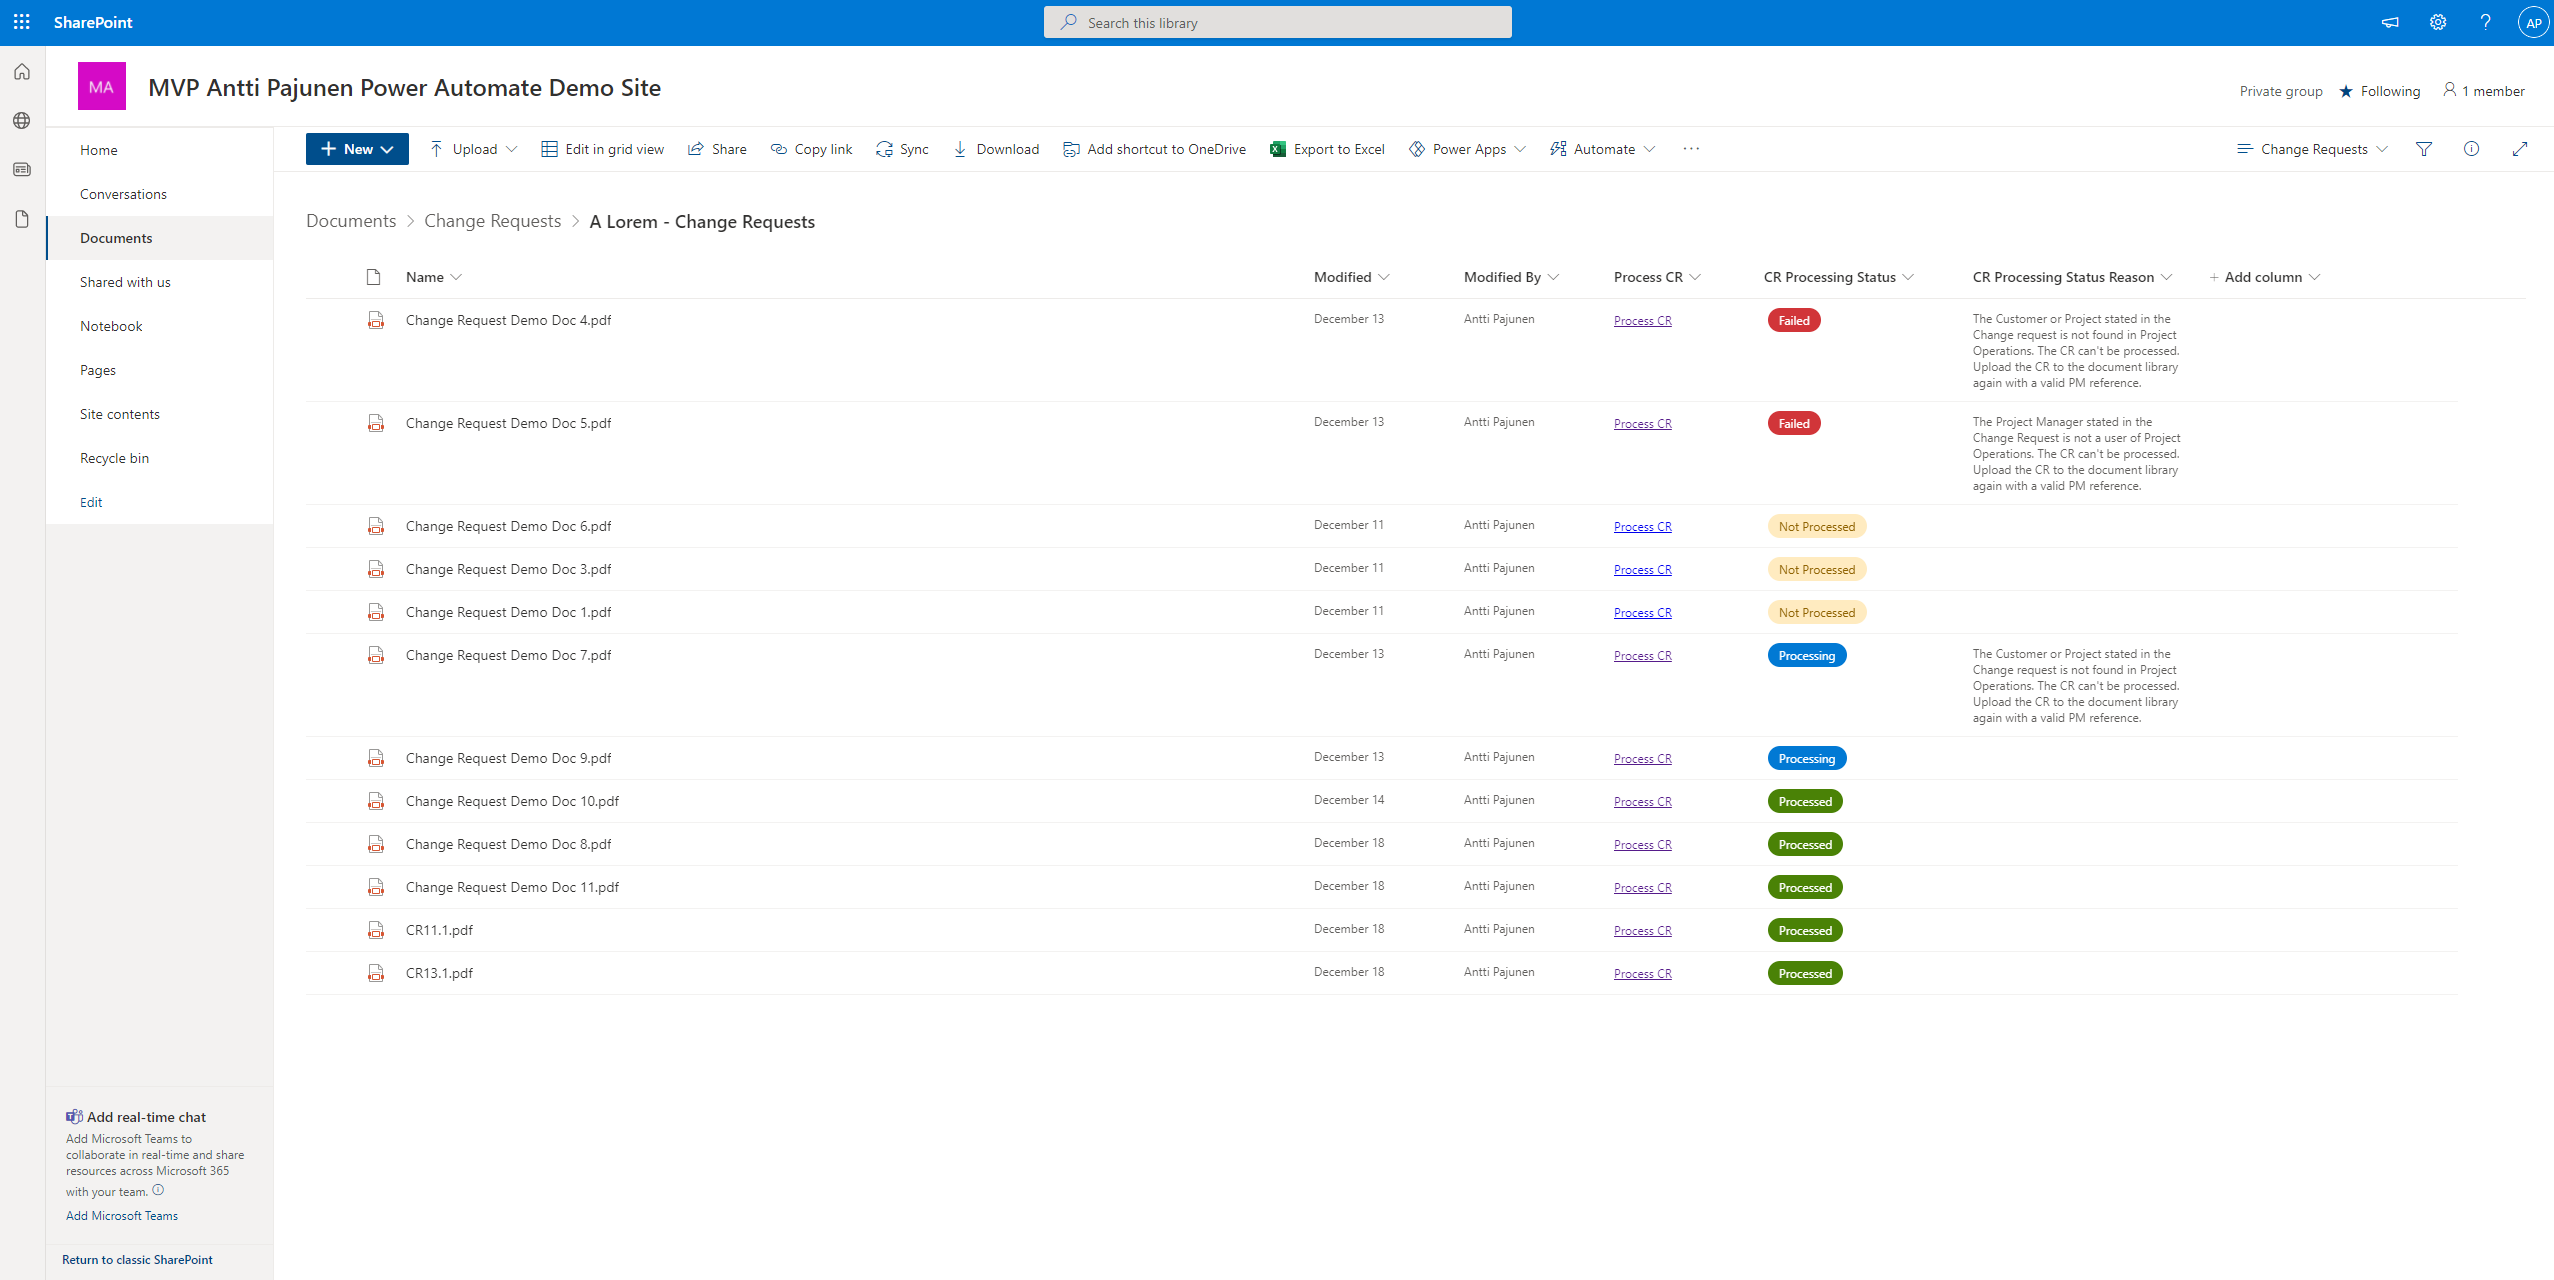
Processing CRs in SharePoint
When CRs are uploaded to SharePoint, they can be processed from a formatted column. Kudos to MVP Vesa “Vesku” Nopanen for his instructions here on how to format columns. A custom view and some JSON were good enough for me to make my scenario work. When a CR is processed, its status and status reason are displayed in the document library. While it’s not the most subtle approach, I got to play with some SharePoint stuff I don’t normally touch so all in all this was a win. The JSON I’ve used for the Process CR column is below. I’ve sanitized the parts that say yourUniqueWorkflowStuffHere . As you may guess, the URL comes from a flow’s When a HTTP request is received trigger.
{
  "$schema": "https://developer.microsoft.com/json-schemas/sp/v2/column-formatting.schema.json",
  "elmType": "a",
  "txtContent": "Process CR",
  "attributes": {
    "target": "_blank",
    "href": "='https://prod-84.westus.logic.azure.com:443/workflows/yourUniqueWorkflowStuffHere/triggers/manual/paths/invoke?FileID=' + [$ID]+'&api-version=2016-06-01&sp=%2Ftriggers%2Fmanual%2Frun&sv=1.0&sig=yourUniqueWorkflowStuffHere'"
  }
}
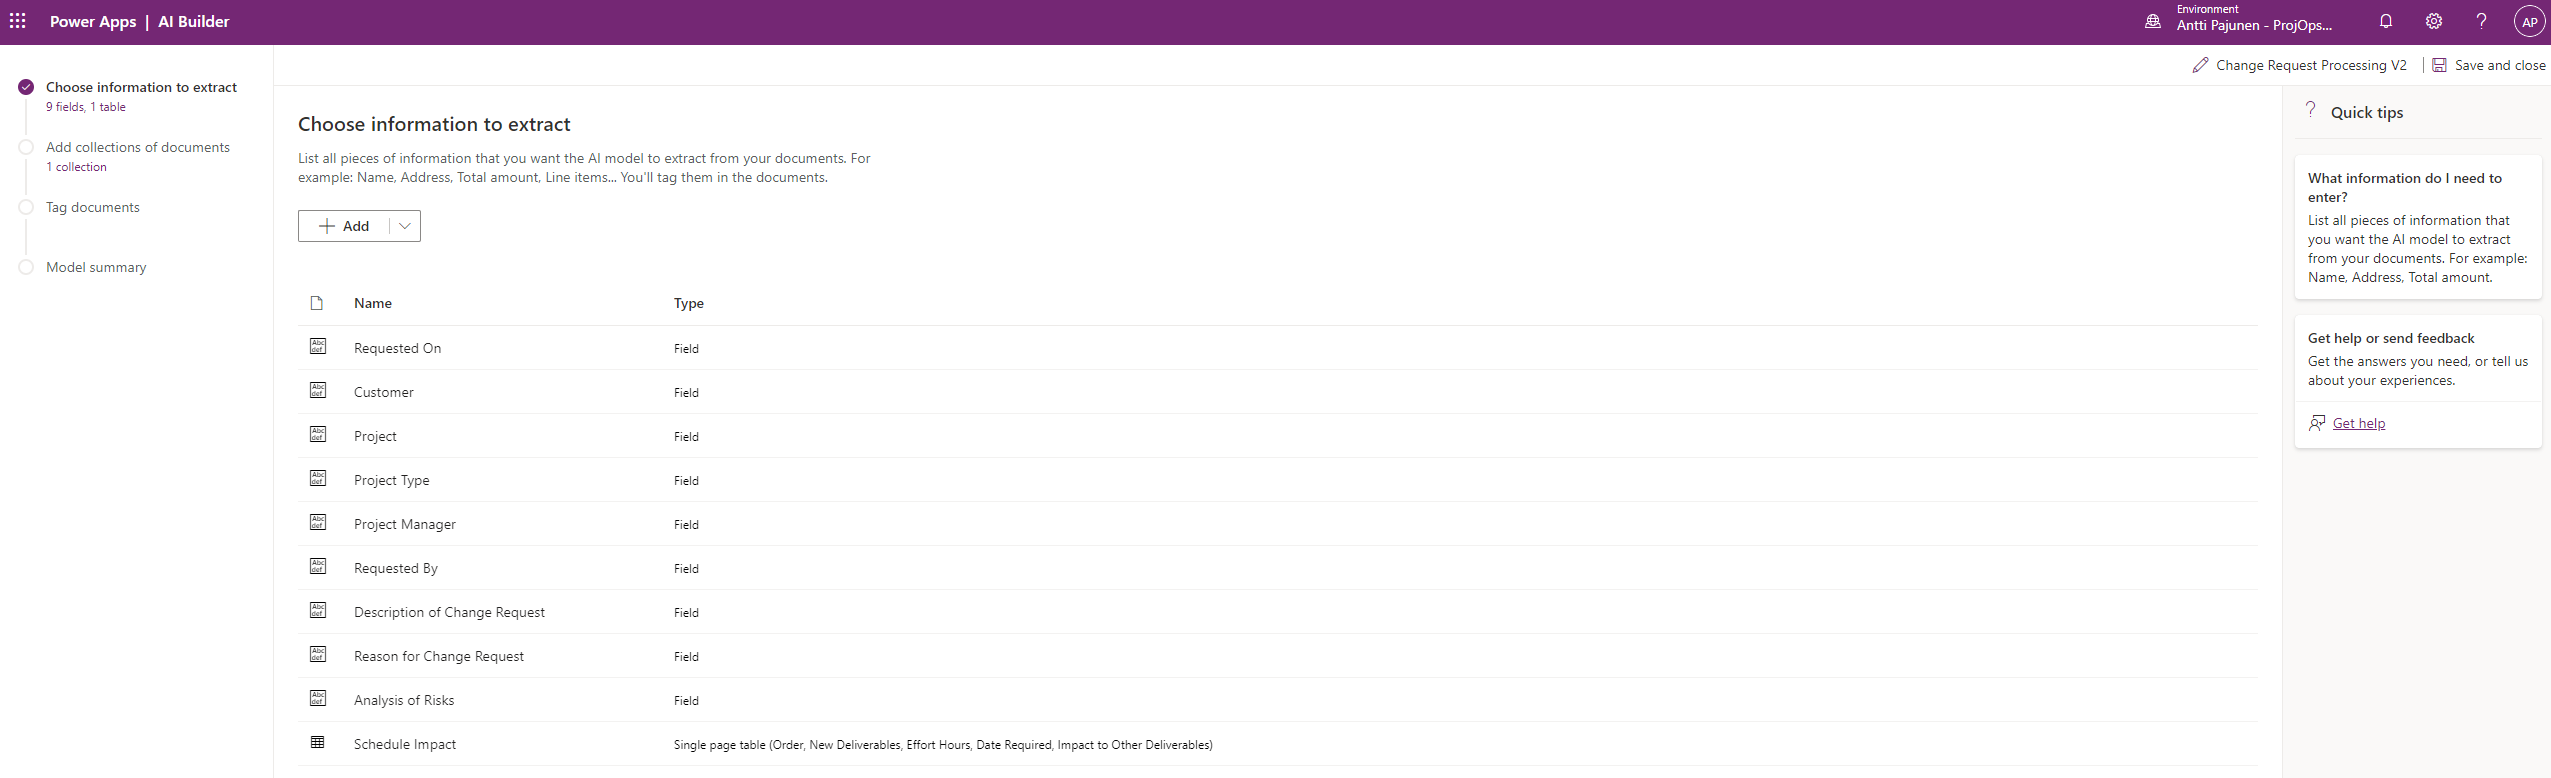
Custom form processing model in AI Builder
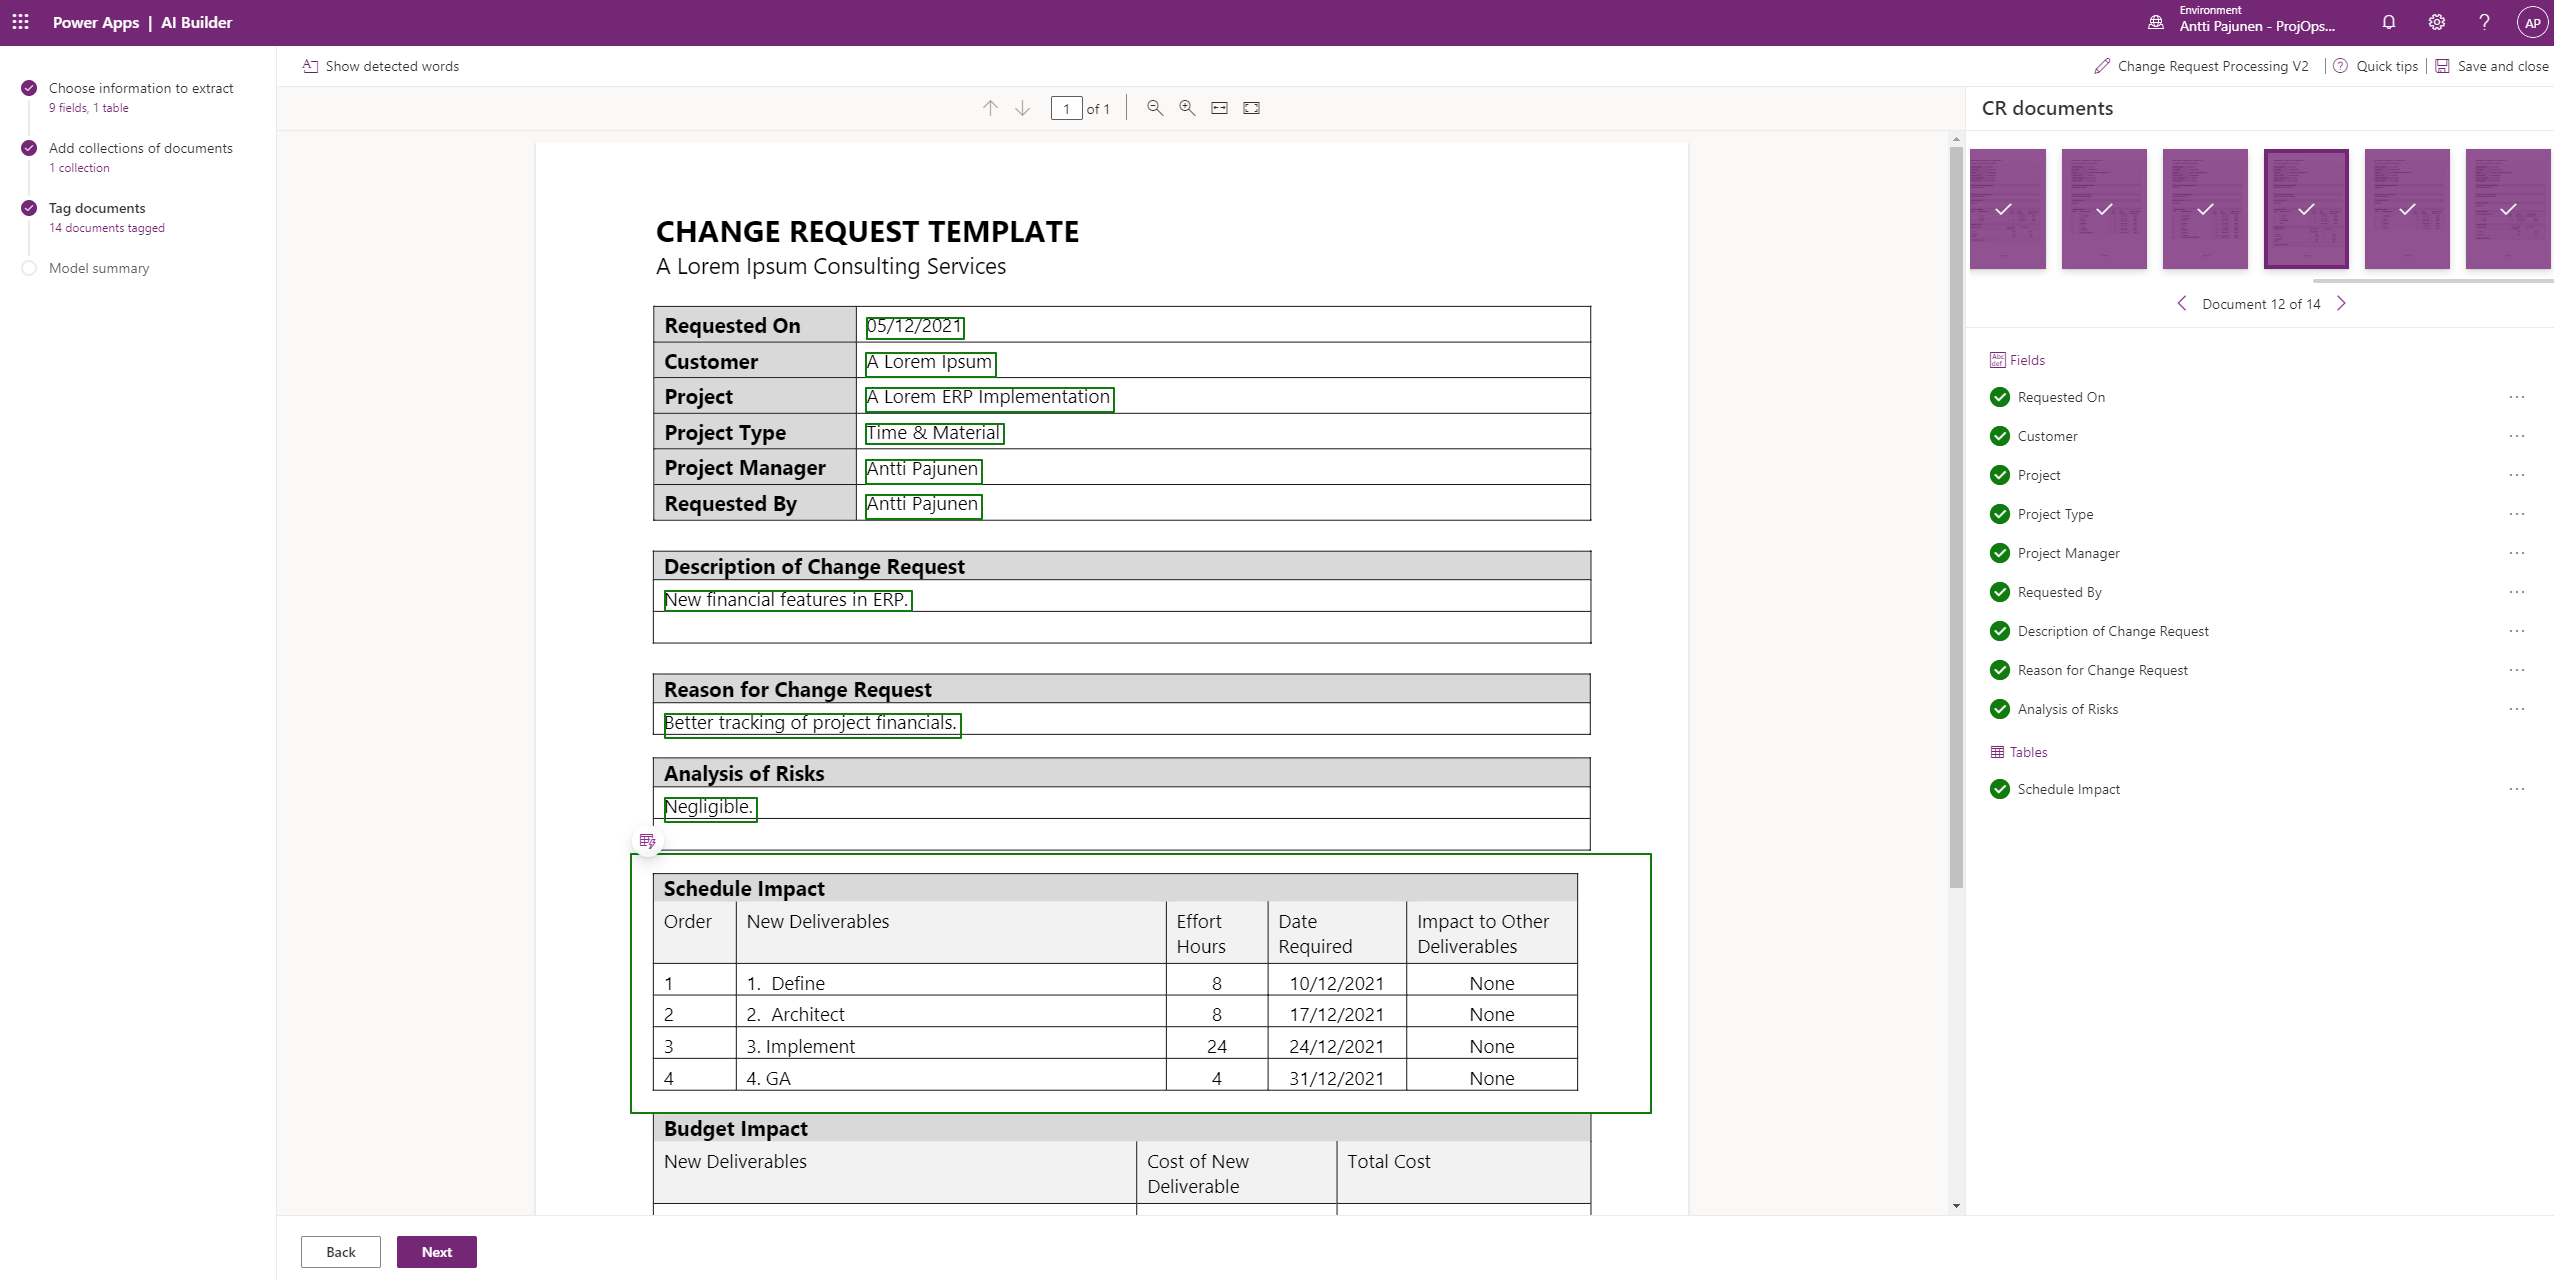
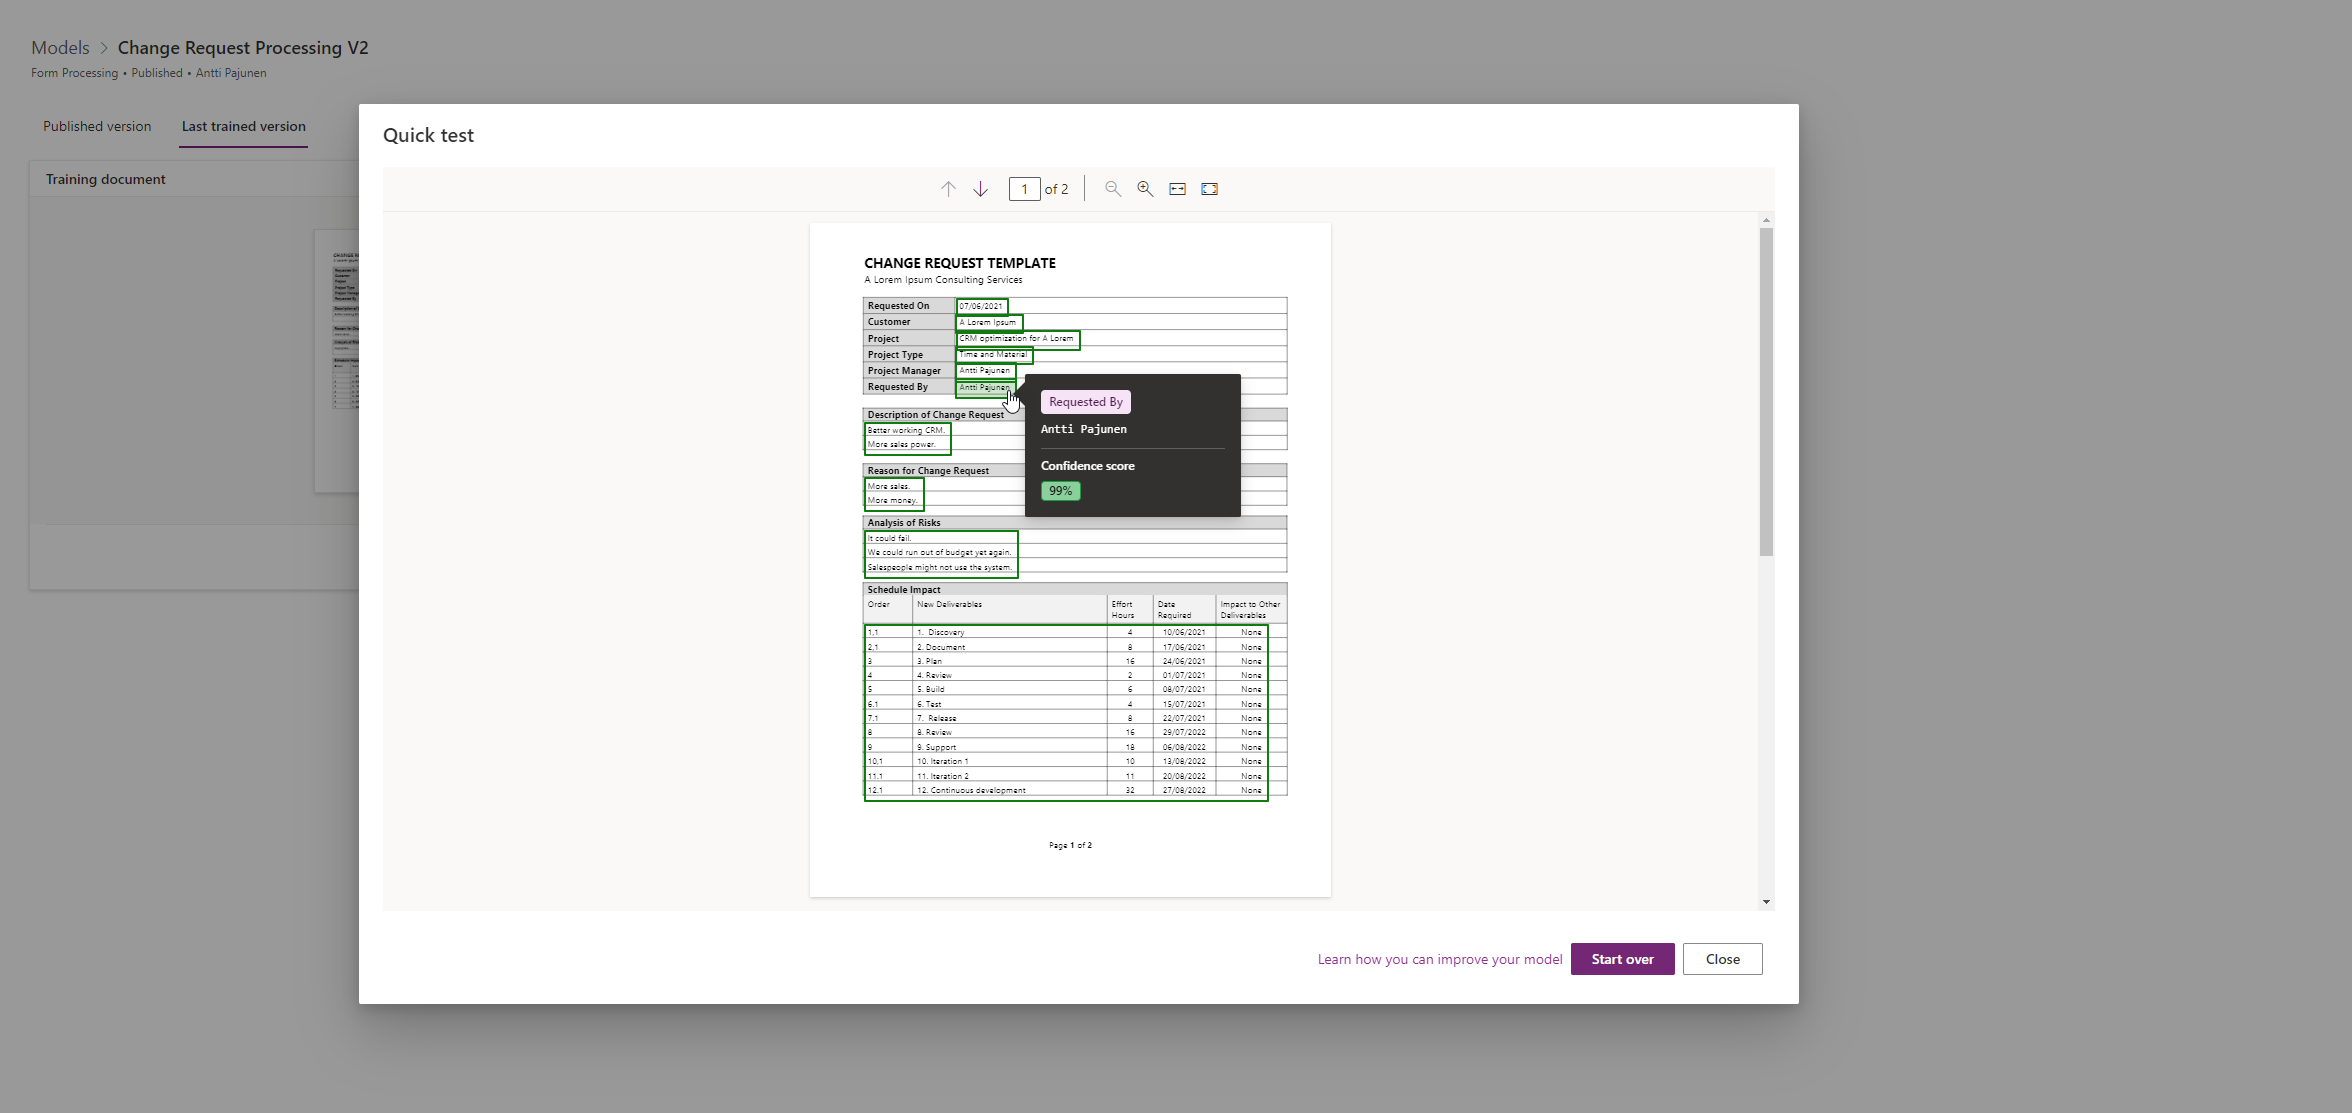
Form processing essentially extracts key information from a document so that the extracted information can then be used in canvas apps or Power Automate. I’ve uploaded and tagged 14 documents that have the same layout. The performance and the model’s confidence score for the different fields have been good in my tests. Sometimes bad results do occur and this solution isn’t a silver bullet like I mentioned earlier. Below are images of AI Builder to illustrate which fields are extracted, how tagging works, and how quick testing can be used to test a model.
Processing in Power Automate
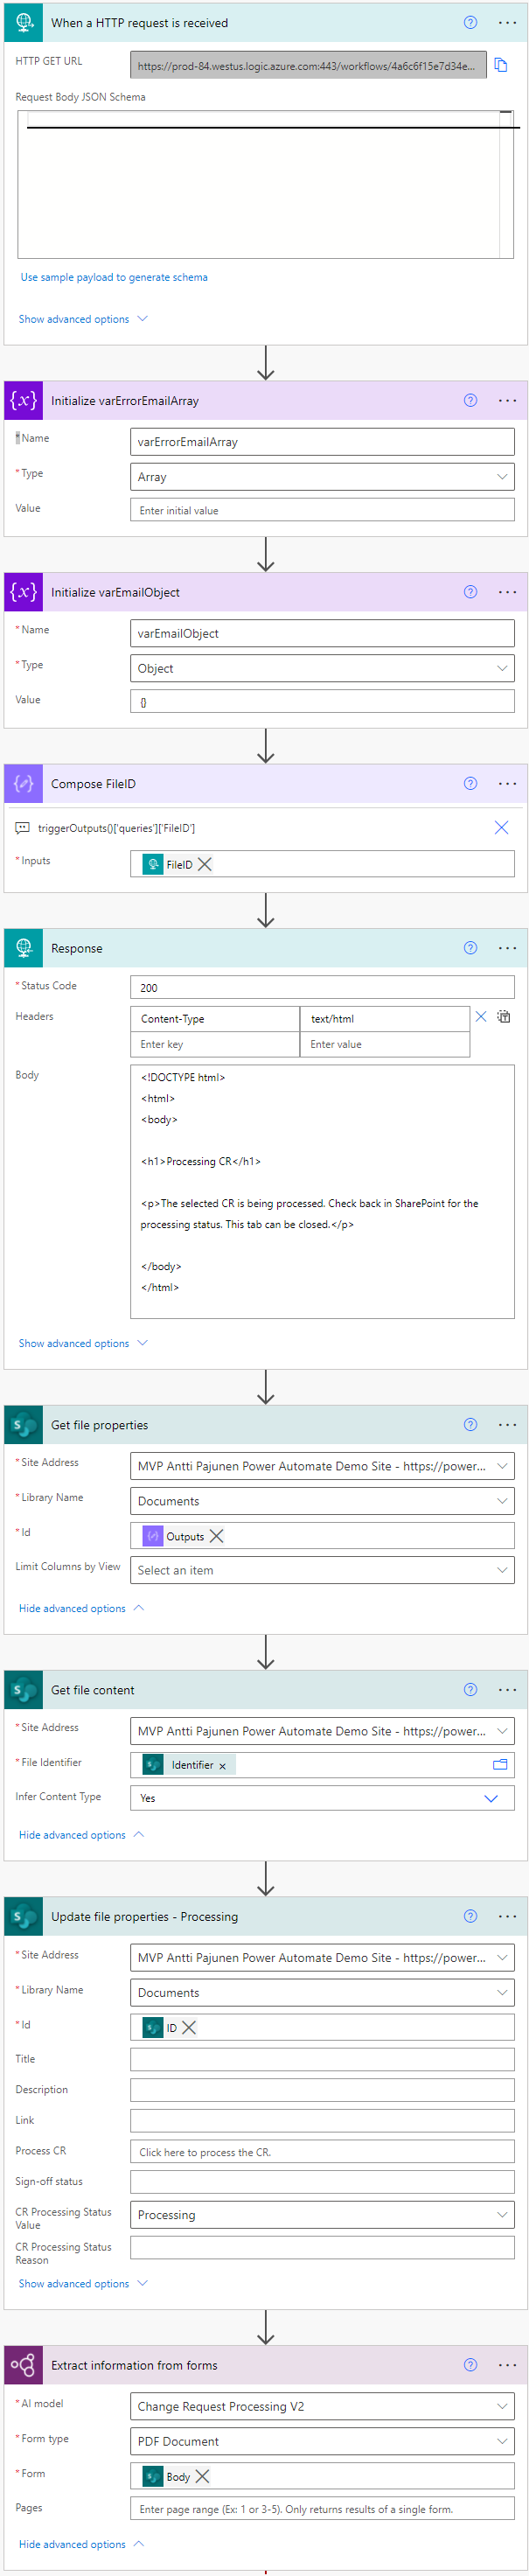
Time to look at the flow that creates a CR in Dataverse based on information extracted from a CR document. The flow’s trigger is naturally an HTTP request trigger, which fires off when a document is processed in SharePoint from the Process CR column. The variables that are initialized are for sending a message to a project manager stated in the CR document if certain criteria are not met. We’re going to look at how to accomplish the aforementioned goal with an array variable and an object variable.
A simple expression will get us the FileID from SharePoint and a response is then pushed out to give the calling user some context. The browser tab that opens when Process CR is clicked in SharePoint can be formatted with HTML and CSS to make it pretty but for this simple and rough use case, I’ve left the response very basic.
File properties can be fetched with the FileID and those properties then allow us to get our hands on file content. After the file properties are updated to Processing (column named CR Processing Status in the document library) the AI Builder action consumes the body from the Get file content action:body('Get_file_content')
We’re now ready to process the output of the AI Builder action and create a CR in Dataverse.
Search scopes
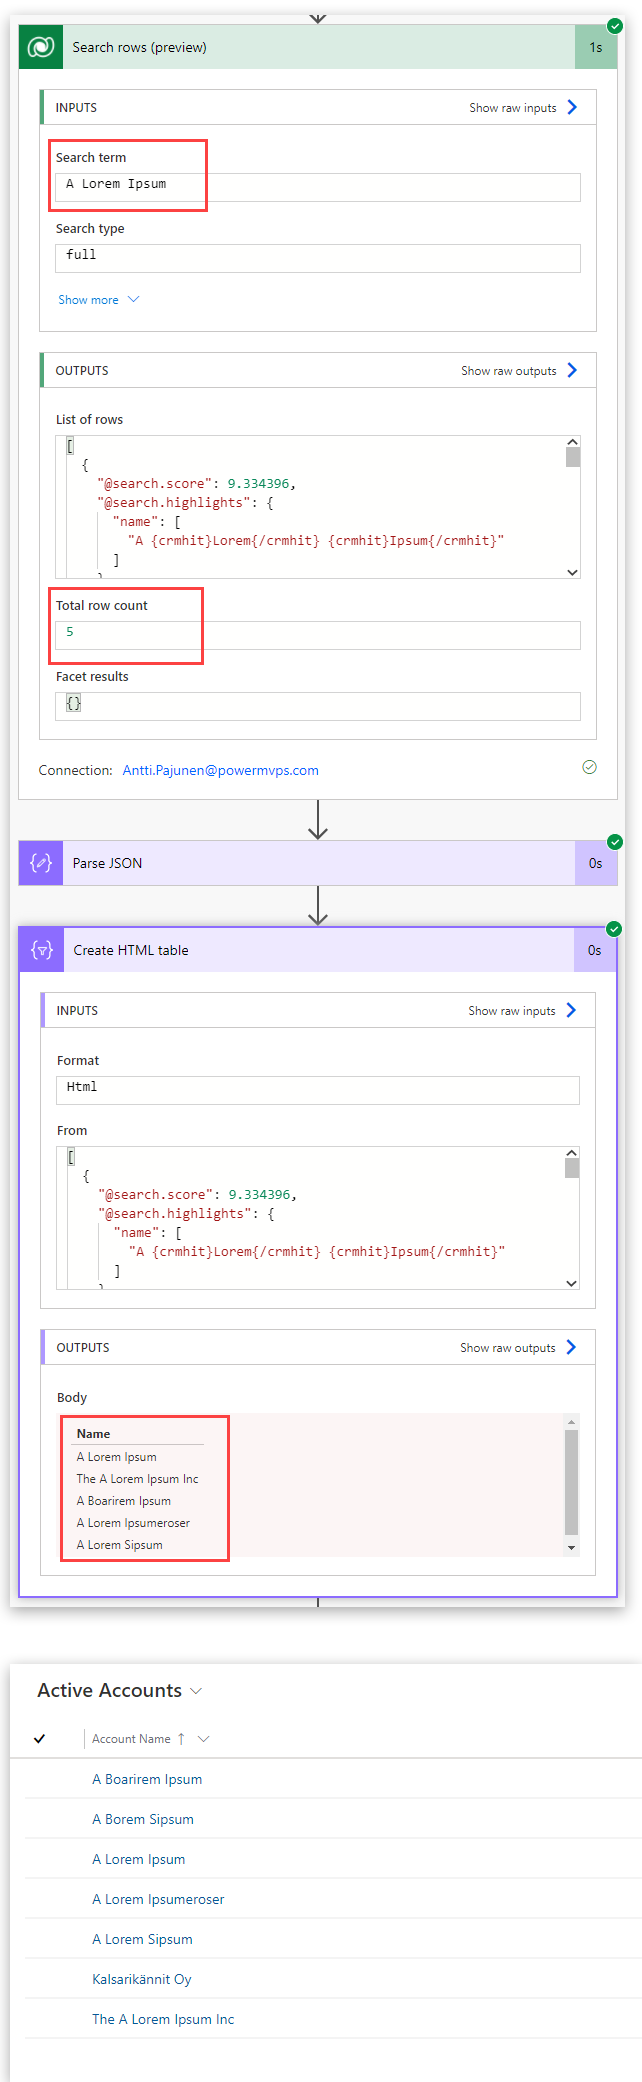
As we’re processing documents, it’s possible that those documents contain typos. Maybe the customer name or the name of the project manager was typed incorrectly. If the original document includes typos, AI Builder will extract whatever the document states. This is naturally a bad thing when working with Dataverse. How can we find rows that are named “close enough”? A Dataverse list rows action won’t return any results if we’re fetching “A Sorem Sipsum” when in fact the correct spelling for an account in Dataverse is “A Lorem Ipsum”. This is where Dataverse search comes in. It’s not a silver bullet either but it could let you return a list of rows as an Adaptive Card for a PM to then select which result is correct for further processing. I didn’t go this far so don’t get your hopes up!
While Dataverse search can be helpful, using it requires good planning. It’s important to understand how the search works so that it’s possible to narrow down the scope of results. Data can also take 15 minutes to appear in search so that will need to be taken into consideration. I spent quite a bit of time just playing around with it and I think I’d have to invest all that time again if I were to implement this in a production scenario at some point. Don’t underestimate the effort that using search takes. Image 7 shows an example of what Dataverse search has returned vs. the account rows I have in Dataverse.
Scope – Search Account
The first out of three search scopes in the flow is for searching accounts in Dataverse. Before we look more closely at the scope I want to point out that running the scopes in parallel will cause concurrency issues with variables. That’s why all search scopes are in consecutive order. I’ve kept my search simple and I’m looking for rows that match what the form processing model returns for Customer value. See images 3 and 4 for the corresponding field and tag in the CR document. The search type of full will also use fuzzy search so it’s a means of overcoming small typos.
The schema for the parse JSON action can be taken from the search action’s output. The filter array action is used to match the search results in the parse JSON with a Customer value extracted from the CR document by AI Builder. Both are evaluated in lower case! This is a means of overcoming typos in upper/lower casing. The expressions used are:toLower(item()['name']) //toLower(outputs('Extract_information_from_forms')?['body/responsev2/predictionOutput/labels/Customer/value'])
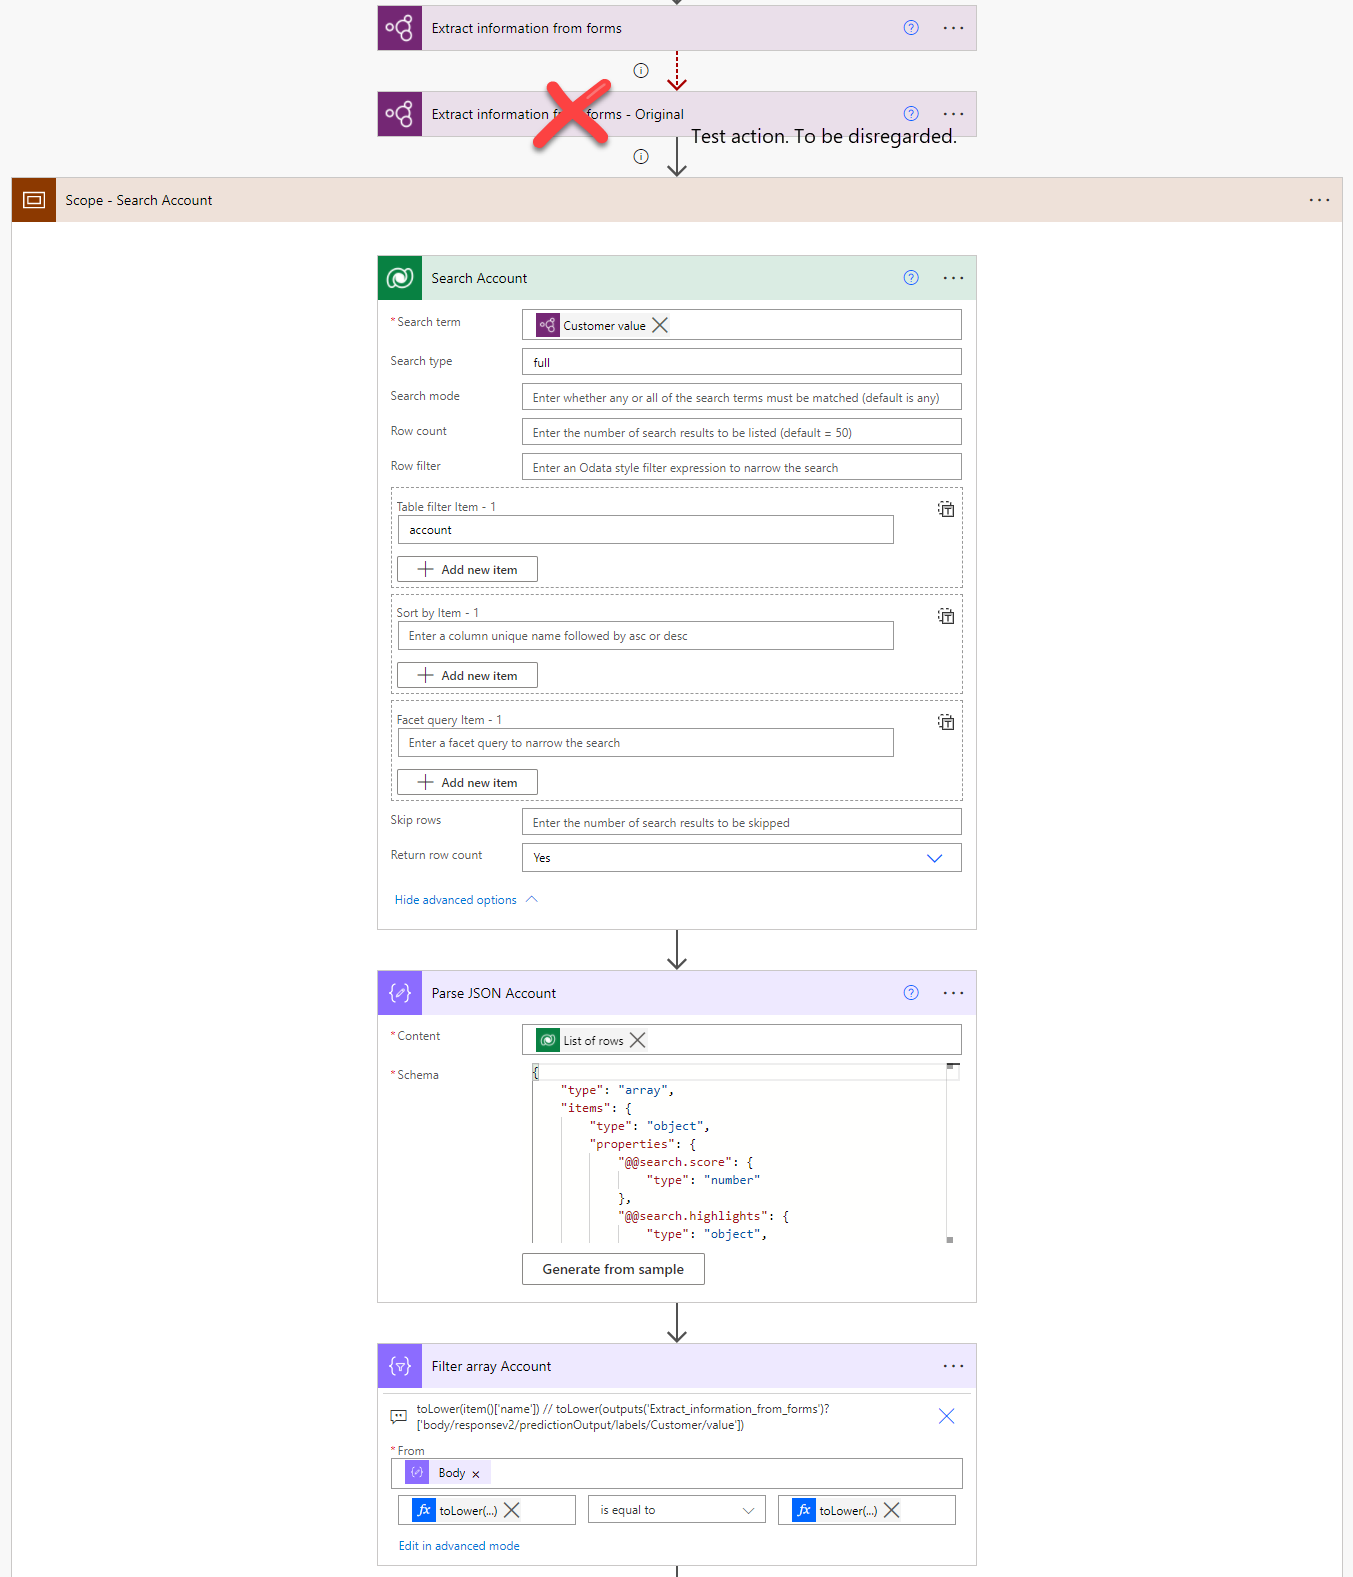
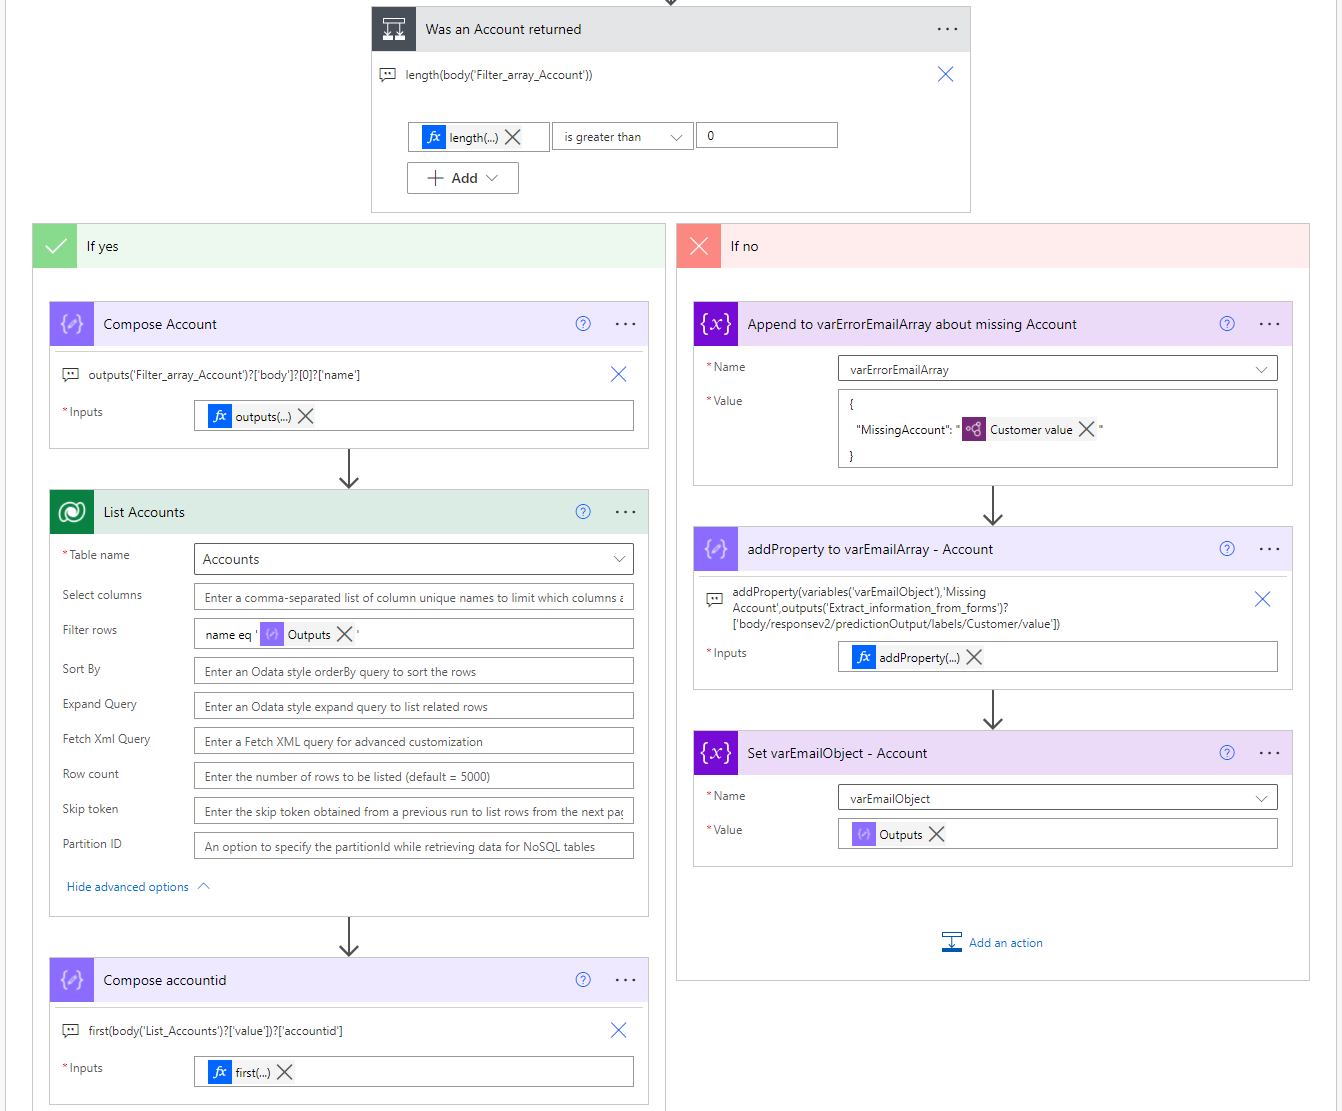
Next, a condition action is used to check whether or not an account was found. If the condition returns true (when length(body('Filter_array_Account')) is greater than 0) the name of the account is composed using the filter action’s output with the following expression: outputs('Filter_array_Account')?['body']?[0]?['name']. The actual account row is then fetched from Dataverse and its accountid composed.
If an account was not found we want to inform the project manager that a customer value could not be extracted from the CR document. As other searches might not provide expected results down the line either, the name of the missing account is stored in a variable. Like I previously mentioned I’ve used two approaches: An array variable and an object variable. Why? Just so you can learn both ways.
With an array variable, we’ll naturally append the missing Customer value to the array. The name I’ve given for the property is MissingAccount. When an object variable is used, a property is added to the variable with an addProperty expression. The object variable is then set with the output of the addProperty compose action. The expression used in the compose action is:addProperty(variables('varEmailObject'),'Missing Account',outputs('Extract_information_from_forms')?['body/responsev2/predictionOutput/labels/Customer/value'])
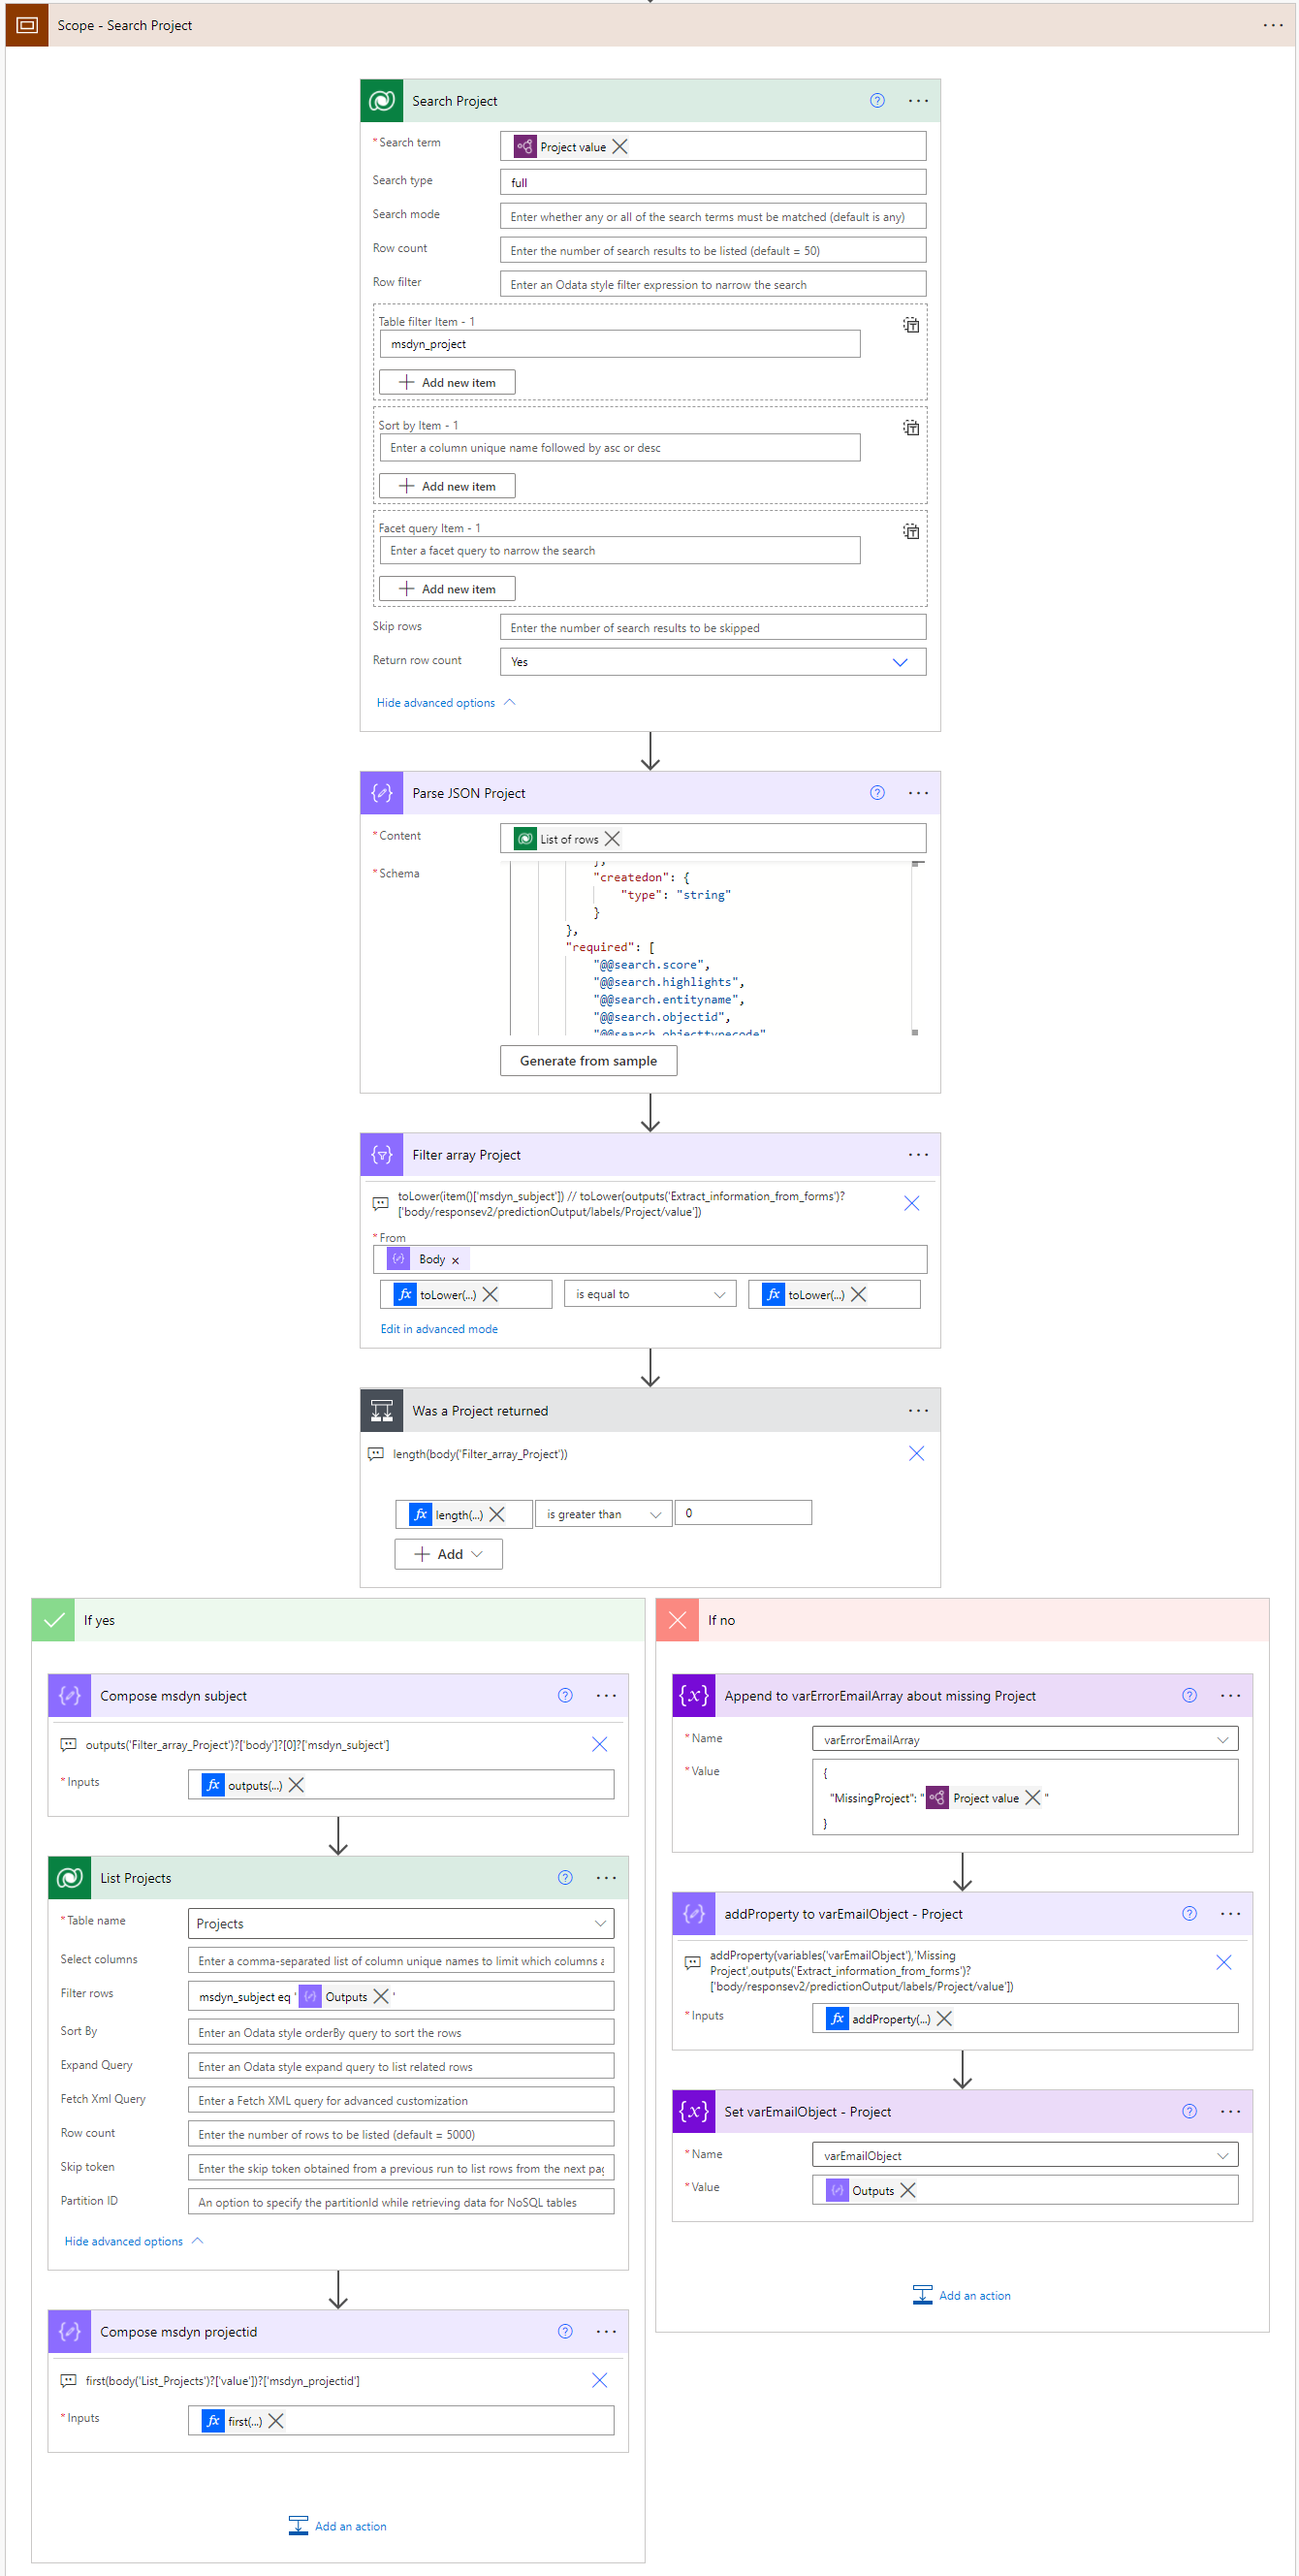
Scope – Search Project
The scope for searching a project is pretty much a rinse and repeat of the search account scope. If a project is found, msdyn_projectid is composed in the true side of the condition. If a project isn’t found, Project value from the form processing model is appended to the array variable as well as the object variable.
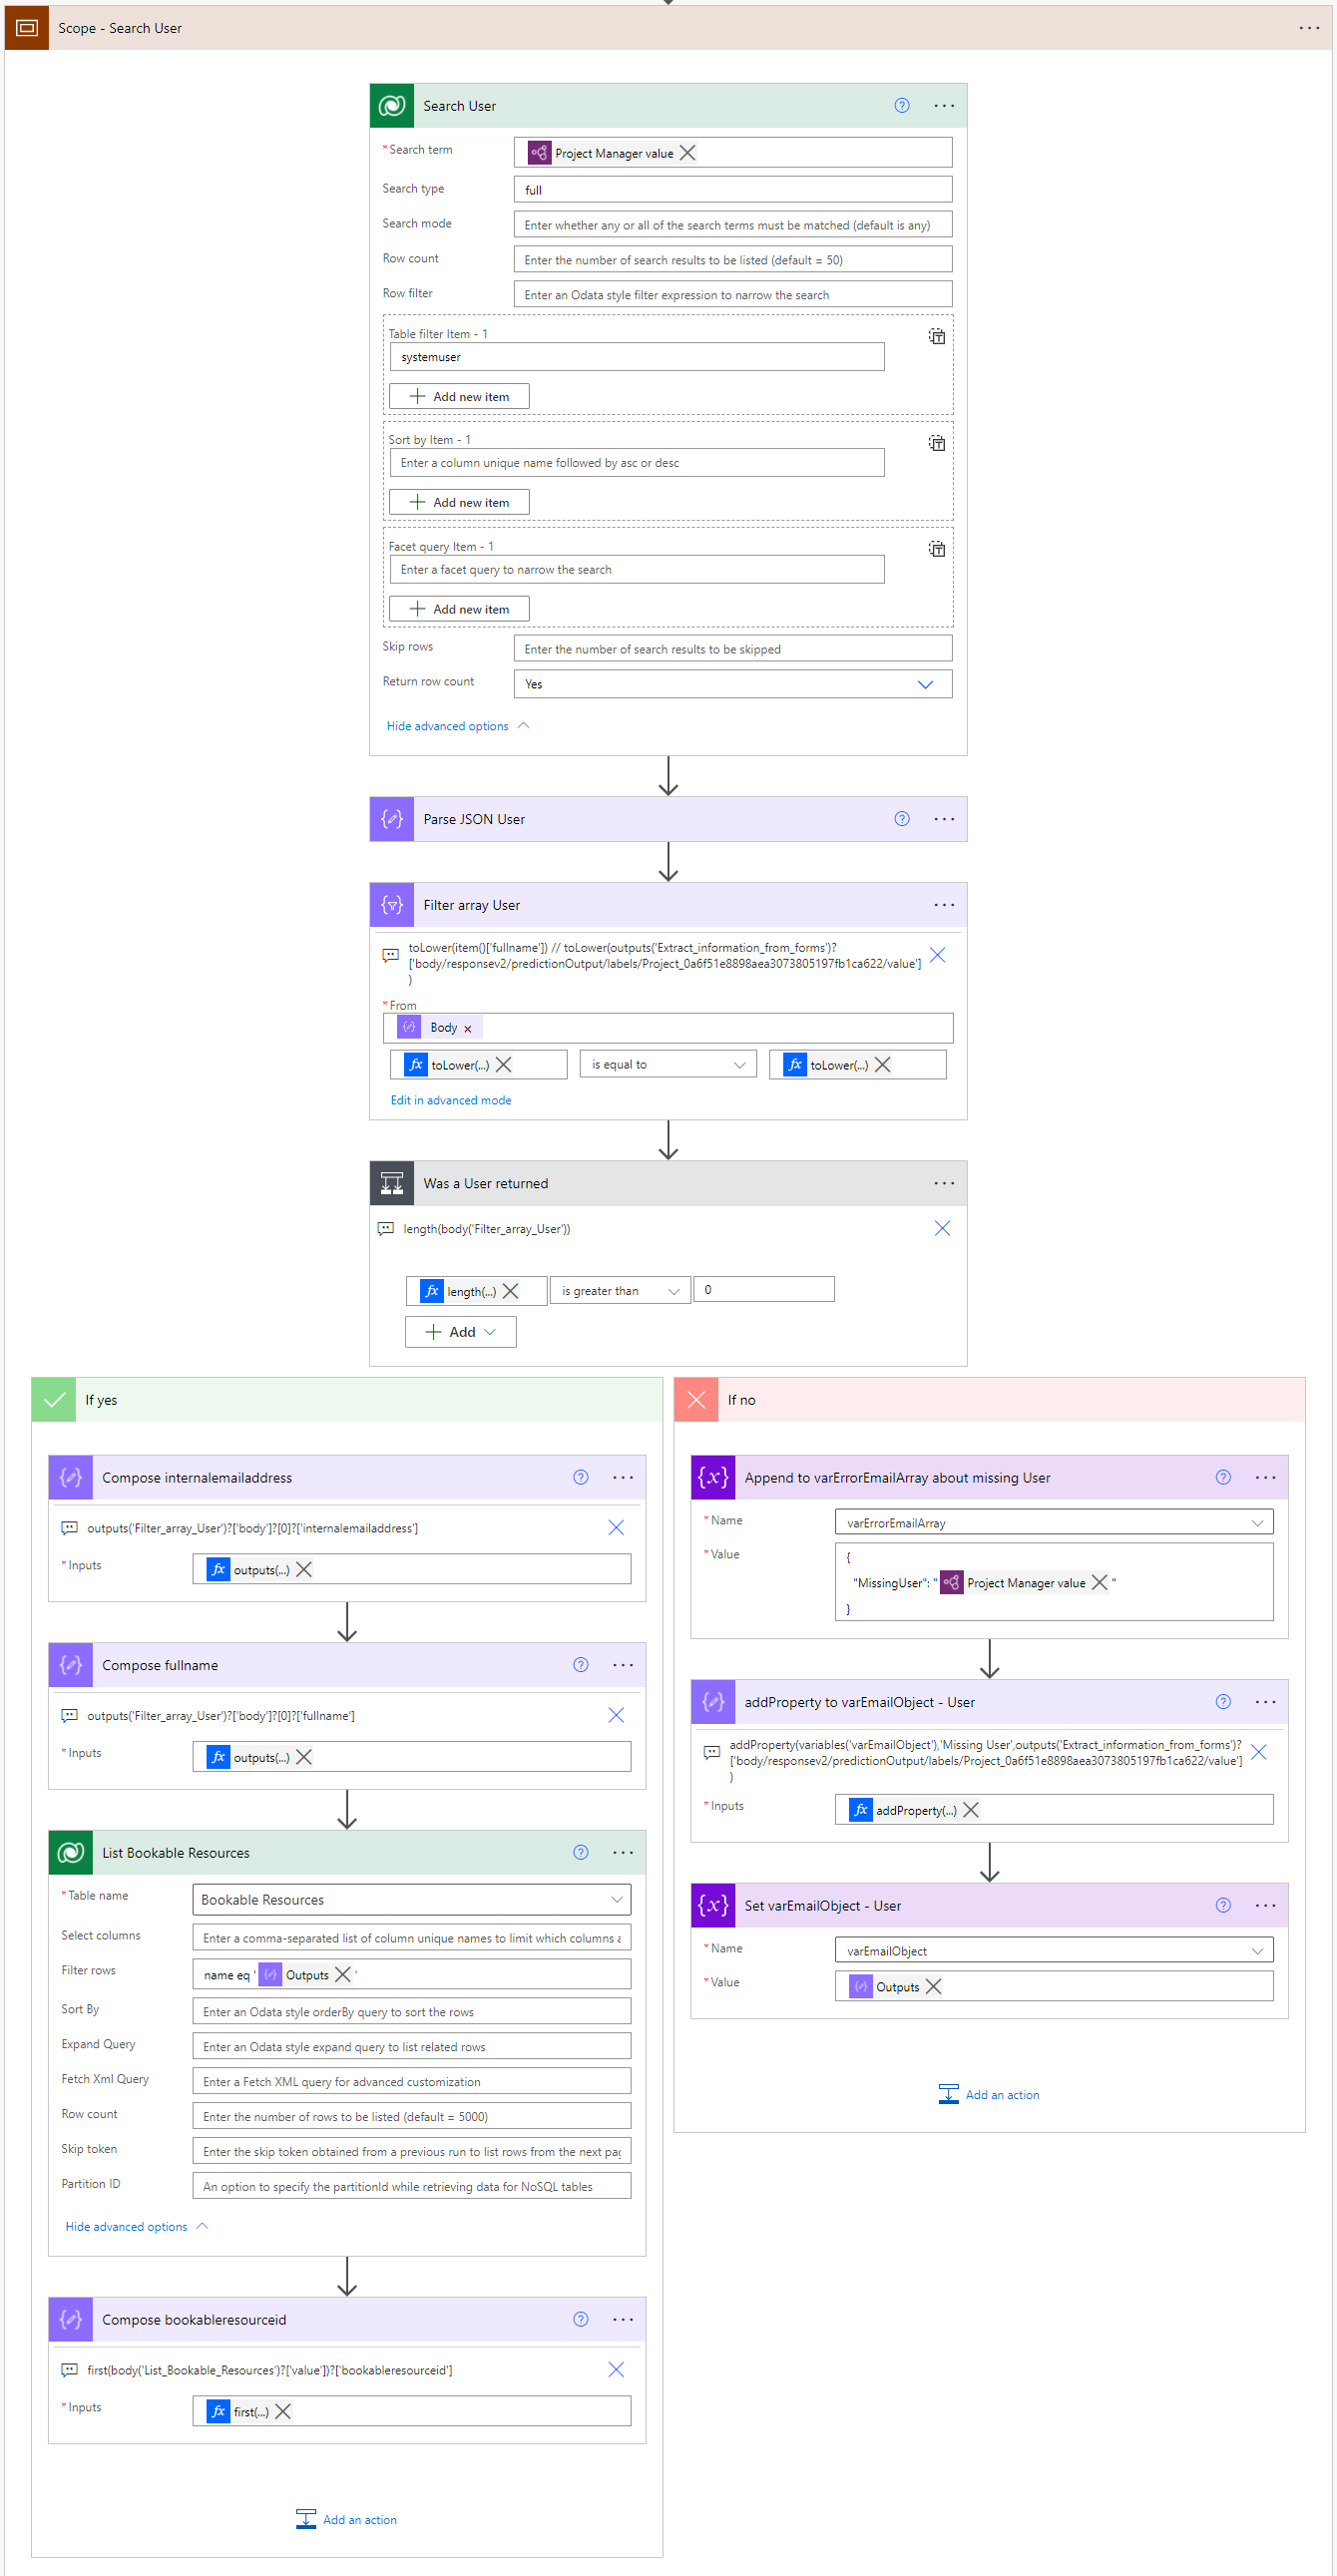
Scope – Search User
This scope turned out to take more time than I anticipated. My original thought was to search for Bookable Resources but it turns out the bookableresource table can’t be enabled for Dataverse search. This is because the managed property “Can enable sync to external search index” is set to false and it is locked down and can’t be changed. As I’m writing this blog post I’m still waiting for feedback from the Product Group whether or not this is something they can change in future updates. As Bookable Resources can’t be searched, I’ve used the systemuser (User) table to look for users where fullname matches Project Manager value from the form processing model. If a user is found, a matching Bookable Resource row can be dug from Dataverse. If a user isn’t found, we’ll add a property to the object variable and append to the array variable.
Processing the variables
Now that we’re done with the search scopes it’s time to process the variables. The first two compose actions are there to help visualize what the two variables contain. When an array variable is used and appended to, the resulting JSON isn’t something we can easily use to create an HTML table. That’s why it needs to be cleaned up with a fairly heavy expression. Kudos and huge thanks to MVPs Linn Zaw Win and George “The Enabler” Doubinski for helping out with not only the expression below but with brainstorming ways of using variables, as well as concurrency. The variable I’ve used to format the JSON is:
json(replace(replace(replace(replace(string(variables('varErrorEmailArray')),'{',''),'}',''),'[','[{'),']','}]'))As can be seen from image 12, I decided to use an object variable while keeping the array version in place for learning purposes. If the object variable is empty it means that all three search scopes successfully returned results that we were able to use to find rows in Dataverse. If the condition Is varEmailObject not empty results in a false, the flow adds a new Change Request row in Dataverse. We’ll look at that in a little bit. First, let’s see what happens if the variable is not empty (when empty(variables('varEmailObject')) is equal to false).
When the object variable is not empty, an HTML table will be created. Columns can be set automatically however the dynamic content for the object variable has to be encased in []. I’ve copy-pasted some CSS from an old blog post of mine to make the table a little fancier:
replace(replace(replace(body('Create_HTML_table'),
'<th>','<th style="text-align:center;color:white;background-color:#077D3F;padding:2px">'),
'<td>','<td style="text-align:center;color:black;padding:3px">'),
'<table>','<table style="border-collapse:collapse;width:100%">')
The next step is to look at whether or not a user was found. If not (when outputs('Search_User')?['body/totalrecordcount'] is greater than 0), it’s pretty much game over! All well can do is update the SharePoint document library’s CR Processing Status column with Failed and give it a status reason in the CR Processing Status Reason column. Let me know if you can think of a better way to handle this!
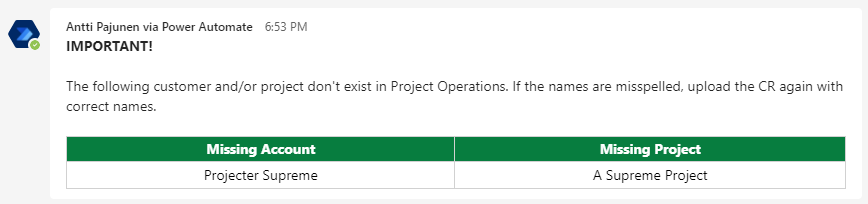
If a user was found we can post the project manager a message as flow bot and then update the SharePoint document library with a slightly different message stating that either a Project or an Account was not found in Dataverse. The flow bot’s message can be seen in image 13.
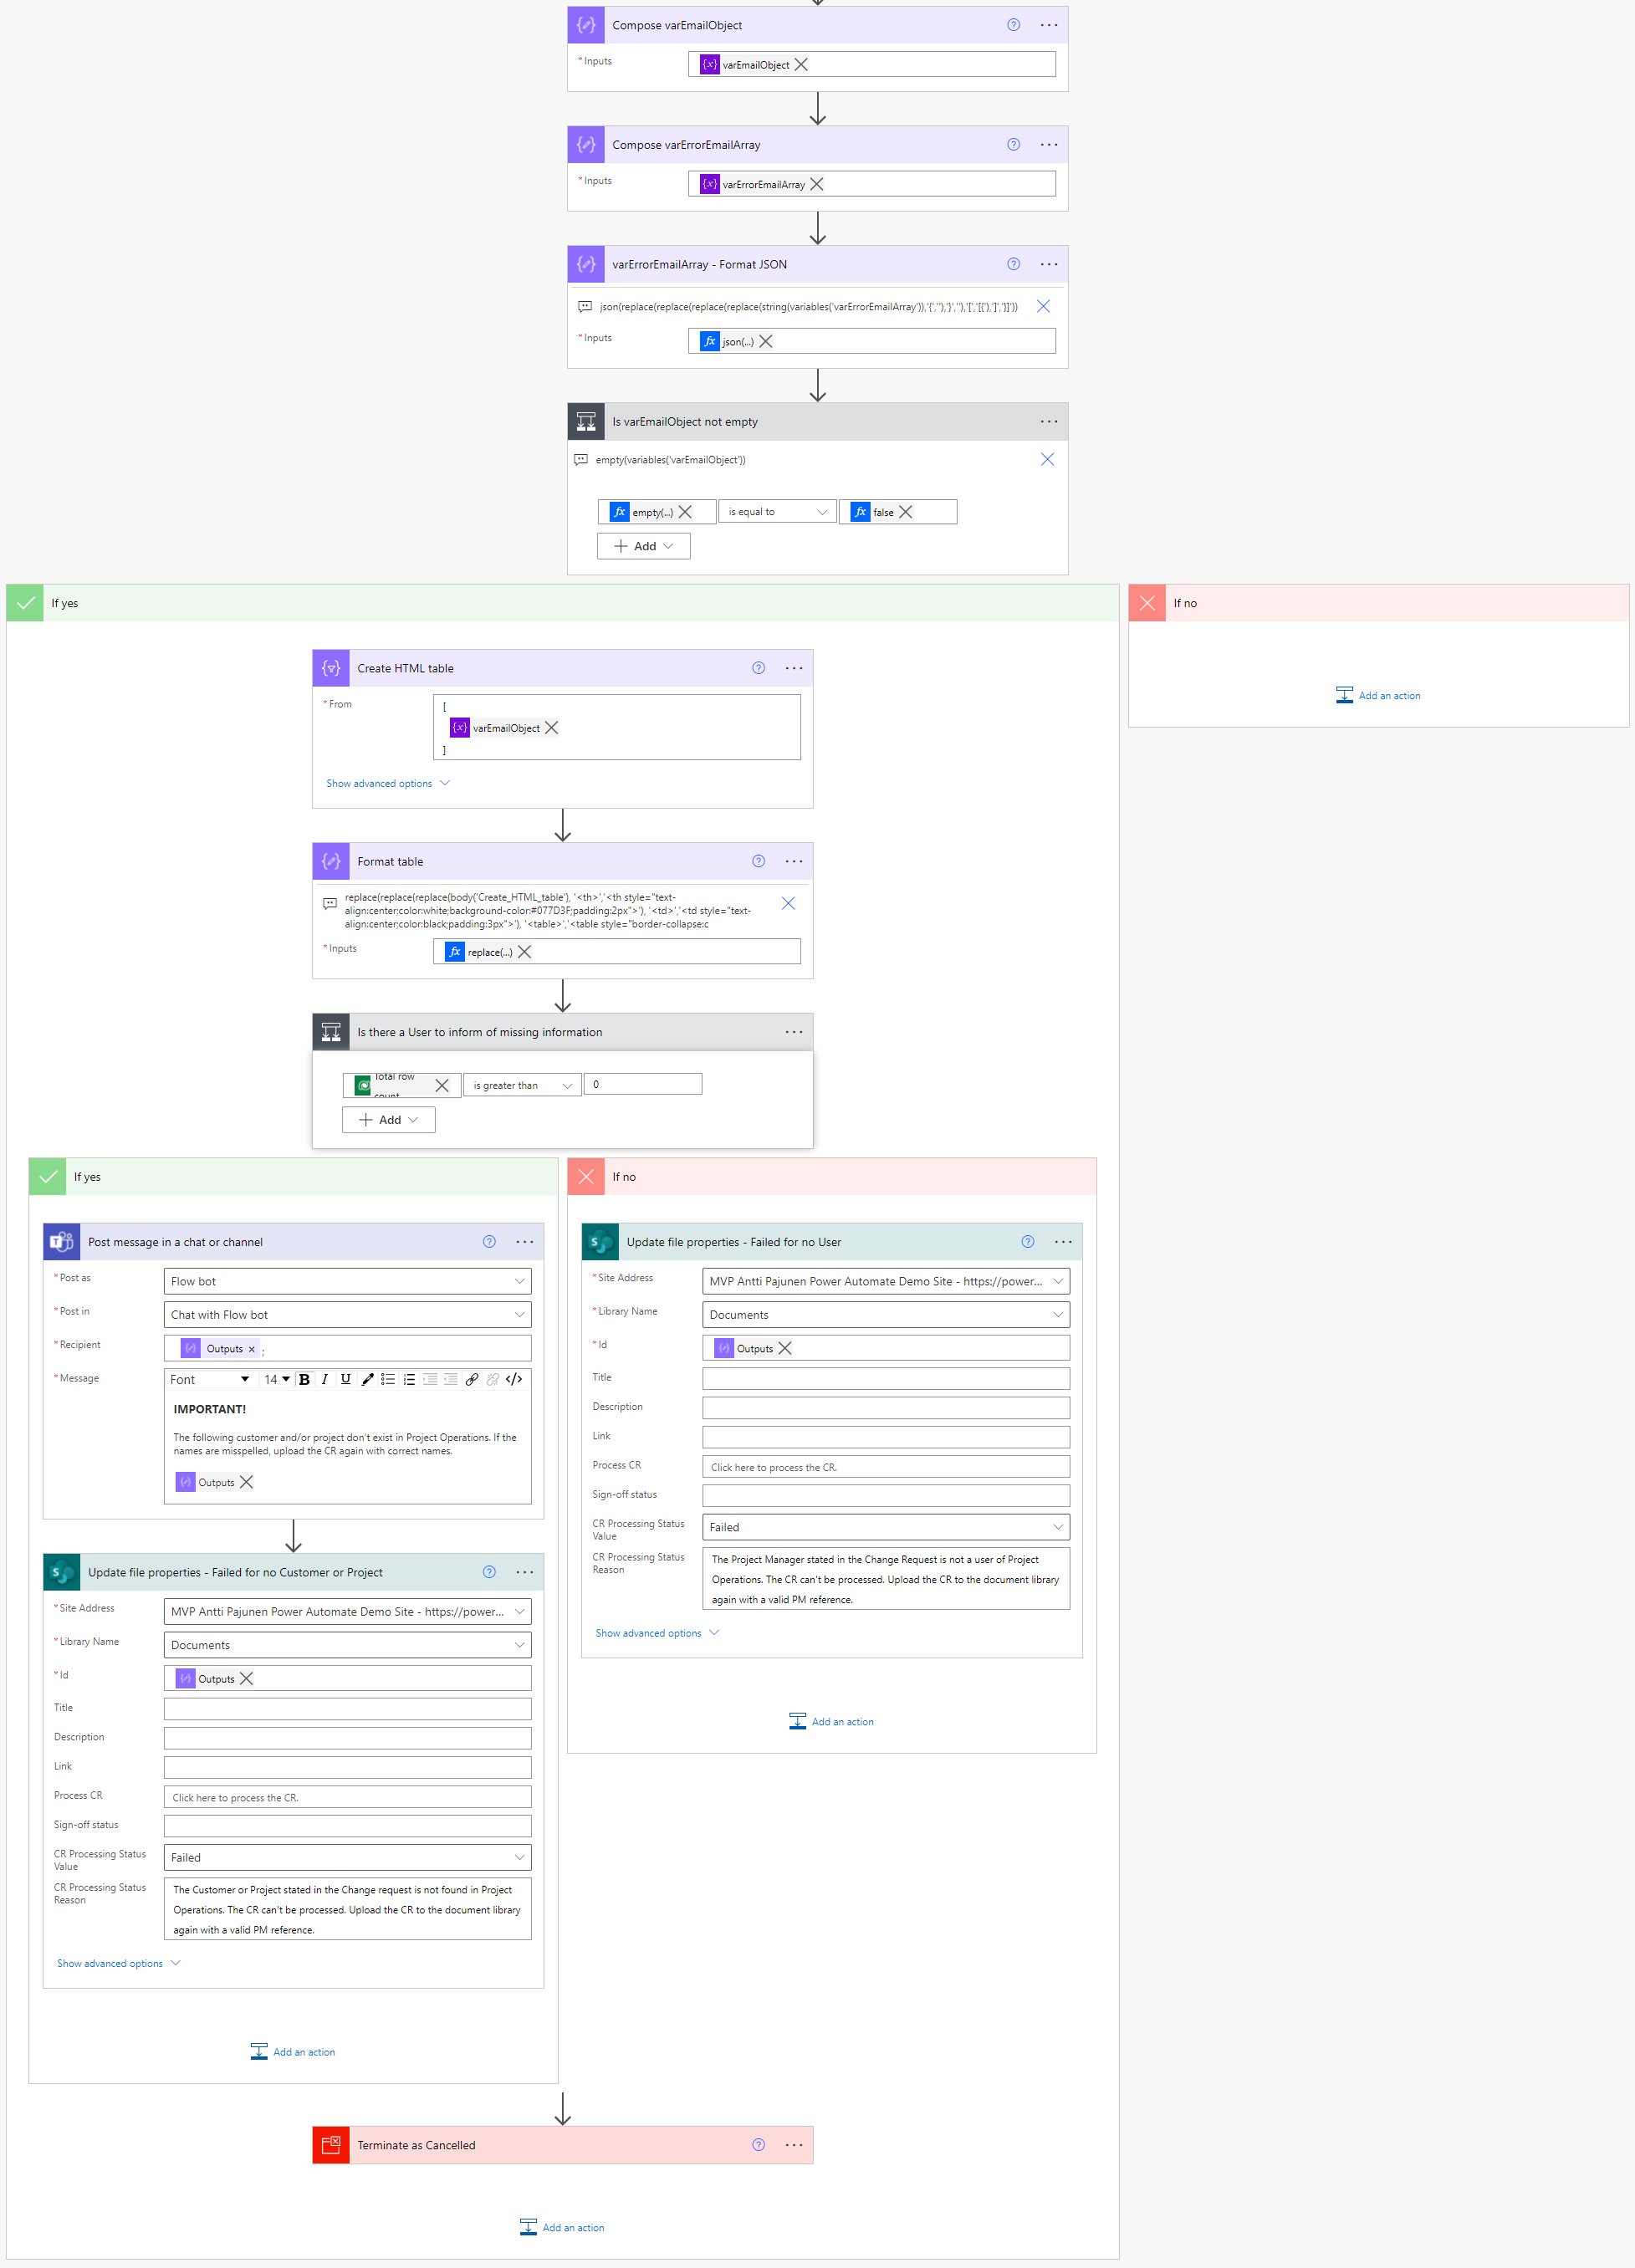
Creating a Change Request in Dataverse
When searching for rows provides expected results and an Account, a Project, and a Bookable Resource (through a User) are found in Dataverse, a new Change Request can be created in Dataverse. This happens when the first condition in image 12 runs in the false path. As there is no OOTB Change Request table in the Project Operations data model in Dataverse, a custom table is needed. I’ve kept the CR concept very simple and have created two tables around CRs:
| Table Name | Purpose | Relationships |
| Change Request | Holds key information about the CR such as Customer, Project, Project Type, Project Manager, CR Status | Change Request – Change Request Line – 1:N relationship |
| Change Request Line | Holds information about deliverables and contains a row per row found in a CR document’s Schedule Impact table | Change Request Line – Change Request – N:1 relationship |
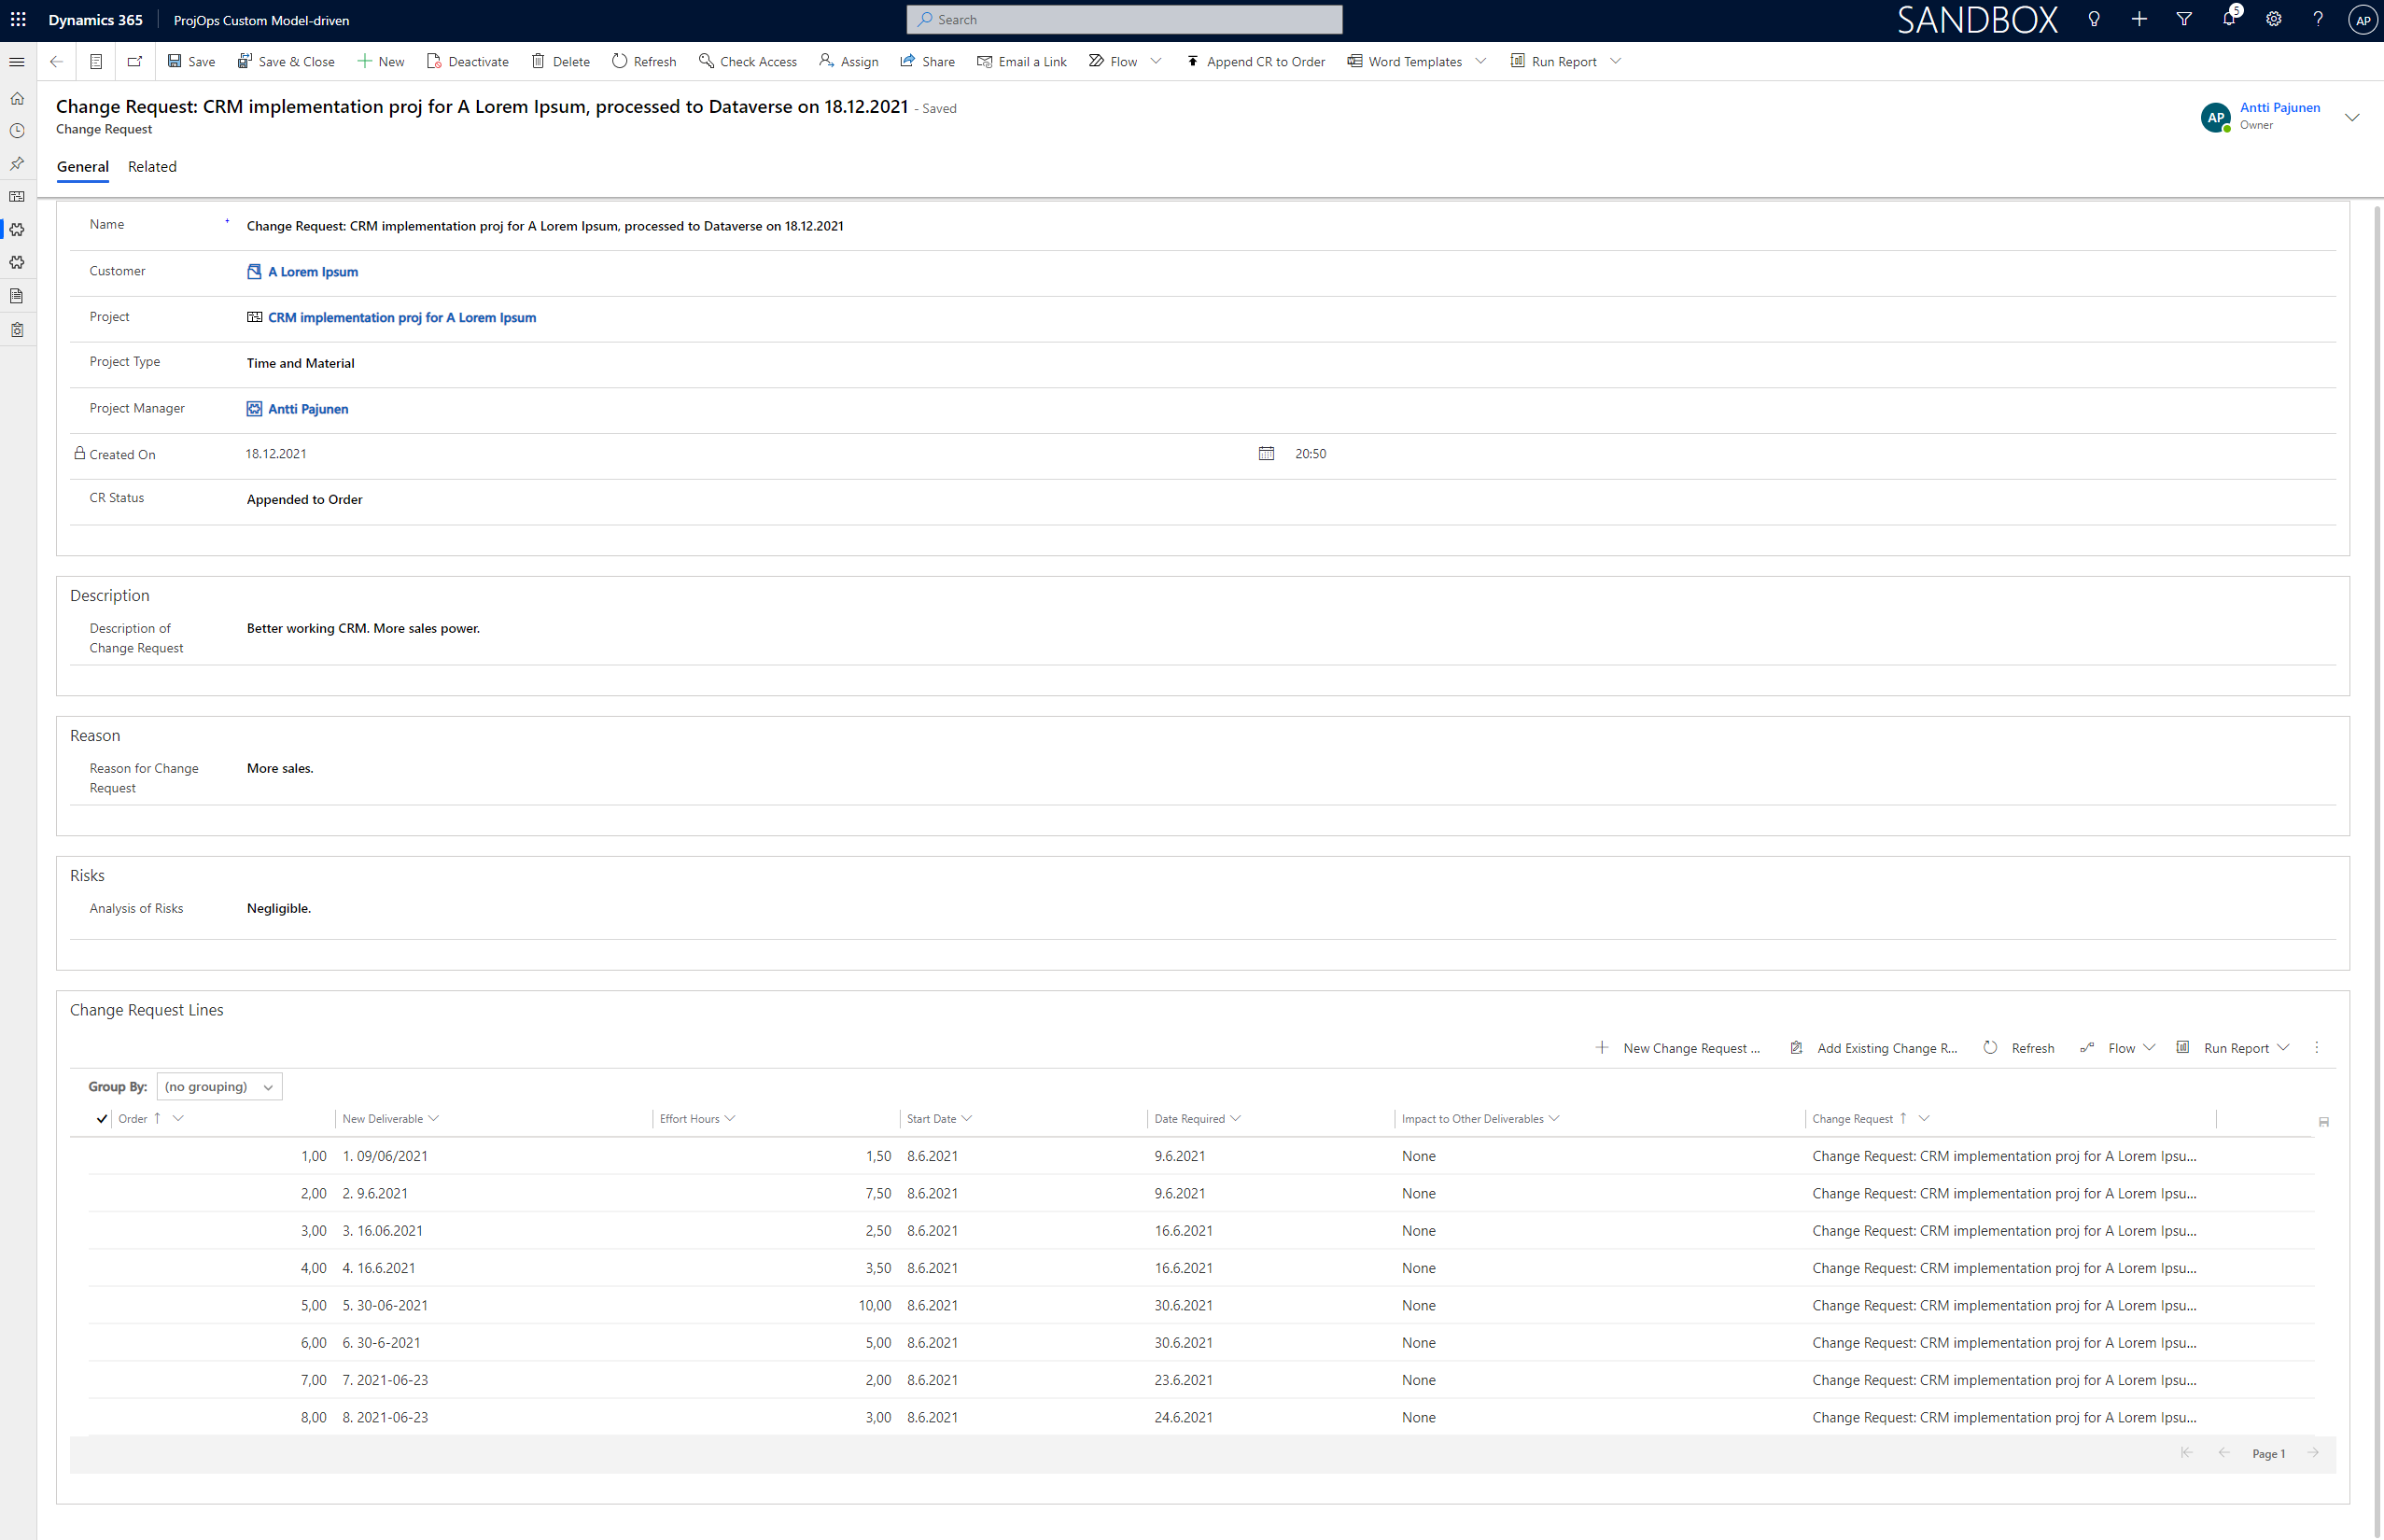
Creating new Change Request and Change Request Line rows in flow
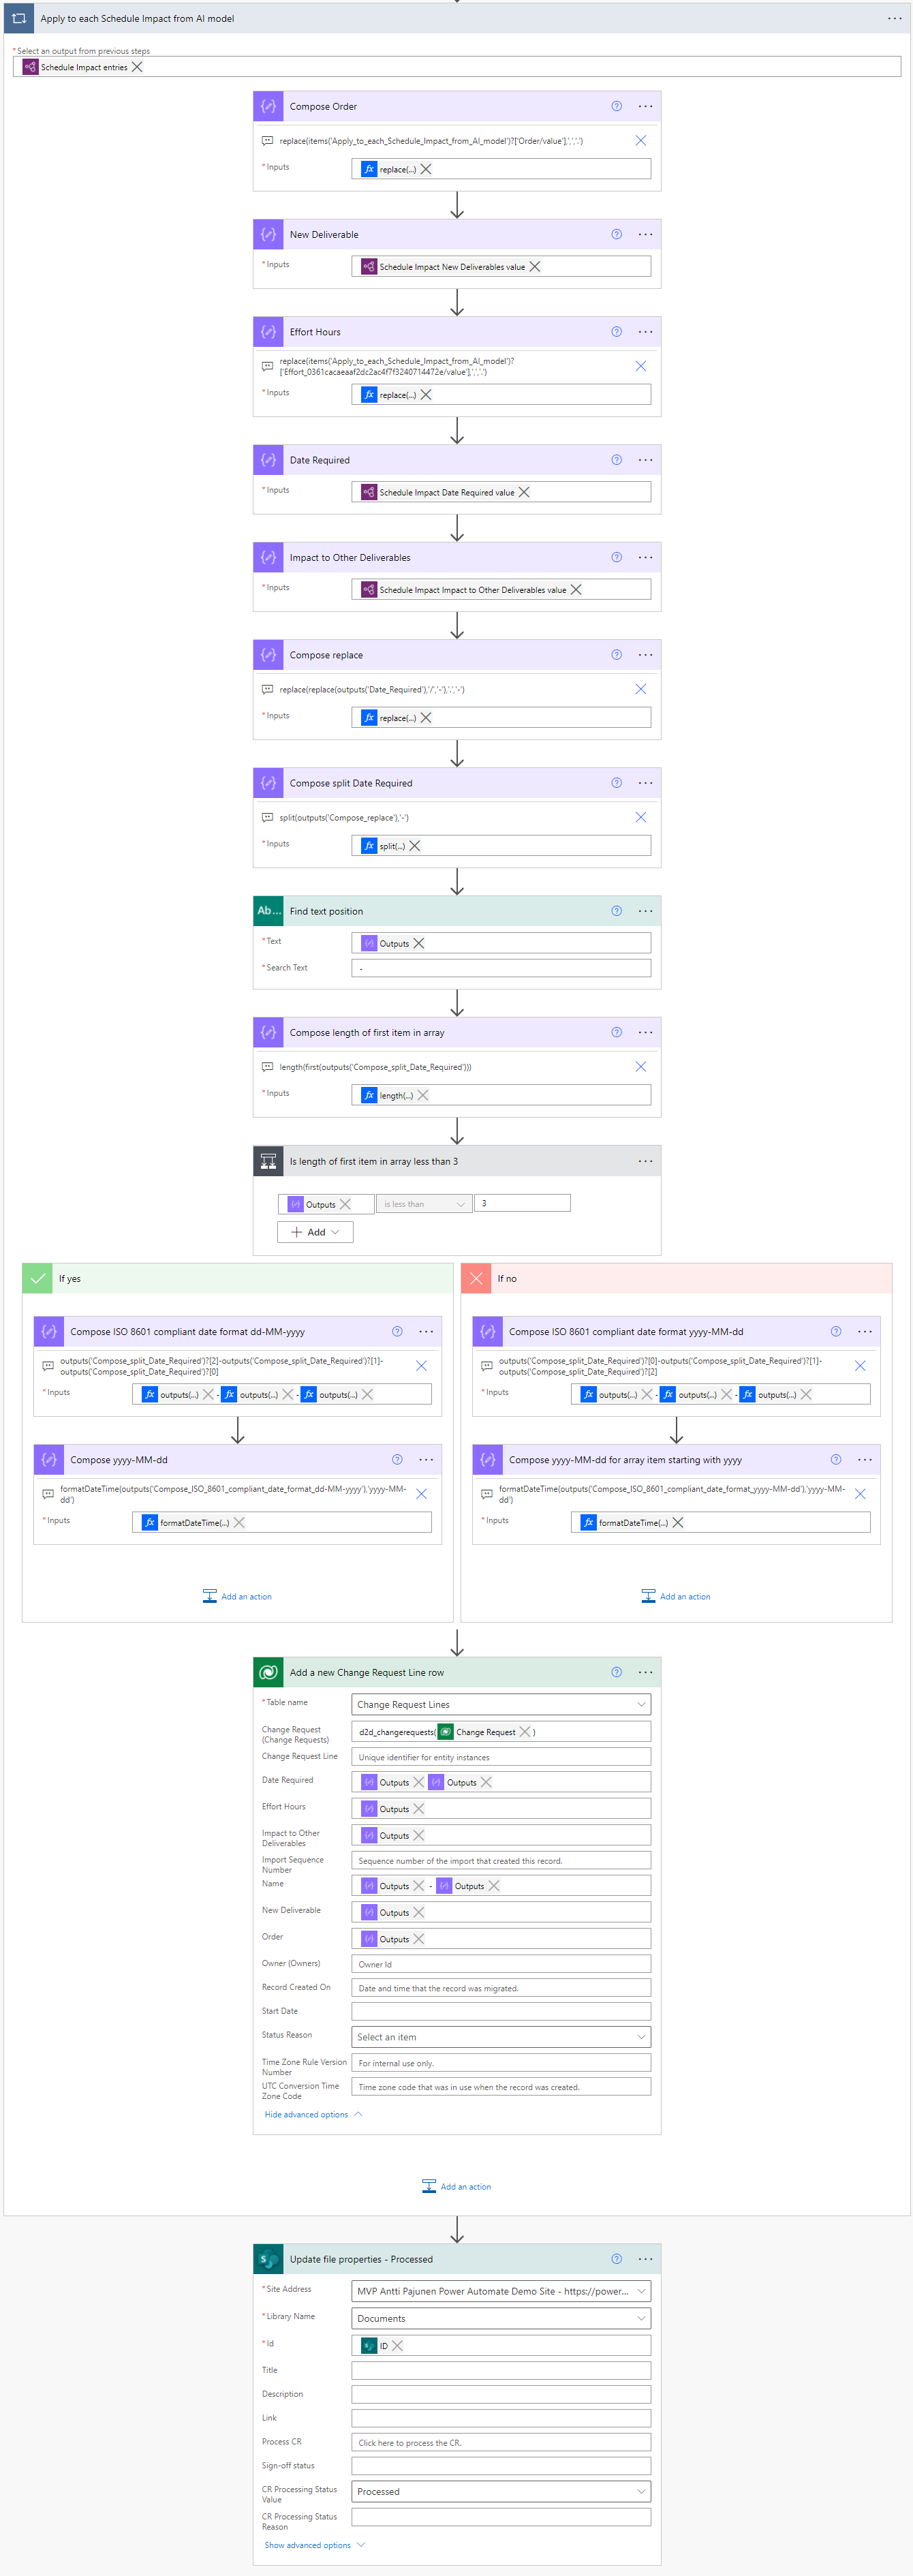
The process of adding a Change Request row is pretty simple as all necessary information is already available to us from the previous steps in the flow. The CR Status custom choice column will be set to Not appended to Order as the idea is to first create a CR with CR Lines in Dataverse and then process it from the CR row manually. Why? Because CRs might be created manually in Dataverse and not exclusively through processing documents in SharePoint. Also due to the Project Scheduling Service and challenges with transactional consistency, it’s a good idea to keep the process of creating CR rows in Dataverse and appending them to an Order and Project separate. More about PSS and transactional consistency in part II.
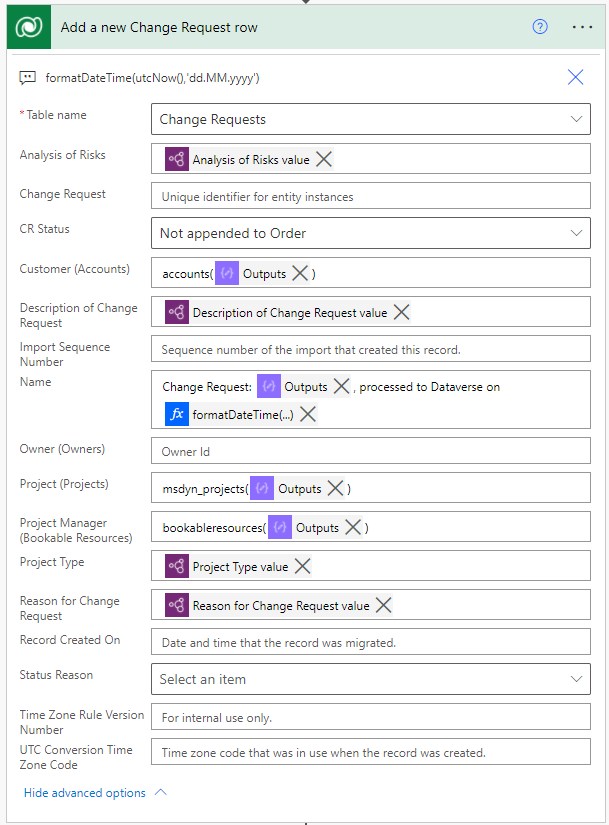
After a new CR is created in Dataverse, all related Change Request Lines are created in an apply to each loop by using Schedule Impact entries from the form processing model as the output. These final steps can be quite tricky. As a CR document is most likely manually filled, the date-time formats and decimal separators used can vary substantially. There’s only so much we can do to account for different variations but in the end, it is possible that the flow fails in this loop if a user uses formats and separators we’ve not factored in. Let’s see what can be done to mitigate human error and differences in date-time formats and decimal separators:
- Order. This column is used to define the order of new tasks to be done as part of the CR. It is the basis of creating corresponding project tasks for the related project in part II. If a user uses a decimal comma as a separator, that comma needs to changed to a decimal point. The expression used is:
replace(items('Apply_to_each_Schedule_Impact_from_AI_model')?['Order/value'],',','.'). - Effort Hours. This column defines the number of hours a new task takes. If a decimal comma is used, it needs to be changed to a decimal point. The expression used is:
replace(items('Apply_to_each_Schedule_Impact_from_AI_model')?['Effort_0361cacaeaaf2dc2ac4f7f3240714472e/value'],',','.'). - Date Required. Date-time formats are tricky because they can be, for example, dd-MM-YYYY or dd.MM.yyyy or dd/MM/yyyy or MM/dd/yyyy. Manipulating the Date Required column is explained in more detail in the following paragraph.
There are two ways we can manipulate the Date Required column and make sure it’s in the correct format of yyyy-MM-dd for adding a value to a date-only column in Dataverse.
Option 1
- Compose replace to change / (slash) or . (period) separators to a – (dash).
- Compose split Date Required to convert the output of #1 to an array.
- Compose length of first item in array to compose the length if the first item from output of #2.
- Evaluate whether the output of #3 is less than 3 in length or not. If length is less than 3, the date begins with MM or dd but if length is 3 the date begins with yyyy.
- If #4 is true, compose ISO 8601 compliant date format dd-MM-yyyy and then format it to yyyy-MM-dd. The formatDateTime expression is required.
- If #4 is false, compose ISO 8601 compliant date format yyyy-MM-dd and then format it to yyyy-MM-dd. The formatDateTime expression is required.
Option 2
- Compose replace to change / (slash) or . (period) separators to a – (dash).
- Find text position to find – (dash) from the output of #1.
- Evaluate whether the output of #2 is less than 3 in length or not. If length is less than 3, the date begins with MM or dd but if length is 3 the date begins with yyyy.
- If #3 is true, compose ISO 8601 compliant date format dd-MM-yyyy and then format it to yyyy-MM-dd. The formatDateTime expression is required.
- If #3 is false, compose ISO 8601 complian date format yyyy-MM-dd and then format it to yyyy-MM-dd. The formatDateTime expression is required.
As we can see from the above options, the difference is that option 1 requires one extra step. Both are valid approaches though. Image 16 shows the results of the actions in flow. Aren’t date-time formats and decimal separators fun in flow!
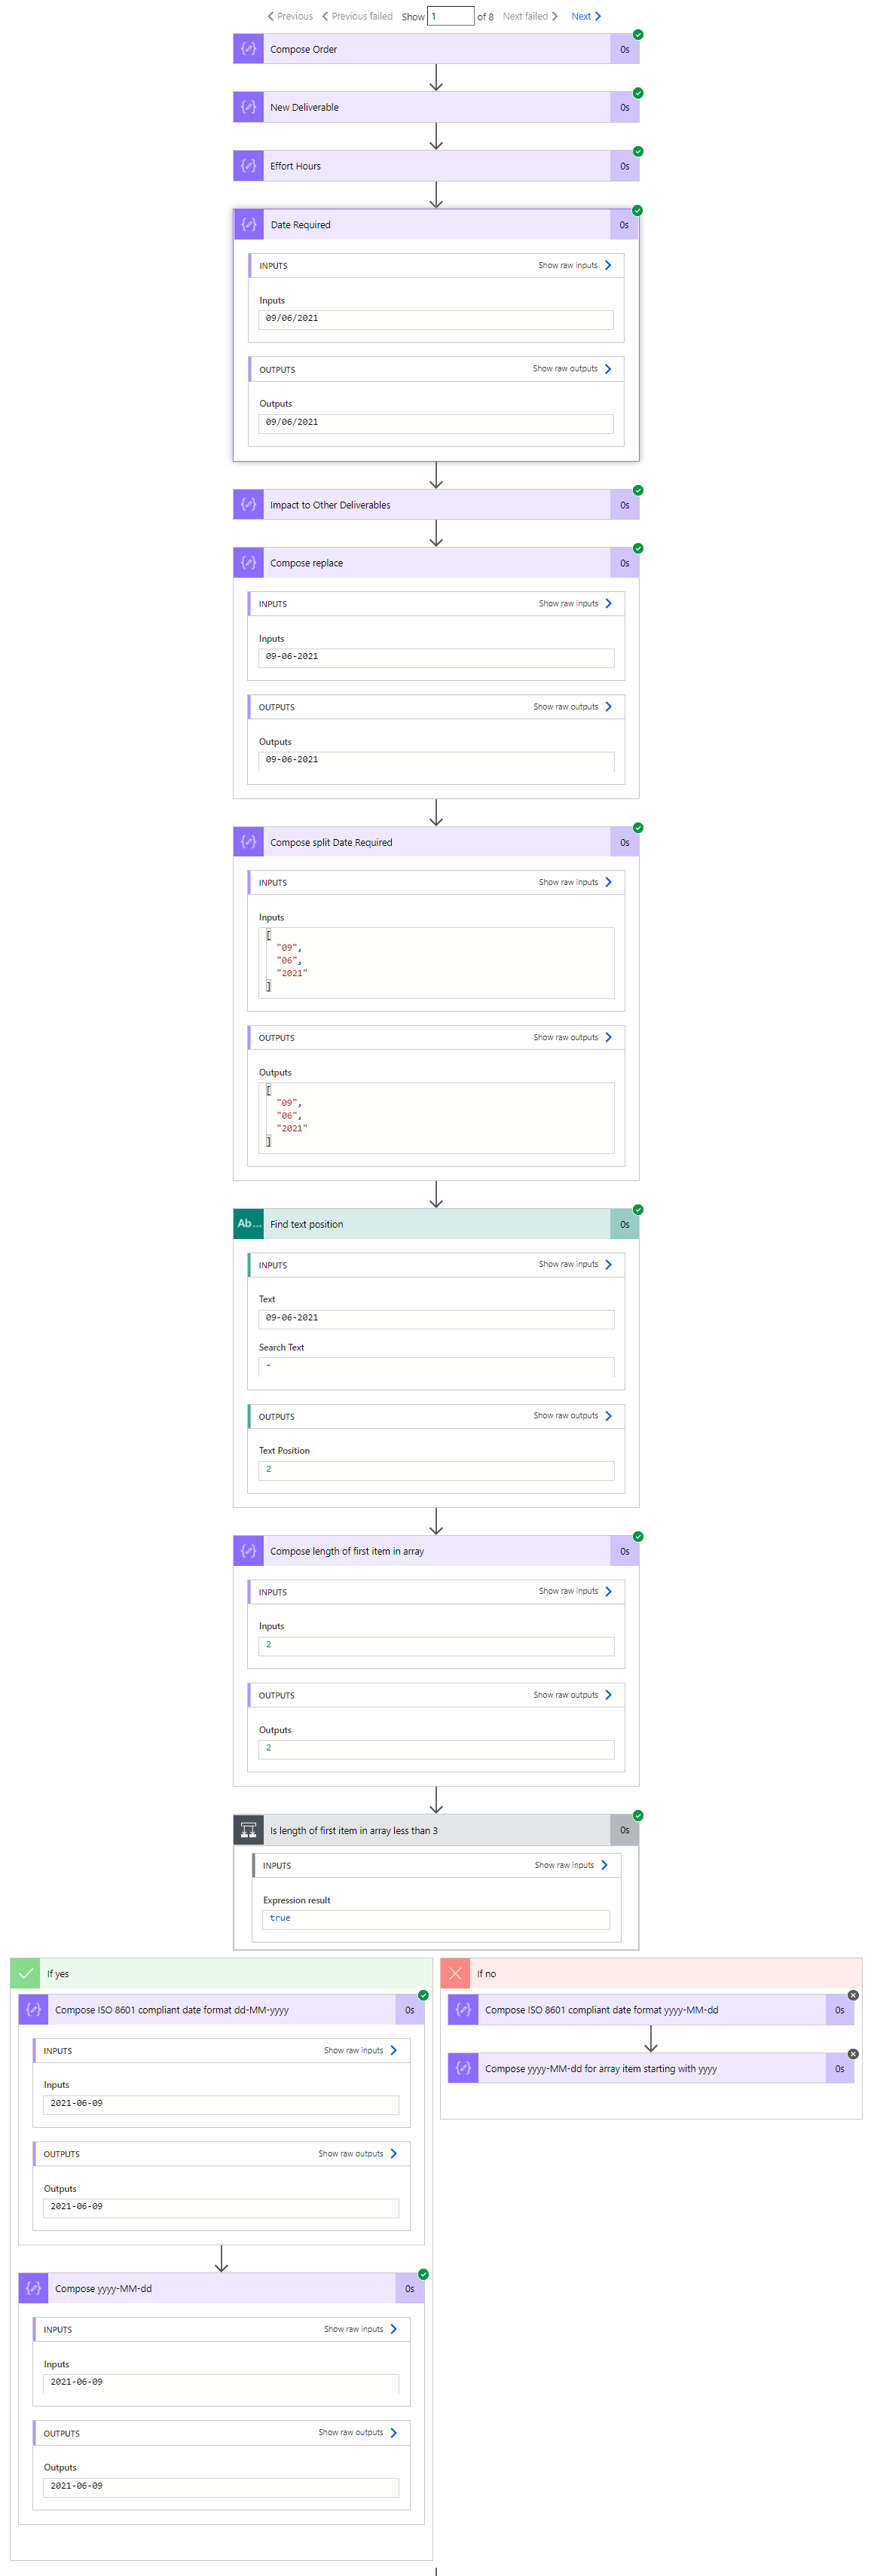
Table 2 below holds the expressions for all the date-time actions for manipulating the Date Required column.
| Action | Expression |
| Compose replace | replace(replace(outputs('Date_Required'),'/','-'),'.','-') |
| Compose split Date Required | split(outputs('Compose_replace'),'-') |
| Compose length of first item in array | length(first(outputs('Compose_split_Date_Required'))) |
| Compose ISO 8601 compliant date format dd-MM-yyyy | outputs('Compose_split_Date_Required')?[2]-outputs('Compose_split_Date_Required')?[1]-outputs('Compose_split_Date_Required')?[0] |
| Compose yyyy-MM-dd | formatDateTime(outputs('Compose_ISO_8601_compliant_date_format_dd-MM-yyyy'),'yyyy-MM-dd') |
| Compose ISO 8601 compliant date format yyyy-MM-dd | outputs('Compose_split_Date_Required')?[0]-outputs('Compose_split_Date_Required')?[1]-outputs('Compose_split_Date_Required')?[2] |
| Compose yyyy-MM-dd for array item starting with yyyy | formatDateTime(outputs('Compose_ISO_8601_compliant_date_format_yyyy-MM-dd'),'yyyy-MM-dd') |
The final two actions in the flow create the CR Lines and then update the document library in SharePoint with a status of Processed. While creating the CR and CR Lines is fairly easy, the heavy lifting is done with all the date-time values and decimal separators. The fact that AI Builder’s output can be uncertain and Dataverse search results might be hard to digest, the end result might only be “close enough”. I think using AI Builder can make it easier to process CR documents but the approach definitely isn’t a silver bullet.
Author’s Effort and References
This is something new I thought of. I thought I’d list effort and references for what it took for me to write this blog post. In the future, I’ll add more concrete references to community articles.
| Build and Write Effort | Community Blogs and Forums | MVPs Consulted | Product Group Interactions | Support Requests |
| Approximately 5 days | Several flow forum posts, several community blog posts on date-time and variables | Linn Zaw Win, George Doubinski, Elaiza Benitez (blog), Matt Collins-Jones, Daniel Laskewitz, Vesa Nopanen | 3 | 1 (Bookable Resource search) |
Disclaimer:
All my blog posts reflect my personal opinions and findings unless otherwise stated.
Hi,
I think this blog is a fantastic resource for D365 developers. How can one subscribe to your new posts (I guess via email?)
Thanks,
Andrew