
Tested on Project Operations on Dataverse version 4.26.0.155 (November 2021)
In part I we looked at processing CR documents from SharePoint by using Power Automate and AI Builder. In part II we’ll append a processed CR to an order and a project. This way time entries can be pointed to new project tasks, which are created from the CR. The idea is that when a CR is appended to a project and order, a new order line and project tasks are created, and task-based billing is set for the new project tasks.
Processed CRs in Dataverse
Let’s revisit the CR concept. When a CE document is processed, a new Change Request row in a custom Change Requests table is created in Dataverse. This CR row will also have Change Request Lines, which are created based on the processed document’s Schedule Impact table. That table defines the actual tasks the CR consists of. Rows in that table become Change Request Lines (later CRLs), and when the CR is appended to an order and project, the CRLs become project tasks.
Appending a CR to an order and project
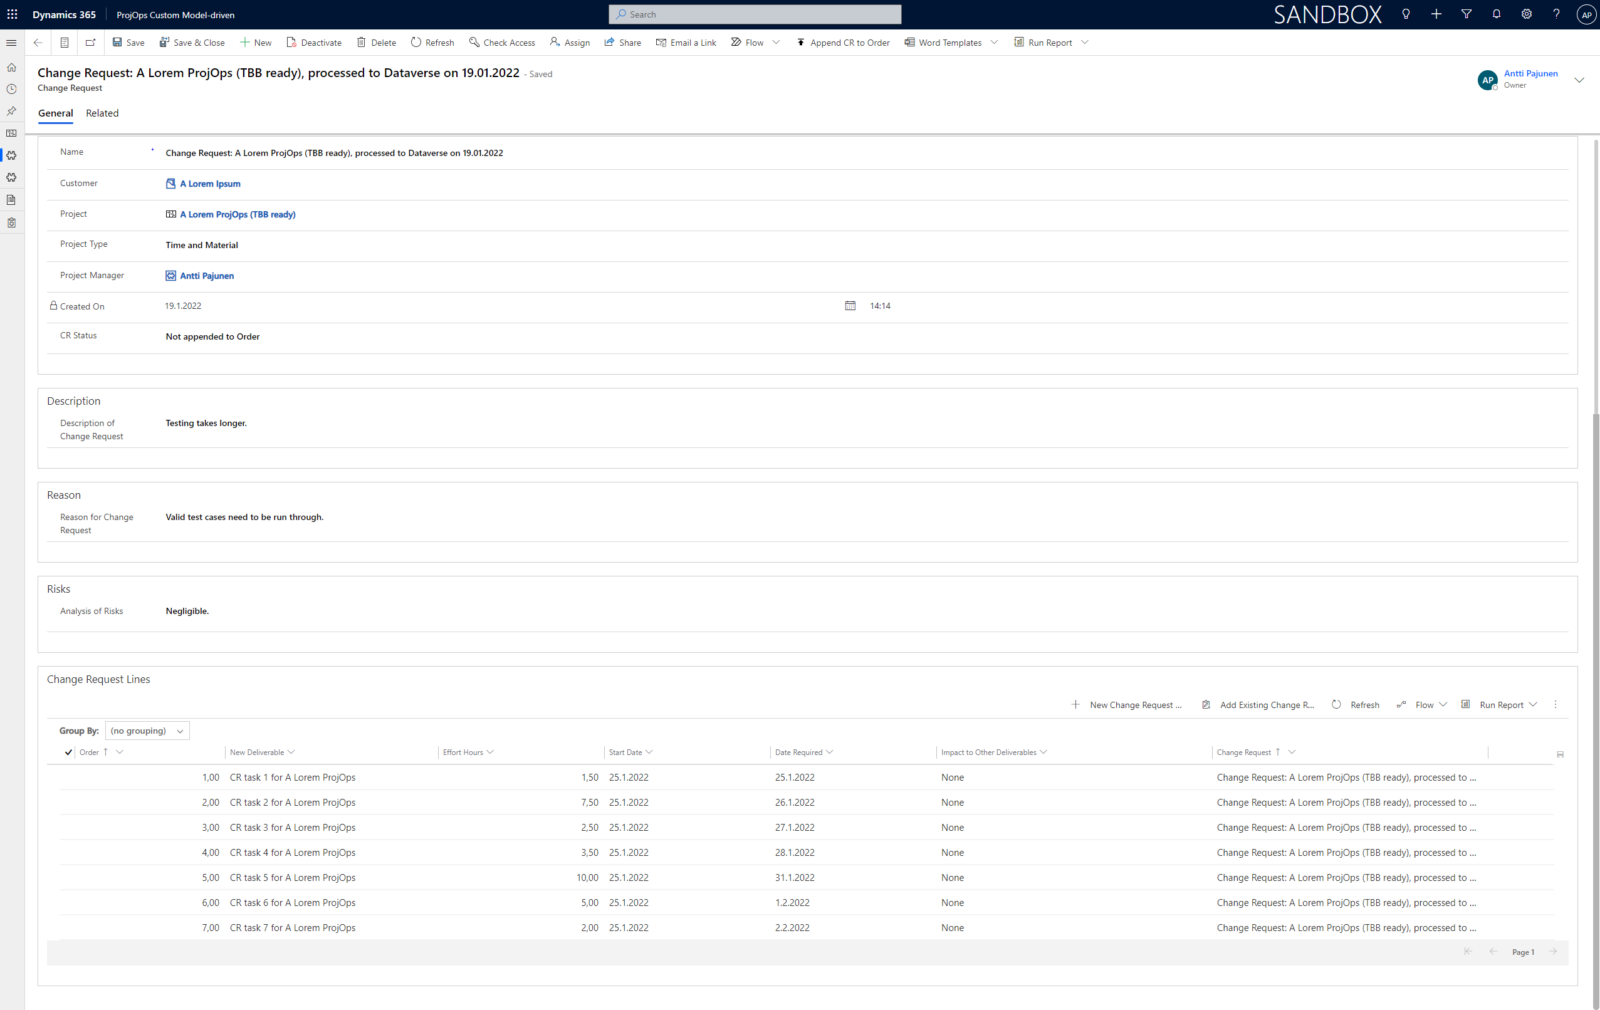
Image 1 describes our starting point: A CR document has been processed and a CR row with Change Request Lines has been created in Dataverse. The CRLs require certain details so that it’s possible to create project tasks from them. Let’s look at these details:
- Order. This will define the order in which tasks are created. All tasks will become subtasks (child tasks) under a summary (parent) task based on this order. The value in this column could also be used in the Project Task table’s Display Sequence column when tasks are being created.
- New Deliverable. This will be the name of the new poject task.
- Effort Hours. In this example, a project uses the Schedule mode of Fixed duration, so task specific effort hours can be defined.
- Start Date. The start date of a project task. This might not be known at the time of processing a CR document so in this example a project manager will fill the start dates manually in the subgrid. If you don’t like it, you can freely change this approach to something else.
- Date Required. Finish date of a project task.
The Impact to Other Deliverables is more of a flexible concept. It could be used for dependencies or as simple free text to describe the impact. The final CR column in the subgrid is a lookup to the CR row. Normally I’d hide such a column but in this case, I simply forgot to do it.
Firing off the flow to append to order and project
Time for a disclaimer: This is an example, not a production implementation. With that in mind, I’ve created a new ribbon button with Smart Buttons to fire off the flow of appending a CR to an order and project. This has some downsides when used with Power Automate:
- We’re not able to leverage the event execution pipeline’s different stages. For example PreValidation is not possible.
- The process is asynchronous and doesn’t roll back changes.
- Users can fire off the process several times unless we go the extra mile and hide the button to wait for the execution to complete.
- Coupled with interacting with the Project Scheduling Service, a flow is most likely more time-consuming to build than a plug-in.
- Unless webhooks/when an HTTP request is received trigger is used, on-demand flows can only be fired off from the legacy Dataverse trigger (when a row is selected).
The biggest upside is that Power Automate presents interesting opportunities for creating complex processes such as this as Proof of Concepts by functional consultants. I’d say Power Automate might suffice for a production implementation in a complex process like this, but personally, I feel we are able to tackle this use case more effectively in code. Leave a comment below and let me know what you think!

Order Line and PSS considerations
Before we dissect the flow that appends a CR to an order and project, there are some points we need to be aware of. When implementing task-based billing, the initial setup of an order line needs to meet certain criteria. With PSS, the way the entire process flows from the CR table to creating new tasks and order lines also has important points we need to take into consideration.
Order Lines
Task-based billing was introduced in 2020 so the feature has been out for a while. I’ve also written about how it works: See here for my older blog post. What’s important to understand about task-based billing is the way order lines need to be set up. When an order and its order lines are initially created, the Include Tasks column of an order line should be set to Selected project tasks only. This way additional order lines for the same combination of Billing Method and time/expense/material/fee flags can be created. Let’s open this up through an example.
Initial setup for an Order Line
Billing Method = Time and Material
Included Tasks = All project tasks or null
Include Time = Yes
Include Expense = Yes
Include Material = Yes
Include Fee = No
Billing activity exists i.e. time/expense/fee is on a proforma invoice. In other words, a project is well on its way and at least one invoice has been created.
When attempting to create a new order line with the same details and with Included Tasks set to Selected project tasks only, ProjOps produces an error. It won’t let you create a new order line with Selected project tasks only as the original order line wasn’t set for task-based billing. This means you’ll be deadlocked and have no way to set your order for task-based billing.
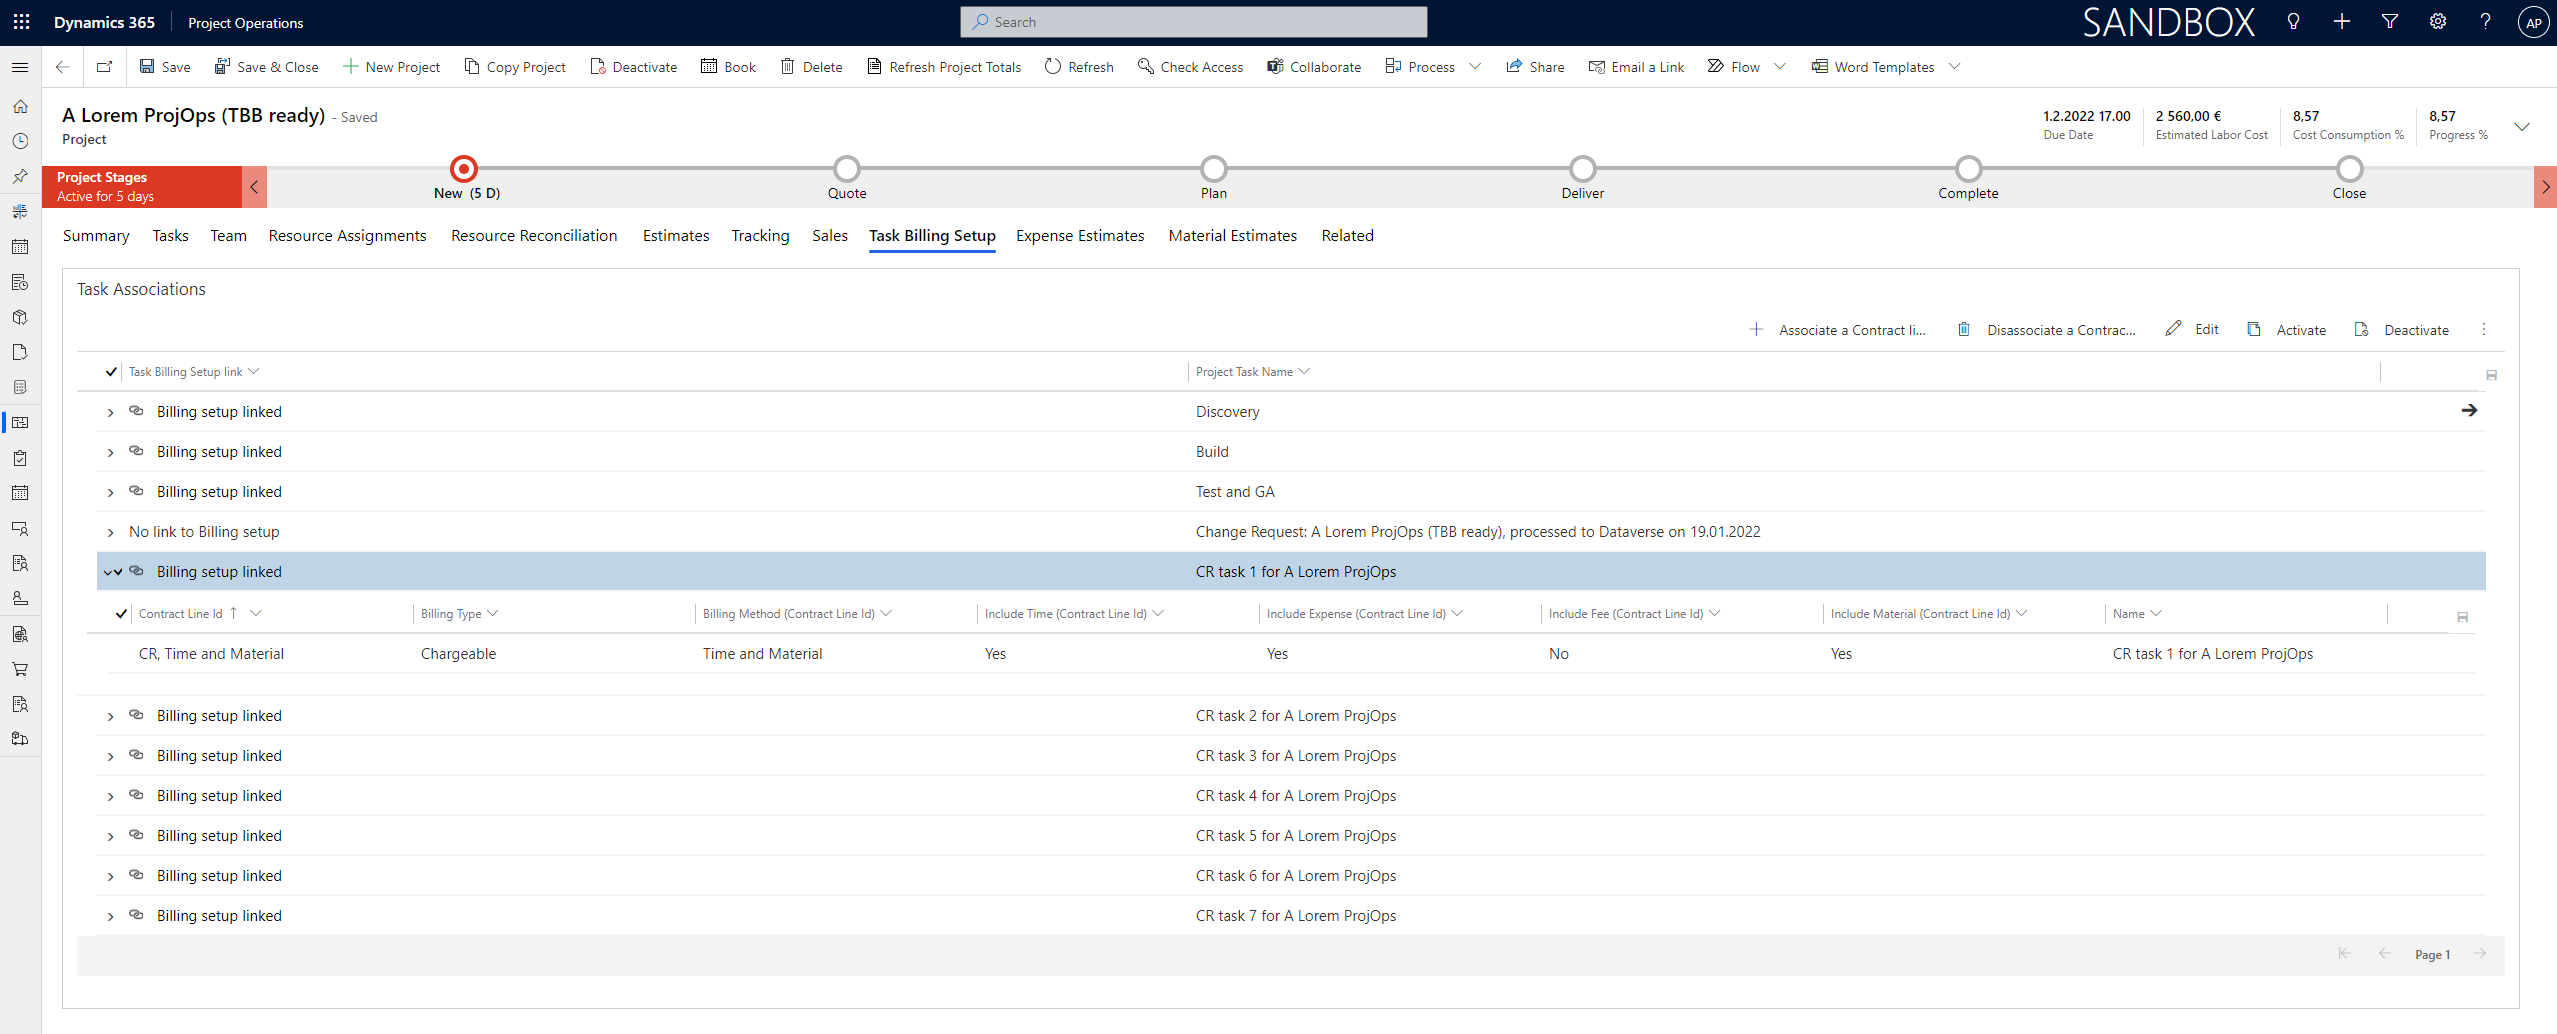
If the original order line is set to include Selected project tasks only, new order lines with Included Task set to Selected project tasks only can be created. The combination of project, and the values of Included Tasks, Include Time, Expense, Material and Fee flags will be unique to a line as specified project tasks point to specified order lines. The Microsoft.Dynamics.ProjectService.Plugins.PreValidatesalesorderdetailUpdate plugin won’t fire off.
The verdict in short: If you want to use task-based billing and leverage CRs, you have to set your order lines to include selected project tasks, when you’re initially setting up your order and its order lines.
In addition to this, project tasks must be made business required on the Time Entry table. Approved time won’t result in an Unbilled Sales Actual if a task is not selected when creating a new time entry!
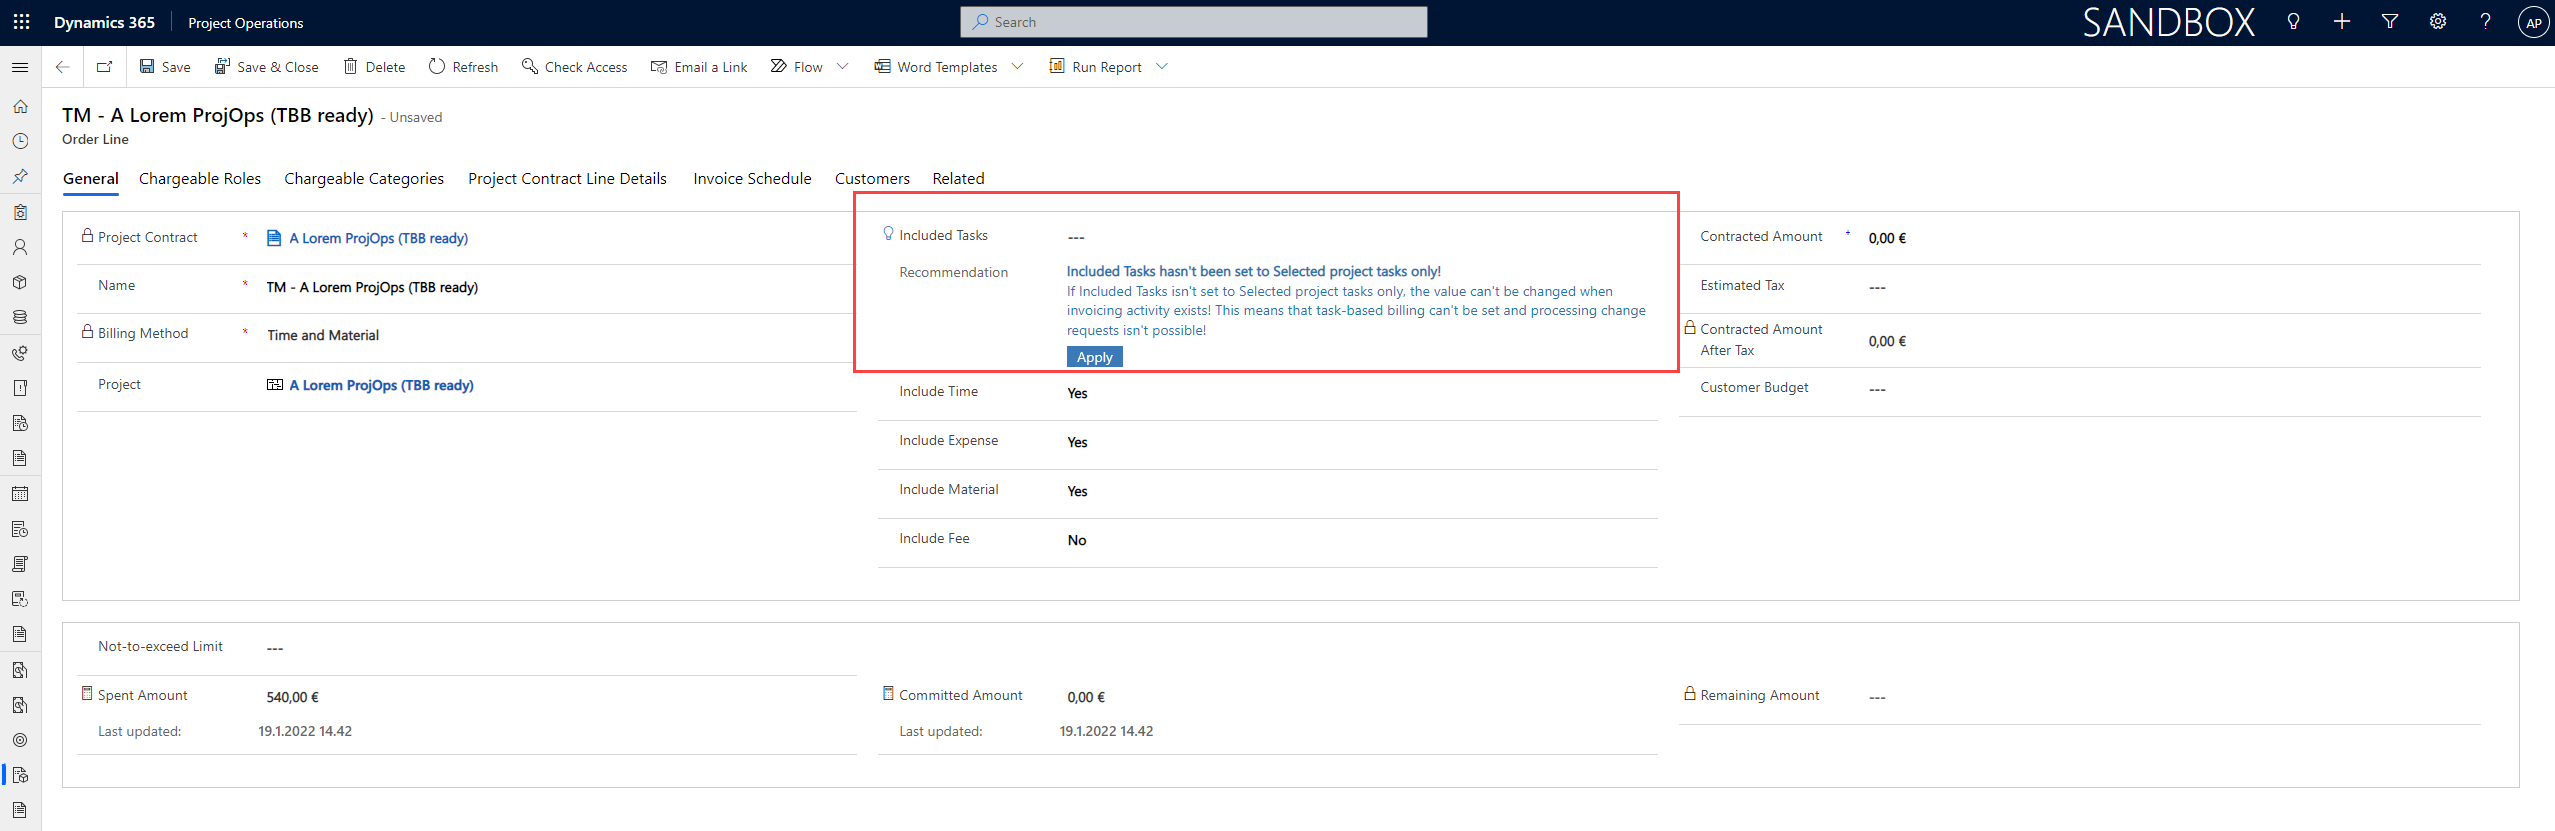
To overcome these gaps, JavaScript could be created for project tasks to be enforced on a time entry when an order line set for task-based billing exists. Another valuable customization would be to implement a notification on order lines to notify users and to reduce unintentional errors. For the sake of example, I’ve created a business rule that points users in the right direction.
If you’re passionate about this topic and want to steer this feature in a less error-prone direction, be sure to vote my idea up on Experience.
The Project Scheduling Service
When running logic through PSS, transactional consistency should be considered. I’ve written about PSS and transactional consistency here so be sure to read that post before using the Project schedule APIs. While this CR use case is fairly simple, there are important considerations about transactional consistency.
- We naturally want a CR row to state that its details have been appended to an order and project and that the operation has been successful. Updating a CR row should be done after PSS has persisted changes to Dataverse. If the operation is done before the Project schedule APIs are used and PSS fails to persist changes, a CR row will have an incorrect status indicating that it has been successfully appended.
- If a new order line is created before PSS persists changes and the persist fails, the result can be an unwanted order line that doesn’t contain task-based billing associations to project tasks. All operations that depend on a successful PSS persist should be created after PSS has successfully persisted changes.
The Flow – Append Change Request to Order and Project
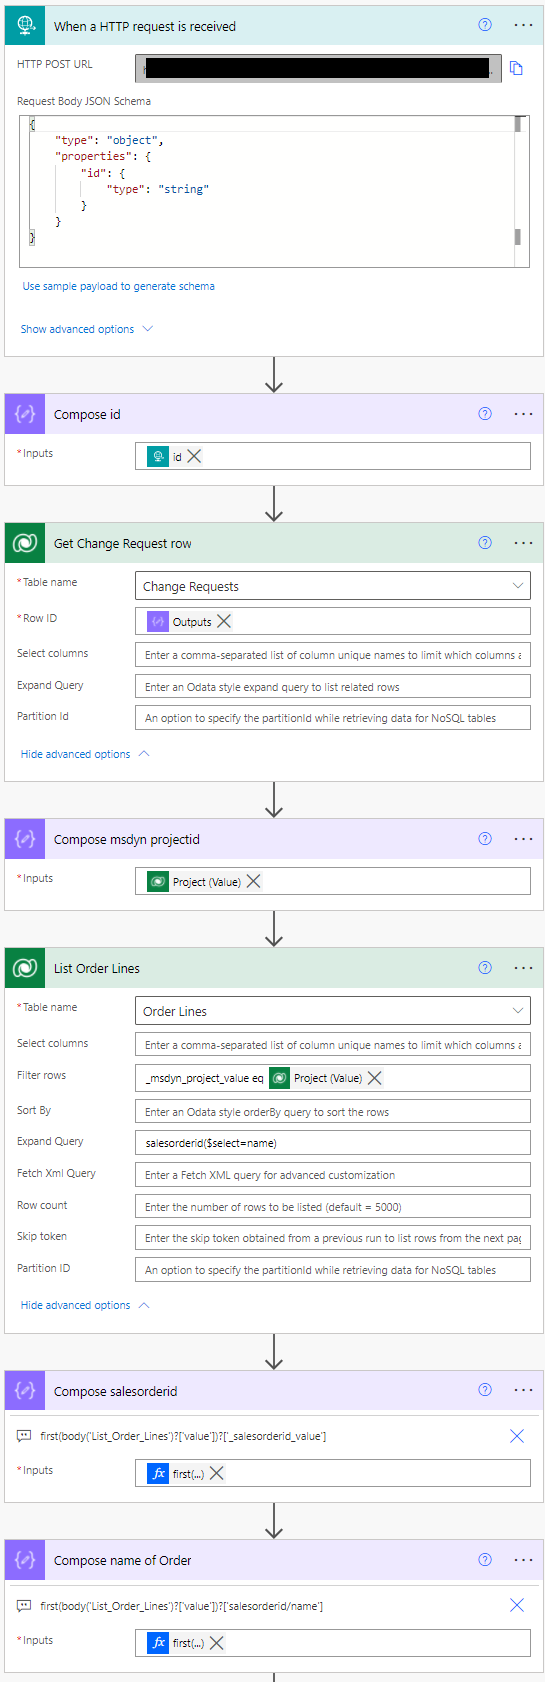
Time to look at the flow that does the magic and heavy lifting. Since Smart Buttons are used the flow is called with the URL that the When a HTTP request is received trigger provides. MVP Matt Collins-Jones has a good article about how to set Smart Buttons up and what the JSON schema for the trigger should be. Check out his post here. Before you read this blog post further, I recommend you to check out my guide to the Project schedule APIs for Power Automate users. It explains how the schedule APIs are called and what all the fine details are.
Initial actions
Following MCJs blog post, we’re able to store the CR row’s id in a compose action. This allows us to get our hands on the CR row and through it the project that it’s related to. As we have the id of the project in question, we can list order lines related to the project. It’s enough to get the first order line from the output of the List Order Lines action as in this use case a single project is related to an order and an order line. How do we know this? In general, I always recommend using a single project per order to keep invoicing and contract management easier. The final compose action in the initial actions is used to compose the id of the related order, which we can get to through an order line by using expand query. At this point, we now know the GUIDs of the project, order line, and order.
Label for Billing Method on Order Line
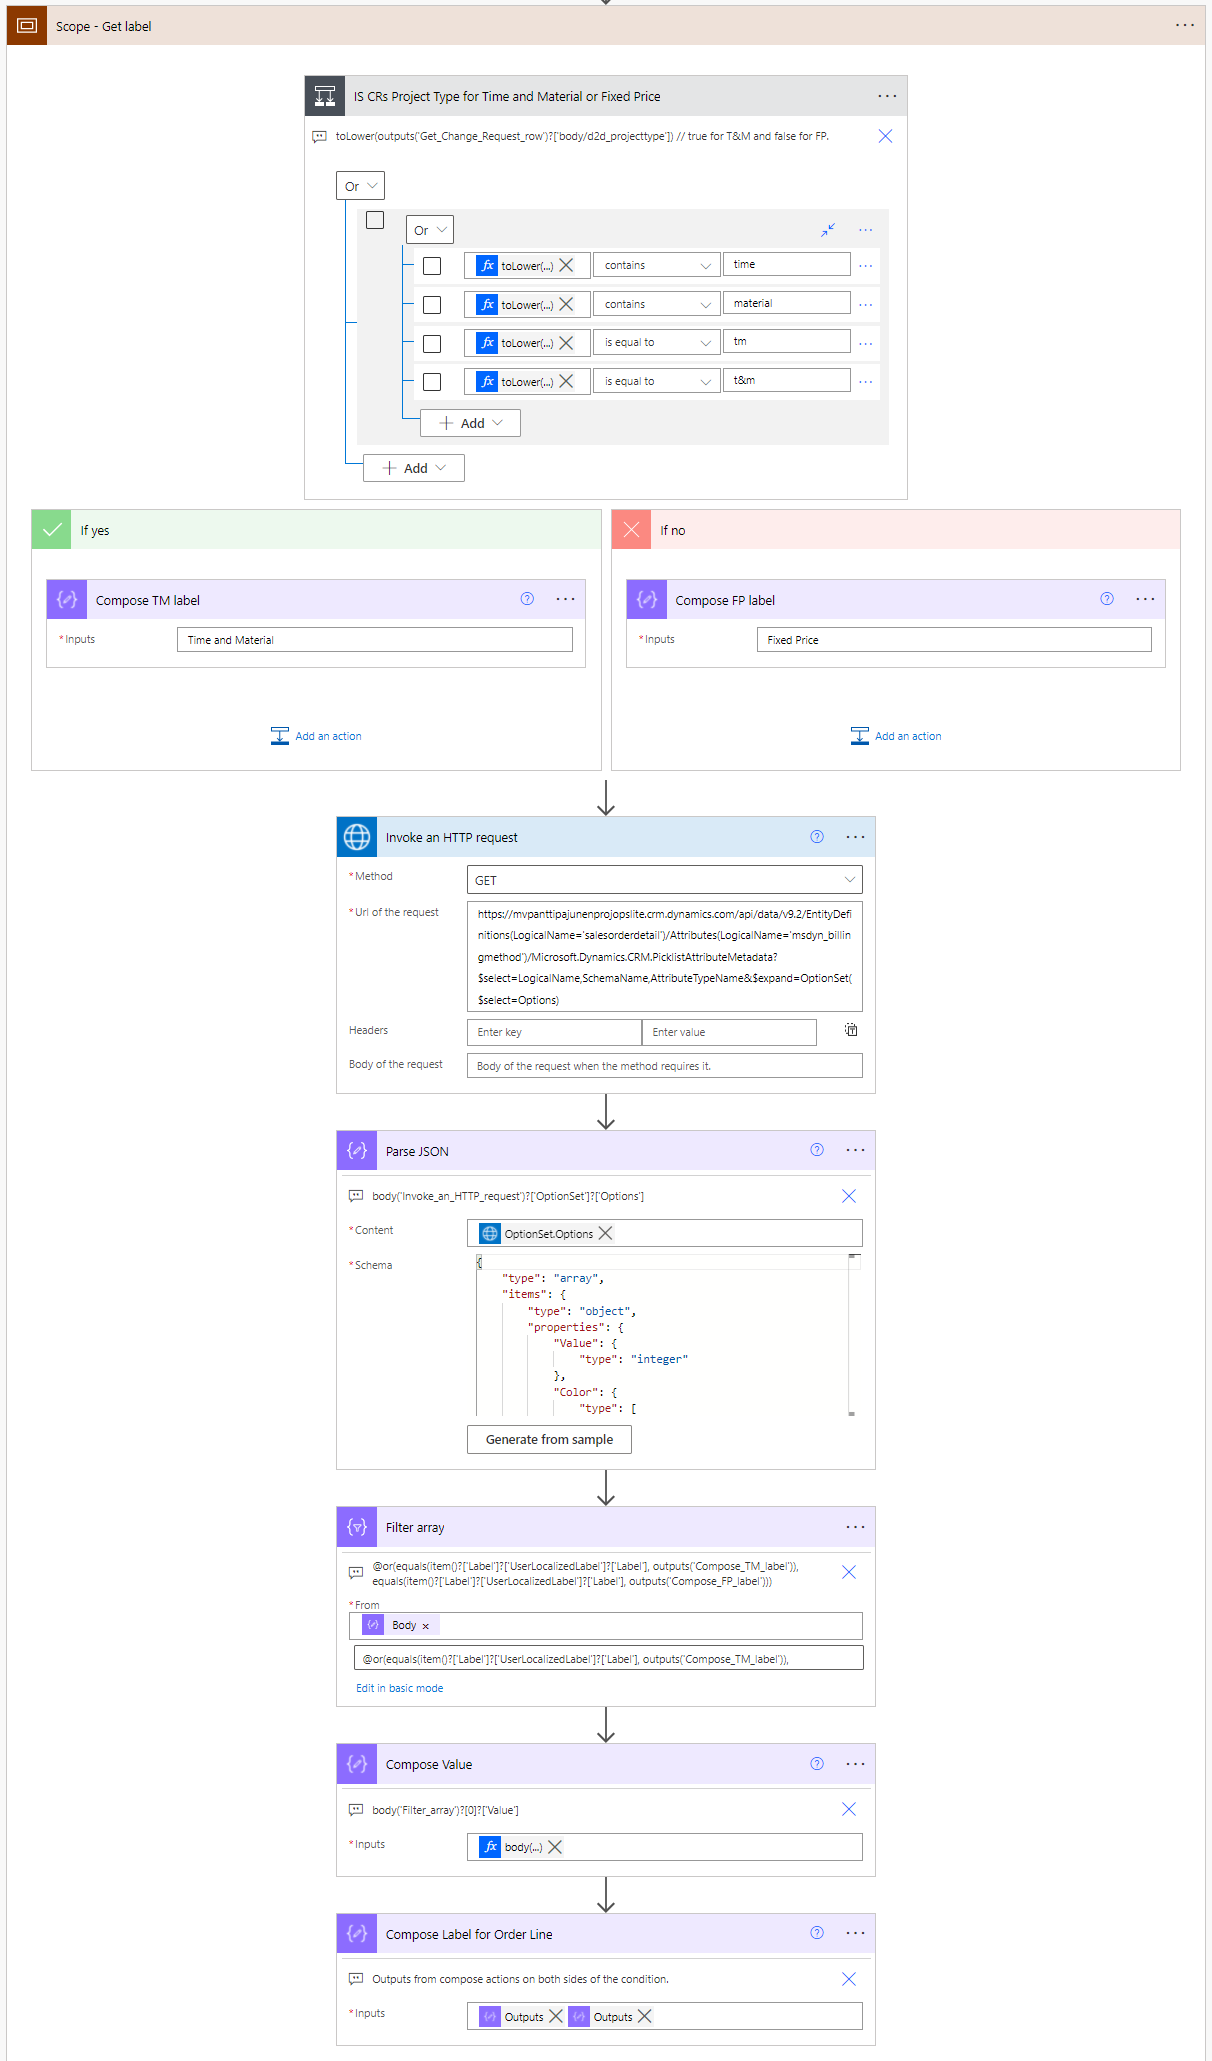
First, we need to check if the CR row’s custom column for Project Type contains a value that we can use to interpret that the CR row is for Time and Material. Remember that the value in this column is based on what AI Builder extracted. Whoever filled the original CR document may have written “Time and Material” in a number of different ways. What we’ll do is we’ll look at whether or not the column has one of the following values and if it does, the condition in the flow will run in one of two branches to compose values for TM or FO labels.
- The column contains time
- The column contains material
- The column is equal to tm
- The column is equal to t&m
If the column has a value that isn’t one of the above, we’ll treat it as Fixed Price. Again, I want to emphasize that this approach of processing CR docs with AI Builder isn’t a silver bullet!
Because choice columns are actually based on integer values, we need to map a label to a value. This sounds simple but it’s actually a bit complex! Instead of explaining how to do it in this blog post, I’ll point you to MVP Amey Holden’s blog, which covers both the topic and a solution to mapping labels to values. She also has an interesting episode about this topic on Citizen Can with MVP George “The Enabler” Doubinski. What about using the String Maps table the way MVP Matt Collins-Jones has done here? I’ve used that same approach myself but The Enabler and Microsoft’s Phil Topness from the Power CAT team have some thoughts about what’s supported and what’s not in this series of tweets.
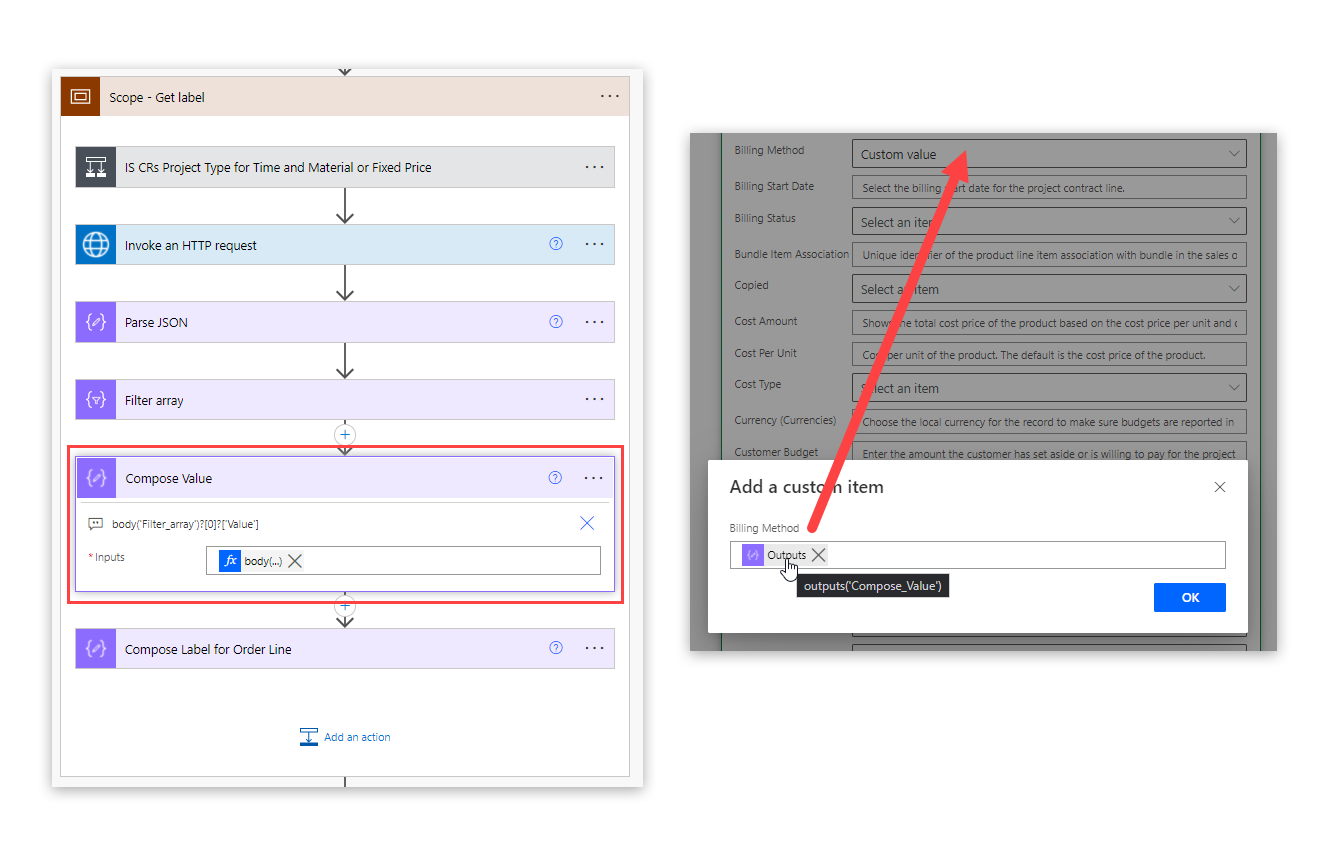
Based on what we can learn from the tweets we’ll use an HTTP request action to query the Web API and EntityDefinitons. The URL for the HTTP request is https://yourDynamicsOrgHere.com/api/data/v9.2/EntityDefinitions(LogicalName='salesorderdetail')/Attributes(LogicalName='msdyn_billingmethod')/Microsoft.Dynamics.CRM.PicklistAttributeMetadata?$select=LogicalName,SchemaName,AttributeTypeName&$expand=OptionSet($select=Options). A parse JSON action is then needed. You can get the schema from Amey’s blog. If you have trouble finding dynamic content for the parse JSON action, use this expression: body('Invoke_an_HTTP_request')?['OptionSet']?['Options'].
After the parse JSON we need to filter the outputs with a filter array. We want to pick one of two options: Either the TM label or the FP label. Only one will be present so we need to pick and choose one or the other based on which one is present. This calls for an advanced condition as follows: @or(equals(item()?['Label']?['UserLocalizedLabel']?['Label'], outputs('Compose_TM_label')), equals(item()?['Label']?['UserLocalizedLabel']?['Label'], outputs('Compose_FP_label'))).
The final compose actions in the scope will hold the Value with a body('Filter_array')?[0]?['Value'] expression and compose the Label based on what the condition returned.
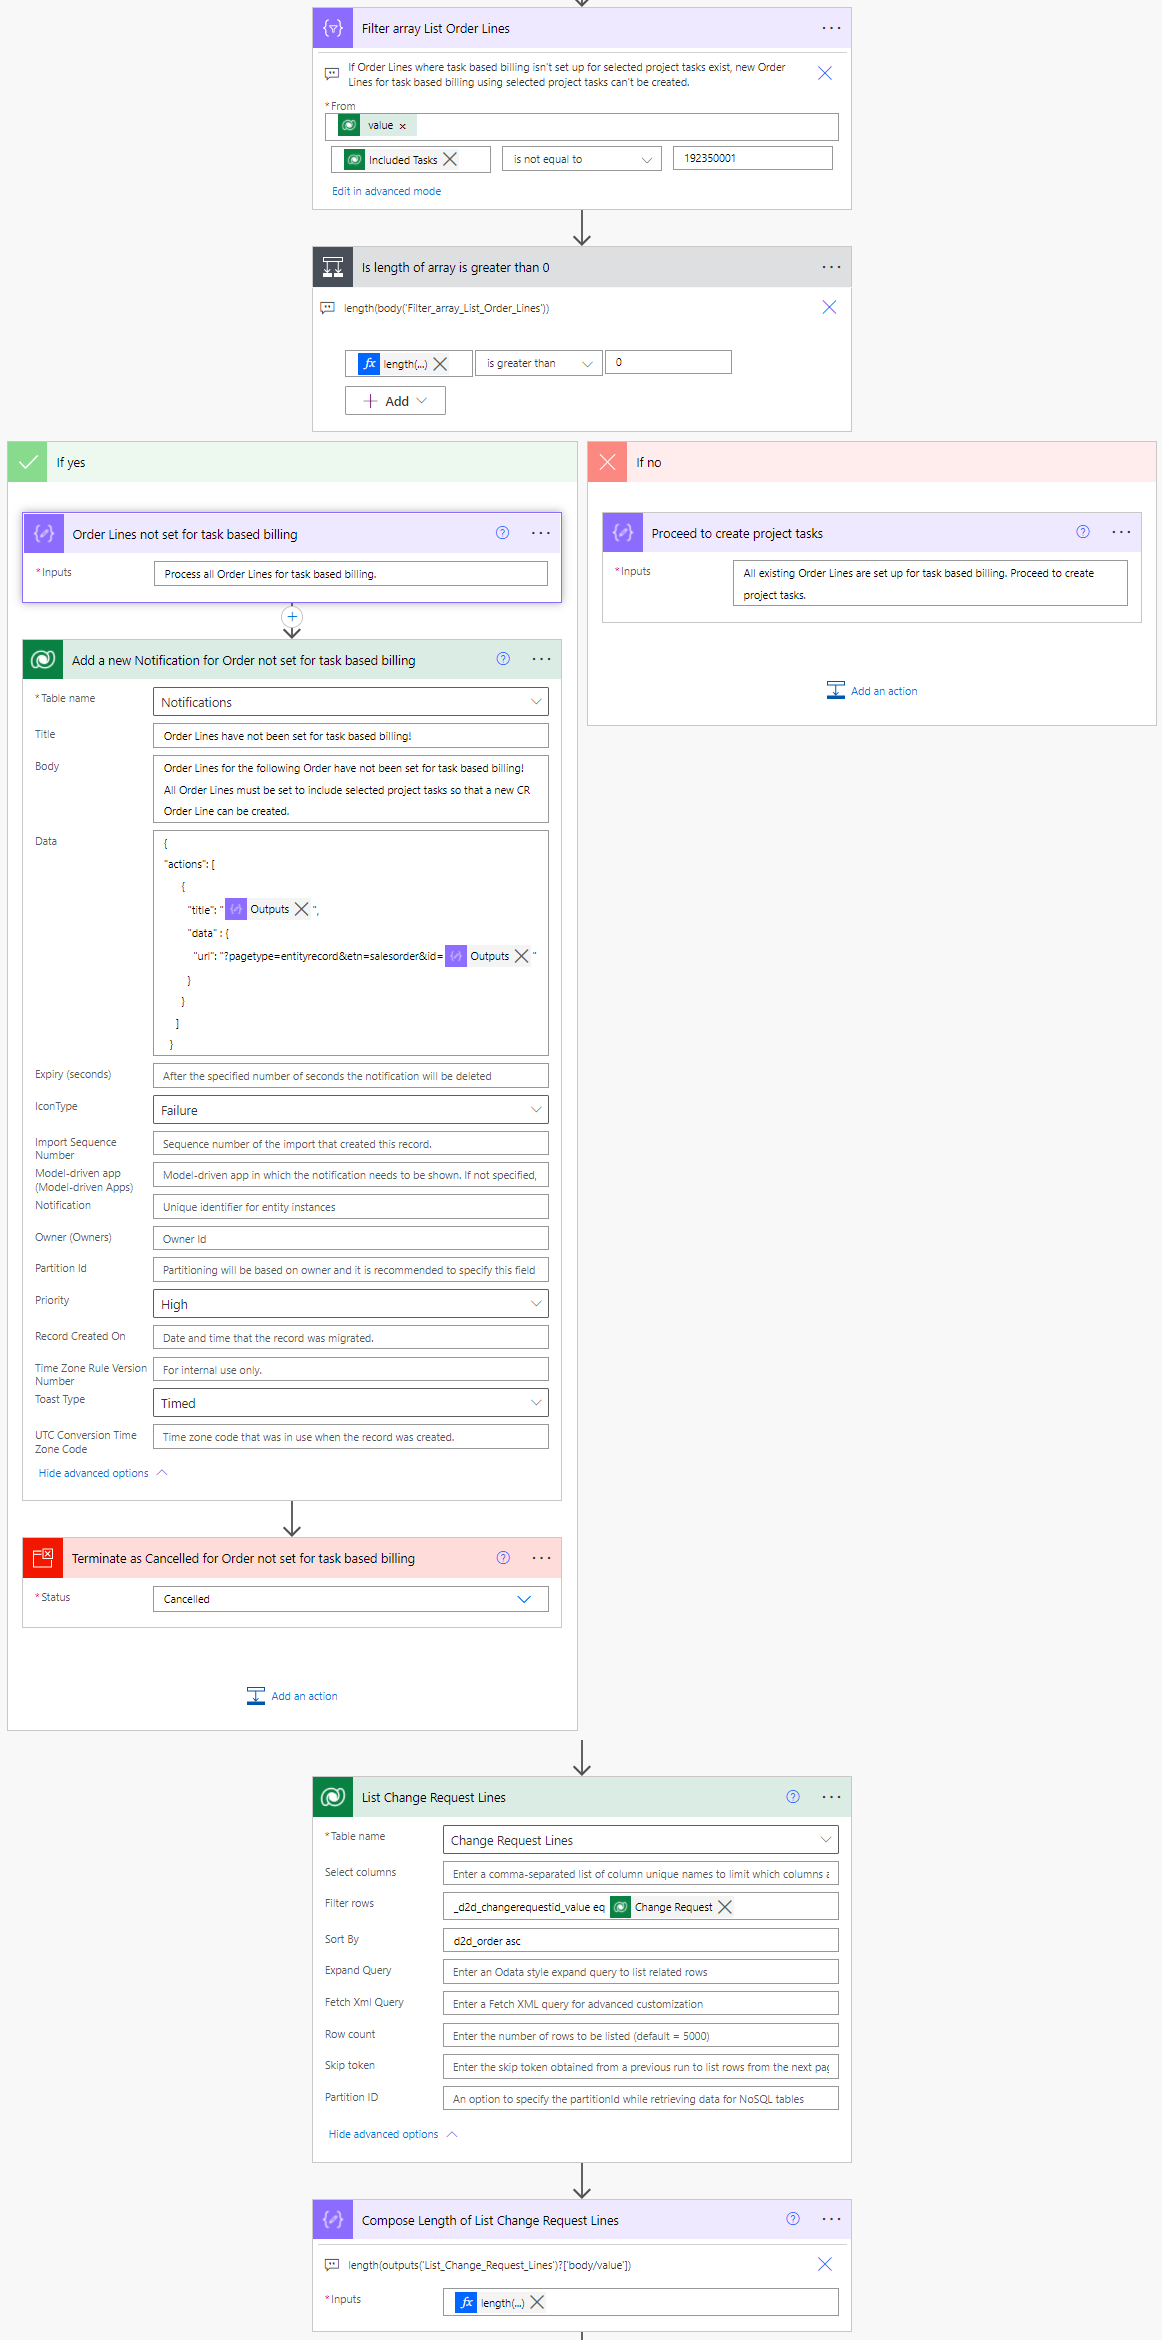
Validating existing Order Lines
Before we get our hopes up and run additional logic in the flow, we need to make sure the Order we’re planning on appending a CR to meets prerequisites: If Order Lines with Included Tasks set to Selected project tasks only (value 192350001) don’t exist, appending a CR to such an Order won’t be possible. A filter array is thus used to filter all Order Lines that were listed as part of the flow’s initial actions. If results are found where Included Tasks are not set to 192350001 (length is greater than 0), a failure notification is sent to the model-driven app and the flow will terminate as canceled. If the related Order has Order Lines where Included Tasks are set to 192350001, the flow will proceed to list Change Request Lines related to the CR by sorting the listed rows based on the custom Order column in ascending order. A compose action is then used to store the length of the number of CRLs returned. Why? The more PSS has to take in, the longer a delay we’ll eventually need in the flow for PSS to process changes.
Calling the Project schedule APIs
Now that we’ve validated that a CR can be appended to an order and project, it’s time to call the Project schedule APIs to create tasks based on the CR. This is where the importance of transactional consistency comes into play. The schedule APIs need to be called before a new Order Line is created in Dataverse. This way transactional consistency can be achieved and the end result isn’t an empty shell of an Order Line.
Initial actions in the PSS scope
The initial actions in the PSS scope are all about getting our hands on different rows that we’ll need when calling the APIs. The default Team Member role and the default Bookable Resource Booking row for Generic Resource are listed so that we can add a Generic Resource on the project team if the team doesn’t already have one. An Operation Set is also created in the initial PSS actions.
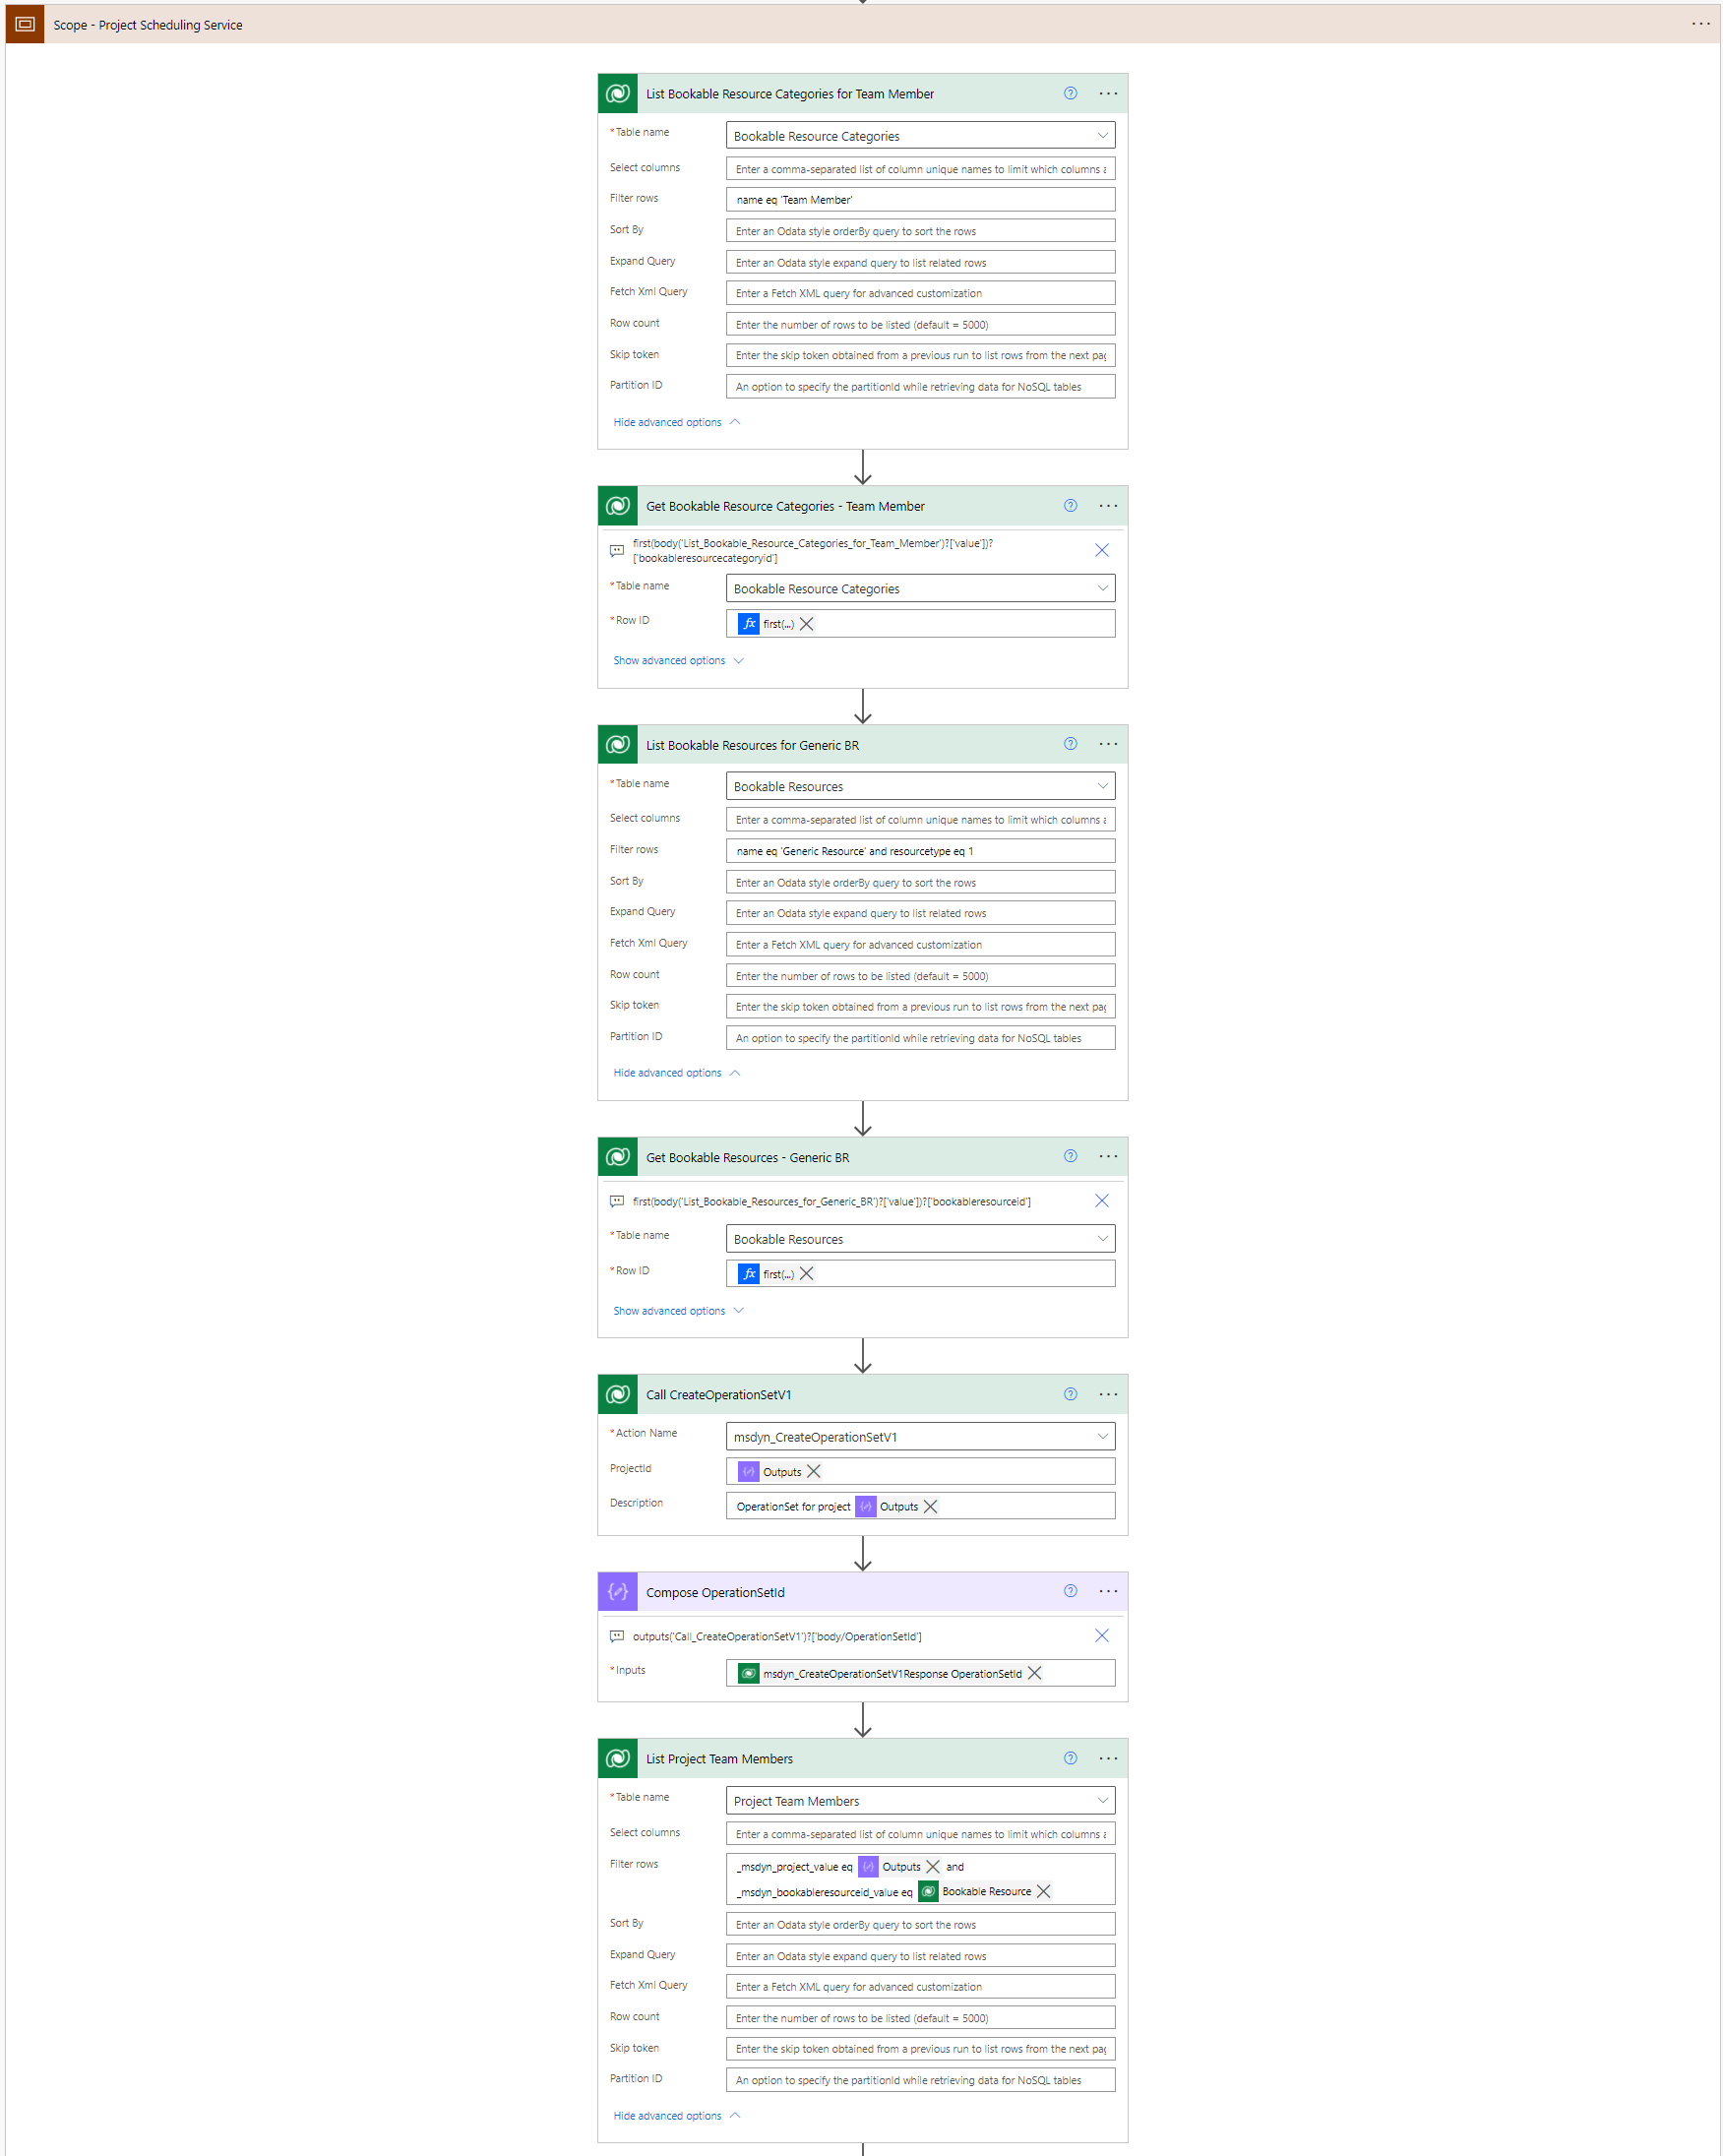
Validating generic Project Team Members
The next step is to validate whether or not a generic team member is on the project team. If the condition returns true, a Generic Resource is on the project team and all that needs to be done is to get the related Project Team Member row. If the project team doesn’t have a generic team member, the CreateTeamMemberV1 API is called by calling the msdyn_CreateTeamMemberV1 unbound action. The JSON for calling the team member API is below.
{
  "TeamMember": {
    "msdyn_name": "Team Member",
    "msdyn_allocationmethod": 192350000,
    "msdyn_project@odata.bind": "msdyn_projects(projectid here)",
    "msdyn_resourcecategory@odata.bind": "bookableresourcecategories(bookableresourcecategoryid here)",
    "msdyn_bookableresourceid@odata.bind": "bookableresources(bookableresourceid here)"
  }
}
The final compose action in this step is to compose @odata.type for use in JSON further down the line in the flow. By composing the value we don’t have to escape the @ with another @ in the JSON.

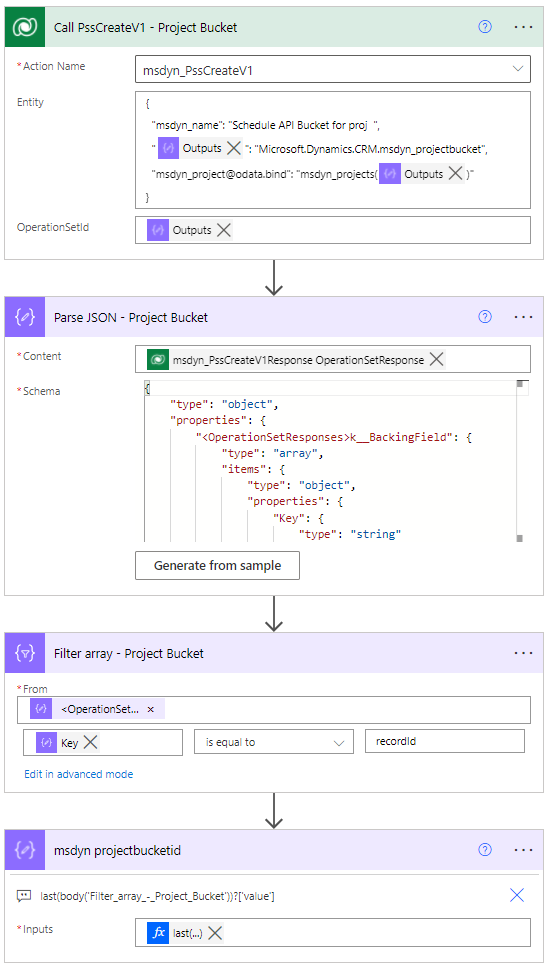
Creating a Project Bucket
The Project schedule API msdyn_PssCreateV1 received support for creating and deleting Project Buckets in the November 2021 release of Project Operations. It makes sense to create all CR-related tasks in a bucket of their own so before we create any tasks, we’ll create a new bucket. The JSON for the action is:
{
  "msdyn_name": "Schedule API Bucket for proj  ",
  "@odata.type": "Microsoft.Dynamics.CRM.msdyn_projectbucket",
  "msdyn_project@odata.bind": "msdyn_projects(
msdyn_projectid here)"
}
Creating Project Tasks and Resource Assignments
Now that a bucket has been created it’s time to create the actual Project Tasks based on the CR’s Change Request Lines. Tasks are created by calling the msdyn_PssCreateV1 API with the unbound action msdyn_PssCreateV1. All new tasks will be created under a summary (parent) task, which is created first. Not a whole lot of metadata is needed for a new summary task, compared to sub (child) tasks. The navigation properties with Odata.binds and the odata.type property is naturally needed but in addition to those, we only need a subject (name), Outline Level, and LinkStatus. Outline Level has to be 1 as a summary task is being created. LinkStatus is related to task-based billing and the value of 192350000 (No link to Billing setup) means that the task is not linked to a billing setup. This is done later in the flow. The parse JSON and filter array actions are used for getting the GUID of the newly created summary task. Again, my aforementioned guide to schedule APIs explains these actions in more detail. The JSON for creating a summary task is:
{
  "msdyn_LinkStatus": 192350000,
  "msdyn_subject": "subject here",
  "msdyn_outlinelevel": 1,
  "@odata.type": "Microsoft.Dynamics.CRM.msdyn_projecttask",
  "msdyn_project@odata.bind": "msdyn_projects(msdyn_projectid here)",
  "msdyn_projectbucket@odata.bind": "msdyn_projectbuckets(msdyn_projectbucketid here)"
}
After the summary task has been created the Change Request Lines are looped through and subtasks are created. The Outline Level for a subtask is 2 and all the remaining metadata is based on values from the related CRL. A navigation property for the parent task is also needed. The JSON for creating subtasks is:
{
  "msdyn_LinkStatus": 192350000,
  "msdyn_subject": "subject here",
  "msdyn_start": "start date here",
  "msdyn_finish": "finish date here",
  "msdyn_effort": "effort here",
  "msdyn_outlinelevel": 2,
  "@odata.type": "Microsoft.Dynamics.CRM.msdyn_projecttask",
  "msdyn_project@odata.bind": "msdyn_projects(msdyn_projectid here)",
  "msdyn_projectbucket@odata.bind": "msdyn_projectbuckets('msdyn_projectbucketid here)",
  "msdyn_parenttask@odata.bind": "msdyn_projecttasks(parent task here)"
}
The final action in the apply to each creates a Resource Assignment for the task that was just created in the loop. The Resource Assignment uses the project team’s Generic Resource. The resource was validated in previous steps. Assigning a Generic Resource on a task is of course optional, and this step is more for you to get an idea of how it’s done. The msdyn_prejectteamid navigation property has its value set with dynamic content from the team member validation steps above. Either we use the existing Generic Resource or the one that had to be created. A new Resource Assignment is created by calling the msdyn_PssCreateV1 API with the unbound action msdyn_PssCreateV1. The JSON used is:
{
  "msdyn_name": "@{items('Apply_to_each_Change_Request_Line')?['d2d_newdeliverable']}",
  "@{outputs('Compose_at_odata_type')}": "Microsoft.Dynamics.CRM.msdyn_resourceassignment",
  "msdyn_projectid@odata.bind": "msdyn_projects(@{outputs('Compose_msdyn_projectid')})",
  "msdyn_projectteamid@odata.bind": "msdyn_projectteams(@{outputs('Get_Generic_Team_Member')?['body/msdyn_projectteamid']}@{outputs('Compose_TeamMemberId')})",
  "msdyn_taskid@odata.bind": "msdyn_projecttasks(task GUID here)"
}
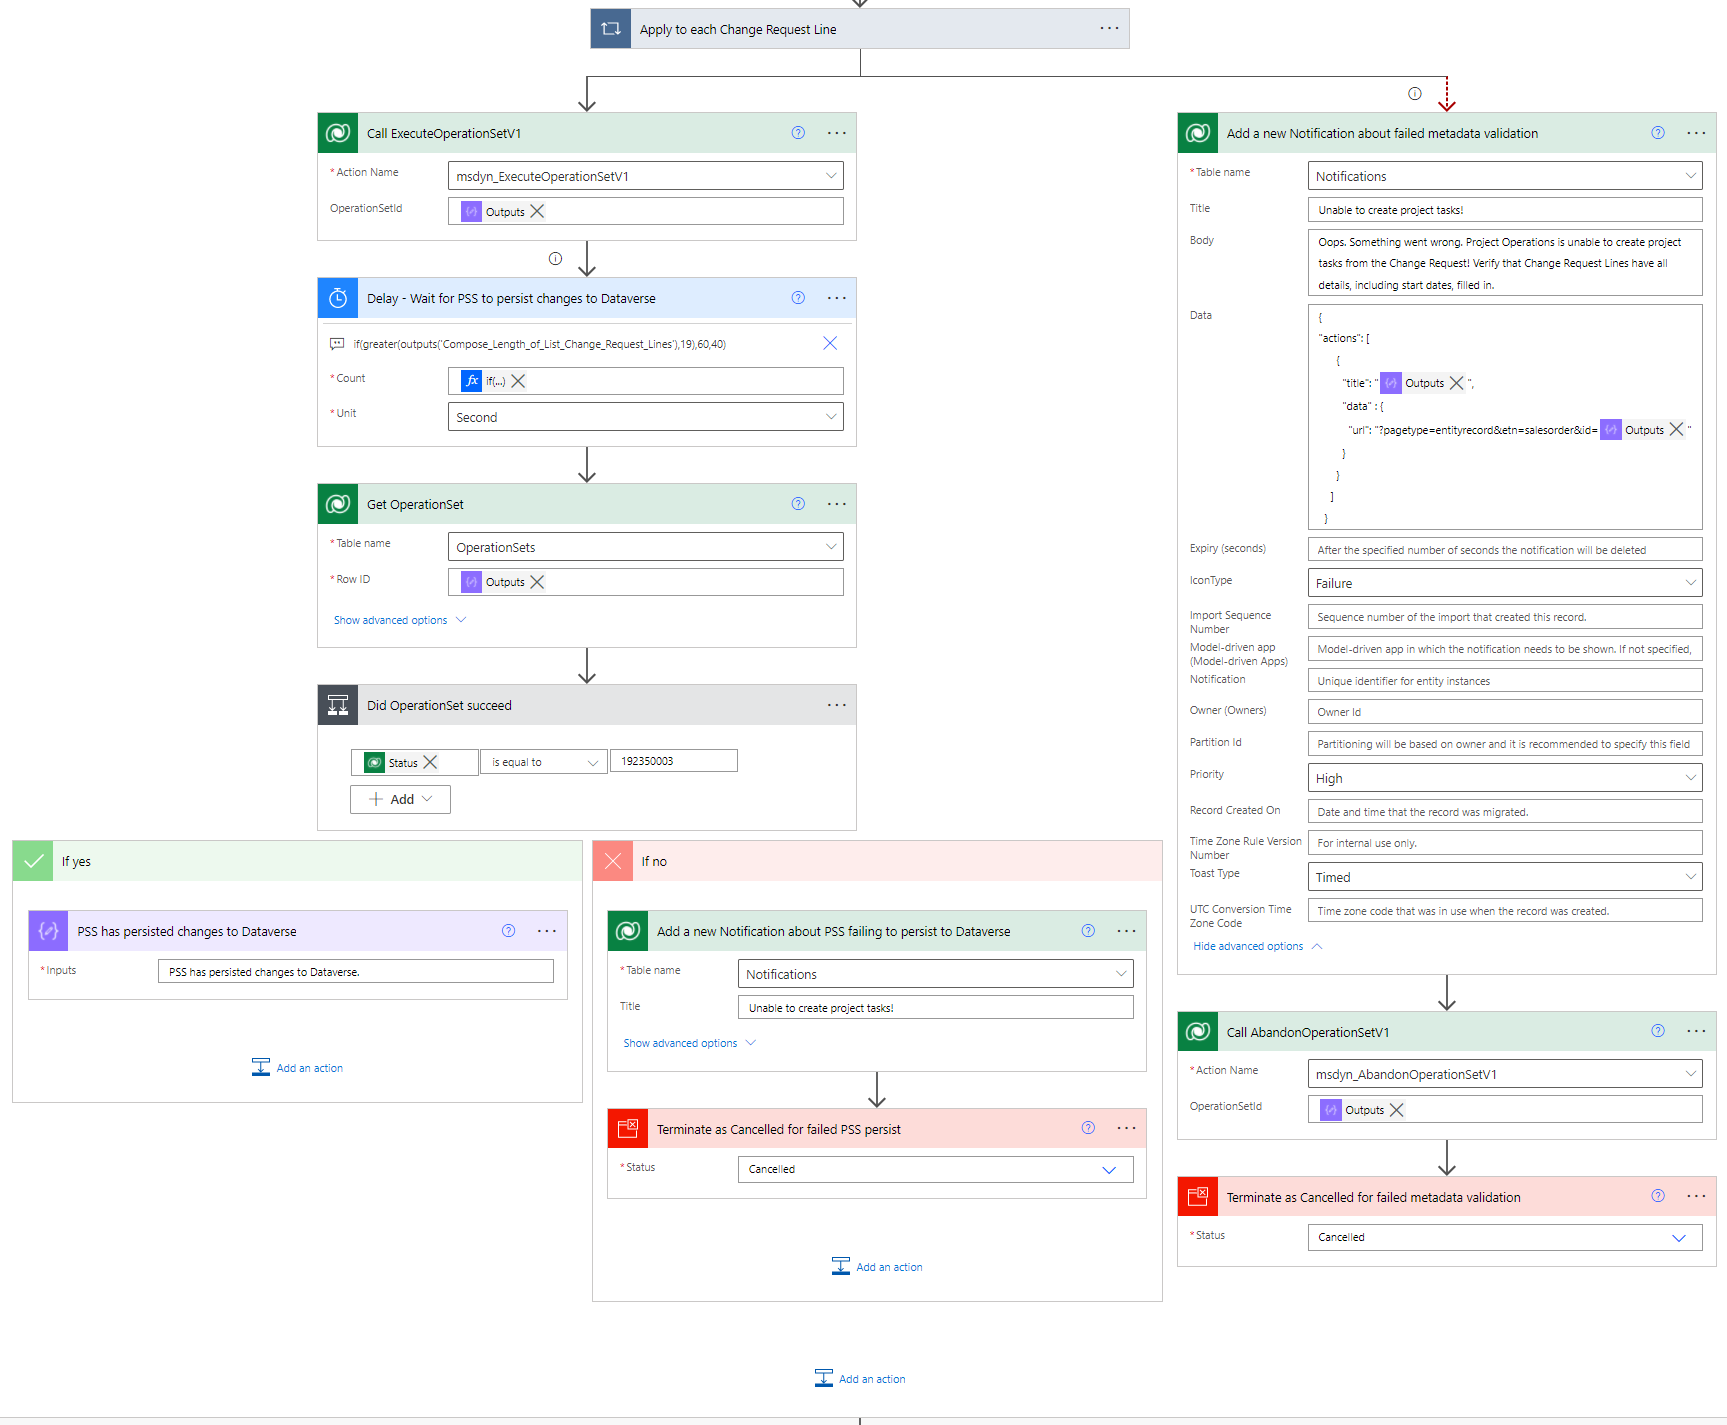
Metadata validation and executing the Operation Set
Now that all the required APIs have been called, it’s time to validate whether or not metadata validation by PSS has passed, and the Operation Set can be executed. If the apply to each loop fails, either creating tasks or assignments has not succeeded and the metadata validation by PSS has failed. If this is the case, a notification will be sent to the model-driven app.
If metadata validation is successful, the Operation Set is executed. The next delay action is very important! When the Save Service in PSS is persisting changes to Dataverse, a delay in the flow is required. Read more about expected PSS performance here. This is also where the output of the previous Compose Length of List Change Request Lines action comes into play. If there are more than 19 CRLs the delay will be for 60 seconds. If there are less than 19 CRLs the delay will be 40 seconds. The expression used in the delay action is if(greater(outputs('Compose_Length_of_List_Change_Request_Lines'),19),60,40.
We need to get the Operation Set row after the delay to validate whether or not its value is 192350003 (Completed). If it isn’t then changes are still being processed or the Operation Set has failed. In either case, a notification is sent to the model-driven app and the flow is canceled. If changes are persisted the flow moves on. This marks the end of the PSS scope in the flow.
Creating a new Order Line and setting task-based billing
We’re almost at the finish line. Now that PSS has persisted changes and new tasks have been created, a new Order Line can be created and task-based billing can be set. All of this is done towards the end of the flow so that we can guarantee transactional consistency. We’ve routed our logic through PSS first and as PSS has persisted changes, the remainder of our logic can now be executed.
A new Order Line is created first. The Billing Method for the Order Line comes from the earlier actions where we composed a value for Billing Type based on the CR row. See image 10 for where this was in the flow. On the Order Line, the label for Included Tasks naturally needs to be set to Selected project tasks only. Image 11 shows the column values for a new Order Line.
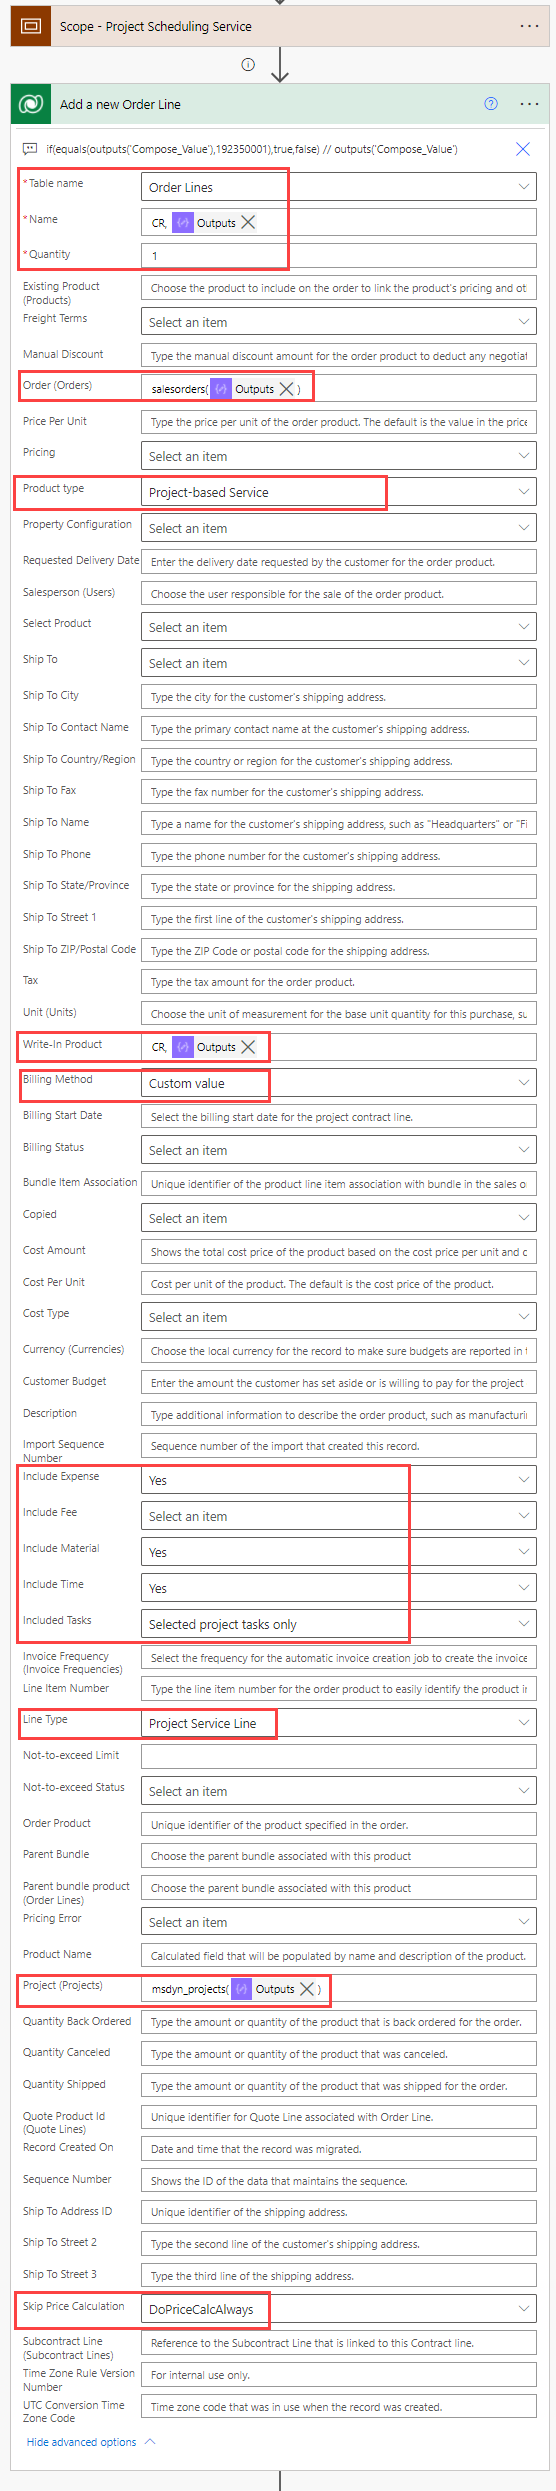
Next, all subtasks created in the PSS scope will be listed. New Project Contract Line Tasks will then be created based on the listed tasks. This way task-based billing can be set up for the new tasks. The final steps are to update the Change Request row’s status to Appended to Order and to call the bound action msdyn_CreateContractLineDetailsFromEstimate to pull the new tasks from the project’s WBS to the Order Line as Project Contract Line Details. The final action is a response, which displays a success message in the model-driven app’s UI.
And there we have it! A concept for CRs in ProjOps is now ready.
Author’s Effort and References
| Build and Write Effort | Community Blogs and Forums | MVPs Consulted | Product Group Interactions | Support Requests |
| Approximately 5 days | Several flow forum posts | Amey Holden, George Doubinski | 4 | 1 (creating new Order Lines with different Included Tasks combinations) |
Disclaimer:
All my blog posts reflect my personal opinions and findings unless otherwise stated.