
Tested on Project Operations on Dataverse version 4.11.0.156 (June 2021 update)
This post updated on August 15th, 2021.
Schedule APIs were introduced to public preview in the spring of 2021 for Dynamics 365 Project Operations and Project for the web (later P4W). They’re used to programmatically create, update, and delete what are known as scheduling tables. These tables are listed below.
| Table name | Table logical name |
| Project | msdyn_project |
| Project Task | msdyn_projecttask |
| Project Task Dependency | msdyn_projecttaskdependency |
| Resource Assignment | msdyn_resourceassignment |
| Project Bucket | msdyn_projectbucket |
| Project Team Member | msdyn_projectteam |
The Why and the How of Schedule APIs
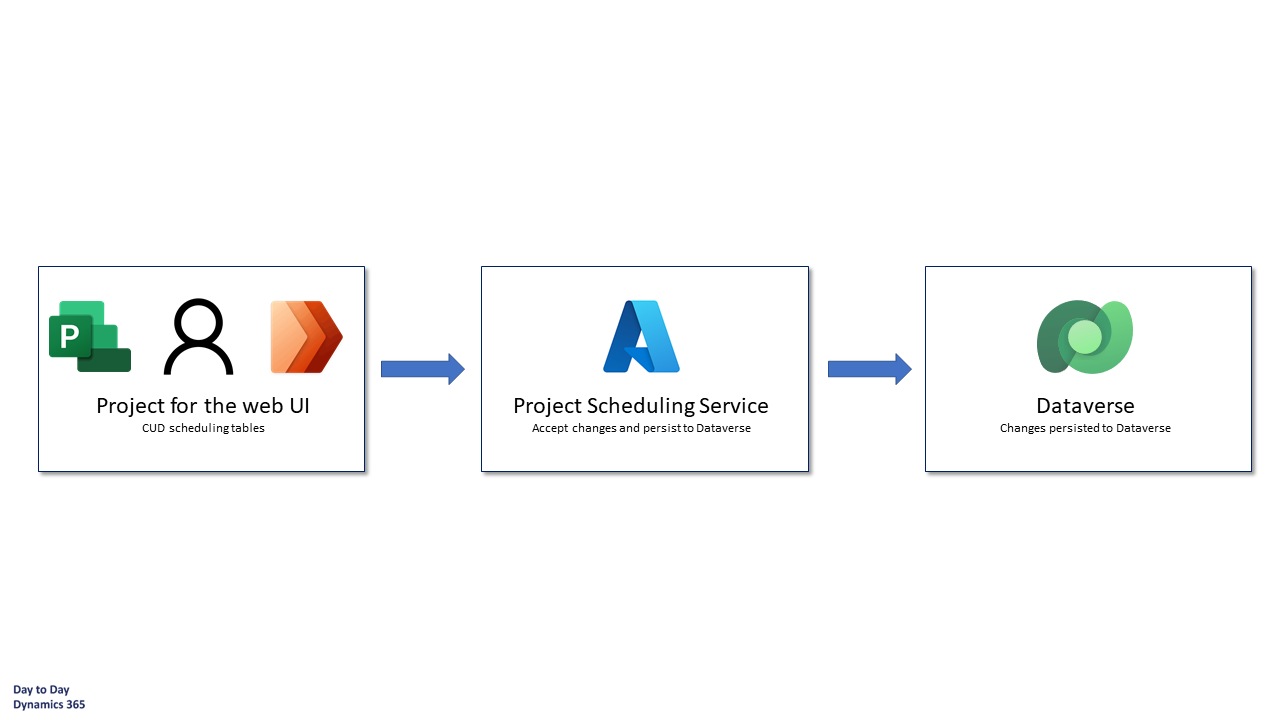
You might be wondering why new, specific APIs are needed to CUD the aforementioned tables. The reason for that is in the overall architecture of Project for the web, which is the infused project management and project planning experience in Dynamics 365 Project Operations. The scheduling engine of P4W, the Project Scheduling Service (later PSS), is hosted in Azure. As P4W is build on the Power Platform i.e it runs on Dataverse, PSS is a means of enabling a fast experience with co-authoring capabilities. Those of you who have experience in Dataverse know that it can be a bit slow and it doesn’t offer co-authoring like we’re all used to from tools like Word, Excel, and Power Point.
How PSS works
When a user changes values in the P4W UI for columns like task start/end, duration or effort, the P4W UI talks to PSS in Azure. PSS then persists changes to Dataverse. In other words when a user makes a change to, for example a task’s start date, data is not directly written to Dataverse. It goes to PSS, which then accepts and persists it to Dataverse. If the asynchronous operation persisting changes fails, changes made in the UI won’t be written to Dataverse and the user sees the data roll back in the P4W UI. An example of such a case is when a user is attempting to delete a task but that task already has dependencies like Actuals created against it.
Implementing custom logic around scheduling tables
As data might not get persisted successfully to Dataverse in every scenario, additional thought has to be put into custom logic built around scheduling tables. If custom logic fails and Dataverse is rolled back, PSS will be unaware of it. If custom logic can be routed through PSS, it’s easier to achieve transactional consistency. Instead of updating a scheduling table after updating table x in Dataverse, update the scheduling table first using the Scheduling APIs. When changes are persisted to Dataverse, then update table x in Dataverse. This way transactional consistency can be achieved in a single transaction.
How Schedule APIs are used
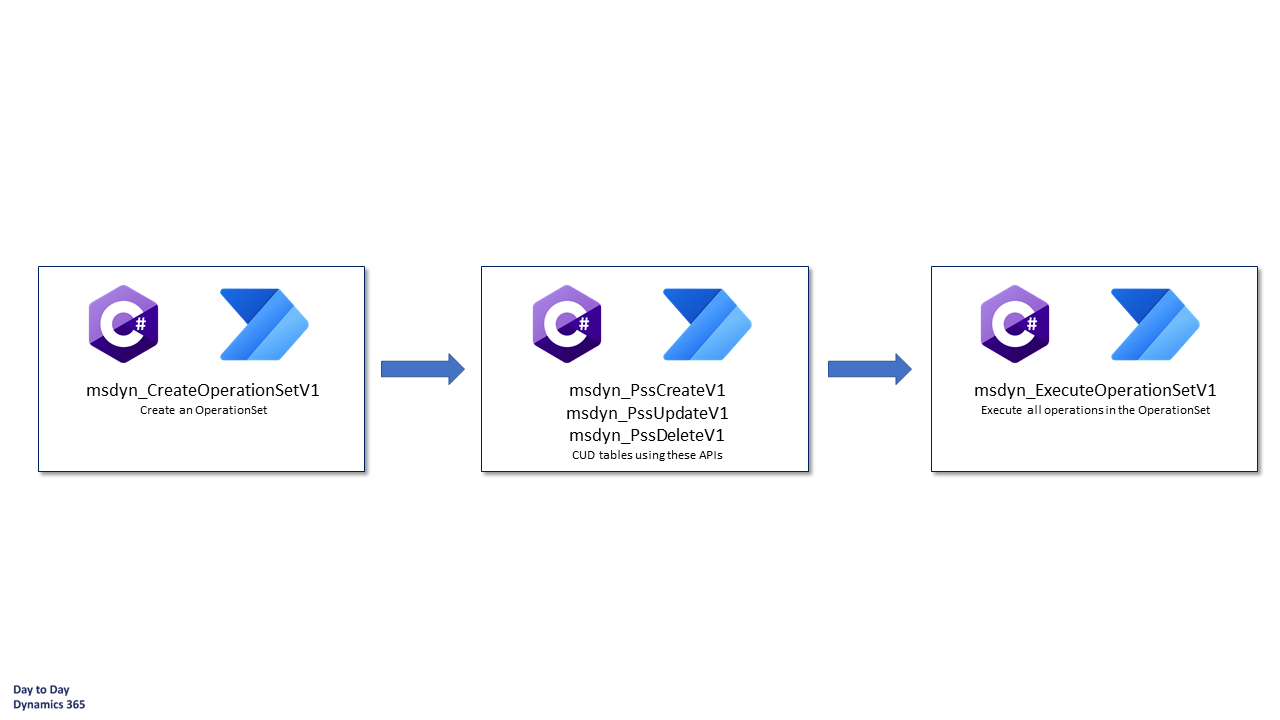
When Schedule APIs are used, operations are batched into an OperationSet, which is then executed. The only exceptions are the APIs used to create Projects (msdyn_CreateProjectV1) and Project Team Members (msdyn_CreateTeamMemberV1). All other scheduling tables supporting CUD operations are executed in a single transaction in an OperationsSet. They either all succeed or they all fail. Image 2 illustrates how OperationsSets work. There are limits and know issues as the APIs are in preview. One specific limit is important to understand when testing the APIs: OperationsSets are limited to a maximum of 10 open OperationSets per user.
Custom project templates
When I was thinking of scenarios for using Schedule APIs, I came up with a thought of creating a very simple project template solution. While the solution won’t add a considerable amount of additional value on top of the msdyn_CopyProjectV3 action, it does provide a starting point for a project template framework that the community can take and refine. It also allowed me to easily pool different create operations into a single OperationSet, so I could create rows in the different scheduling tables in one go.
An ERD of the simple project template solution is seen in image 3. The idea is very straightforward:
- A Project Template has Project Template Tasks.
- Project Template Tasks are self-referencing as a task can be a parent/summary task or a subtask.
- A task can have several roles (Bookable Resource Category) related to it so a manual intersect table Project Template Task Role is used to tie together tasks and roles.

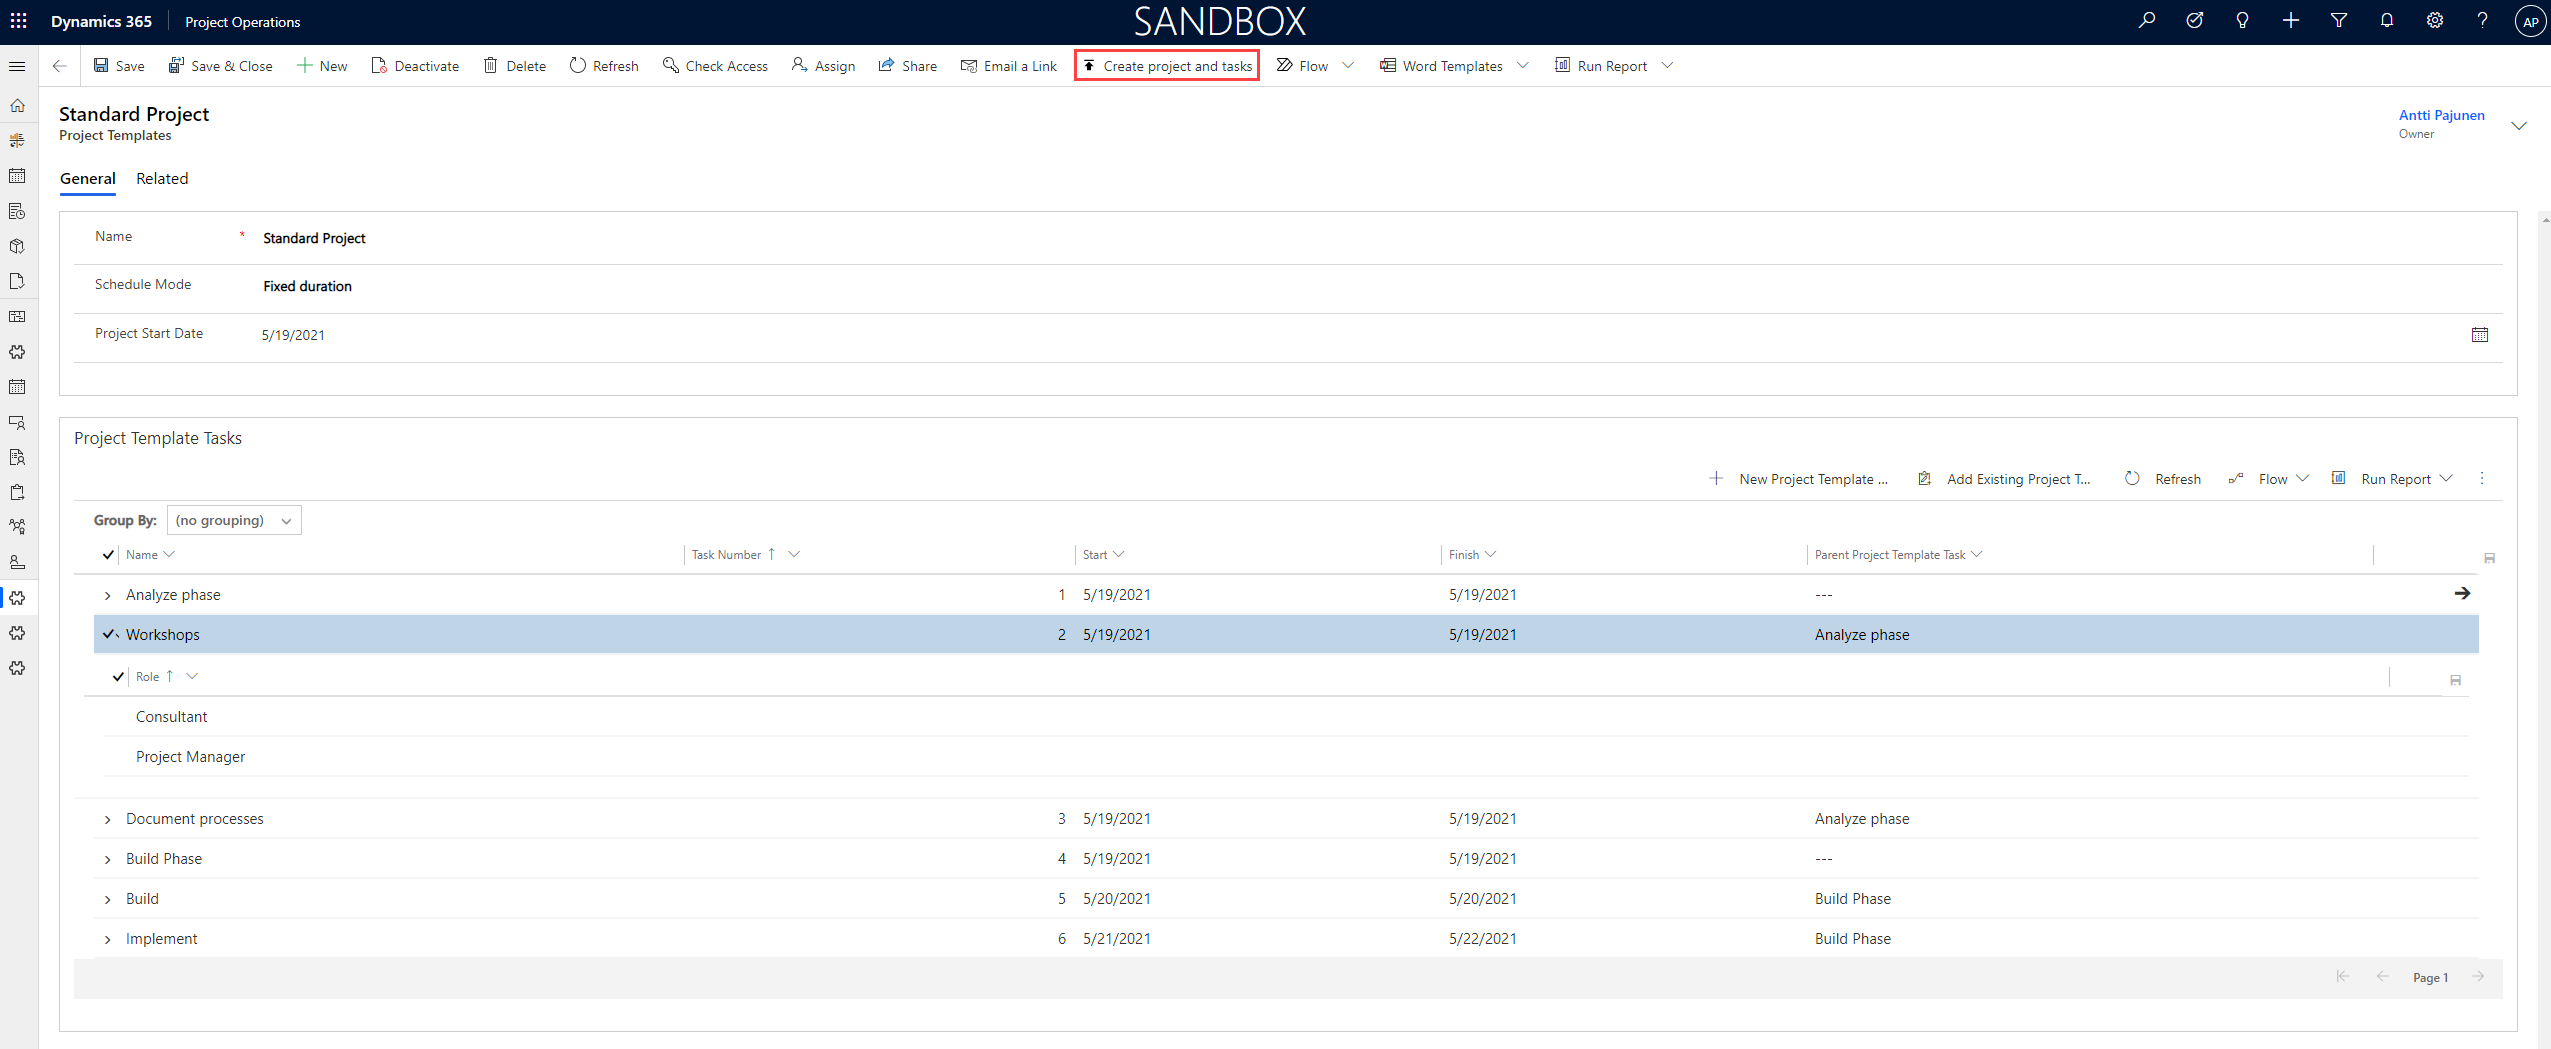
I’ve used an OOTB nested grid to display Project Template Tasks and Project Template Task Roles on the Project Template table’s main form. As always with editable grids and nested grids, the UX is clunky and crude but it’s the best we have without building a custom canvas app or a PCF. It will suffice for this small concept. The creation of a new project is fired off from the command bar button, which is created using RibbonWorkbench SmartButtons.
Schedule APIs with Power Automate
By far the trickiest part of using the new Schedule APIs is using them with Power Automate. First off I want to make absolutely clear that the APIs are best used pro-code in C#. There are C# code samples on the docs page. A developer can call the APIs with a significantly lower amount of work than what it takes to achieve proper results in low-code. As I’m writing this blog post, some of the OOTB Web API actions for Schedule APIs can’t be called from Power Automate with the action Perform an unbound action. This is a know issue that is being worked on. The only solution is to create a custom connector to call the Web API if connectors are to be used. Again, just use C# to get all this done a lot faster.
Update:
The bug with Power Automate has been resolved and the Perform an unbound action action can be used to call Schedule APIs. See my blog post here for more information.
Custom connector for msdyn_PssCreateV1
Let’s run though an image intensive chapter to understand how a custom connector is created. The following images cover a custom connector that is used to create project tasks. The main flow that is covered later will also include a custom connector for resource assignments but only the JSON for its request body is covered in this blog post. It’s trial and error to figure out the exact code and JSON needed for the Schedule APIs so this is a new feature that requires patience.
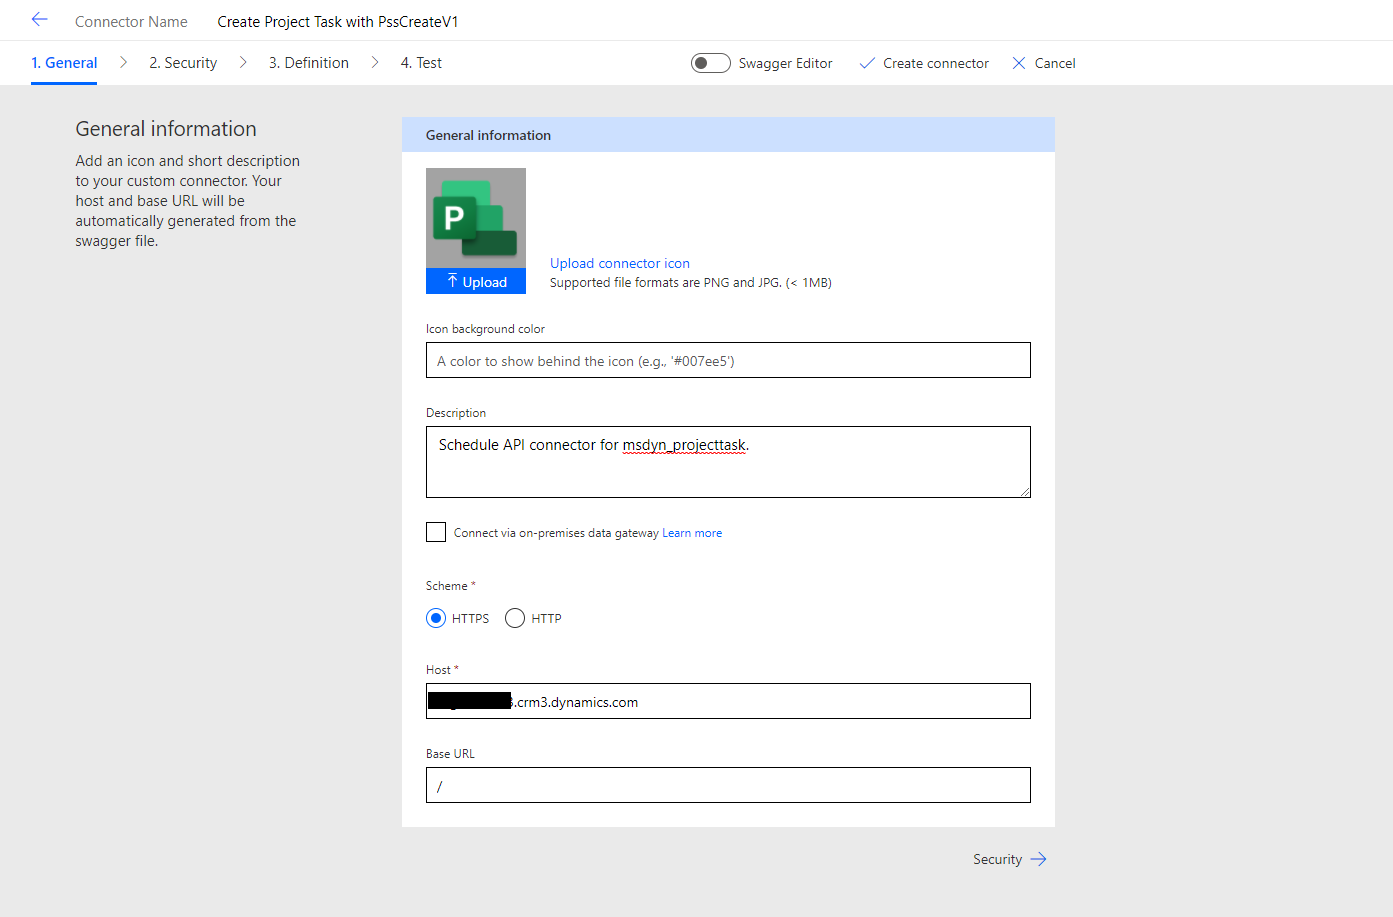
When a custom connector is being created, the 4-stage creation process will run us through the general, security, definition, and test tabs.
Scheme: HTTPS
Host: URL of your D365 environment without https://
Base URL: This can be left to /
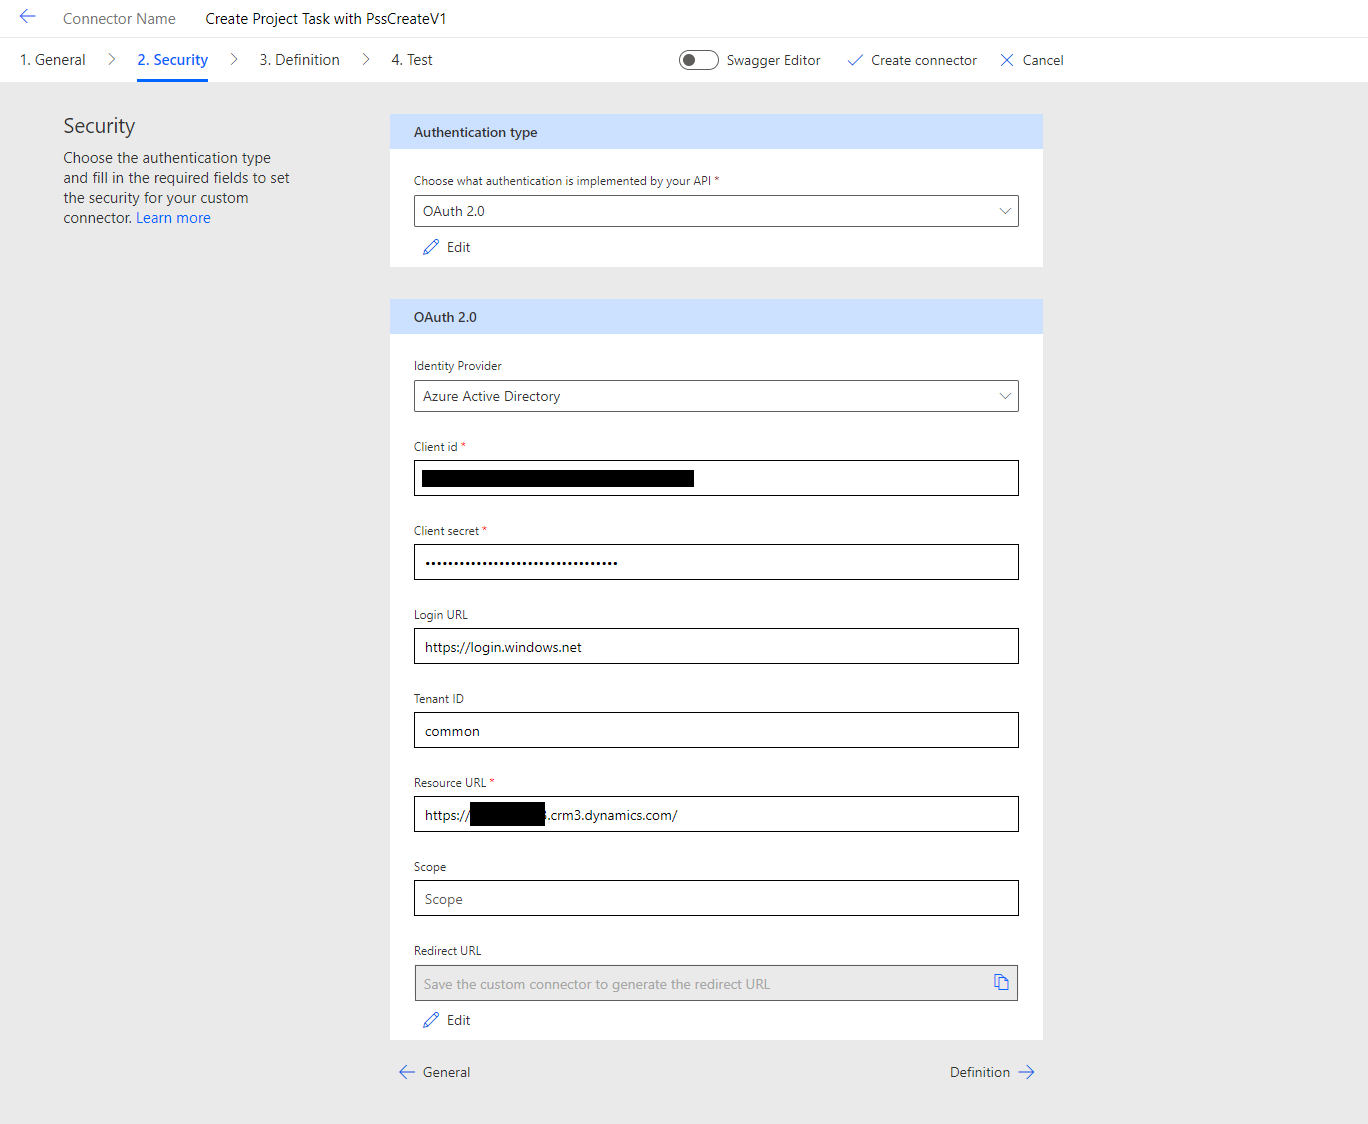
This custom connector requires and AAD app with permissions for D365. There are several posts about AAD apps with custom connectors in the community so creating one is outside the scope of this blog post.
Authentication: OAuth 2.0
Identity Provider: Azure Active Directory
Client id: AAD app id
Client secret: AAD app secret
Login URL: https://login.windows.net
Tenant ID: common
Resource URL: You D365 environment with https://
Scope: Leave empty
Redirect URL: This will be generated when the custom connector is saved. Will be used as a Redirect URI in the AAD app.
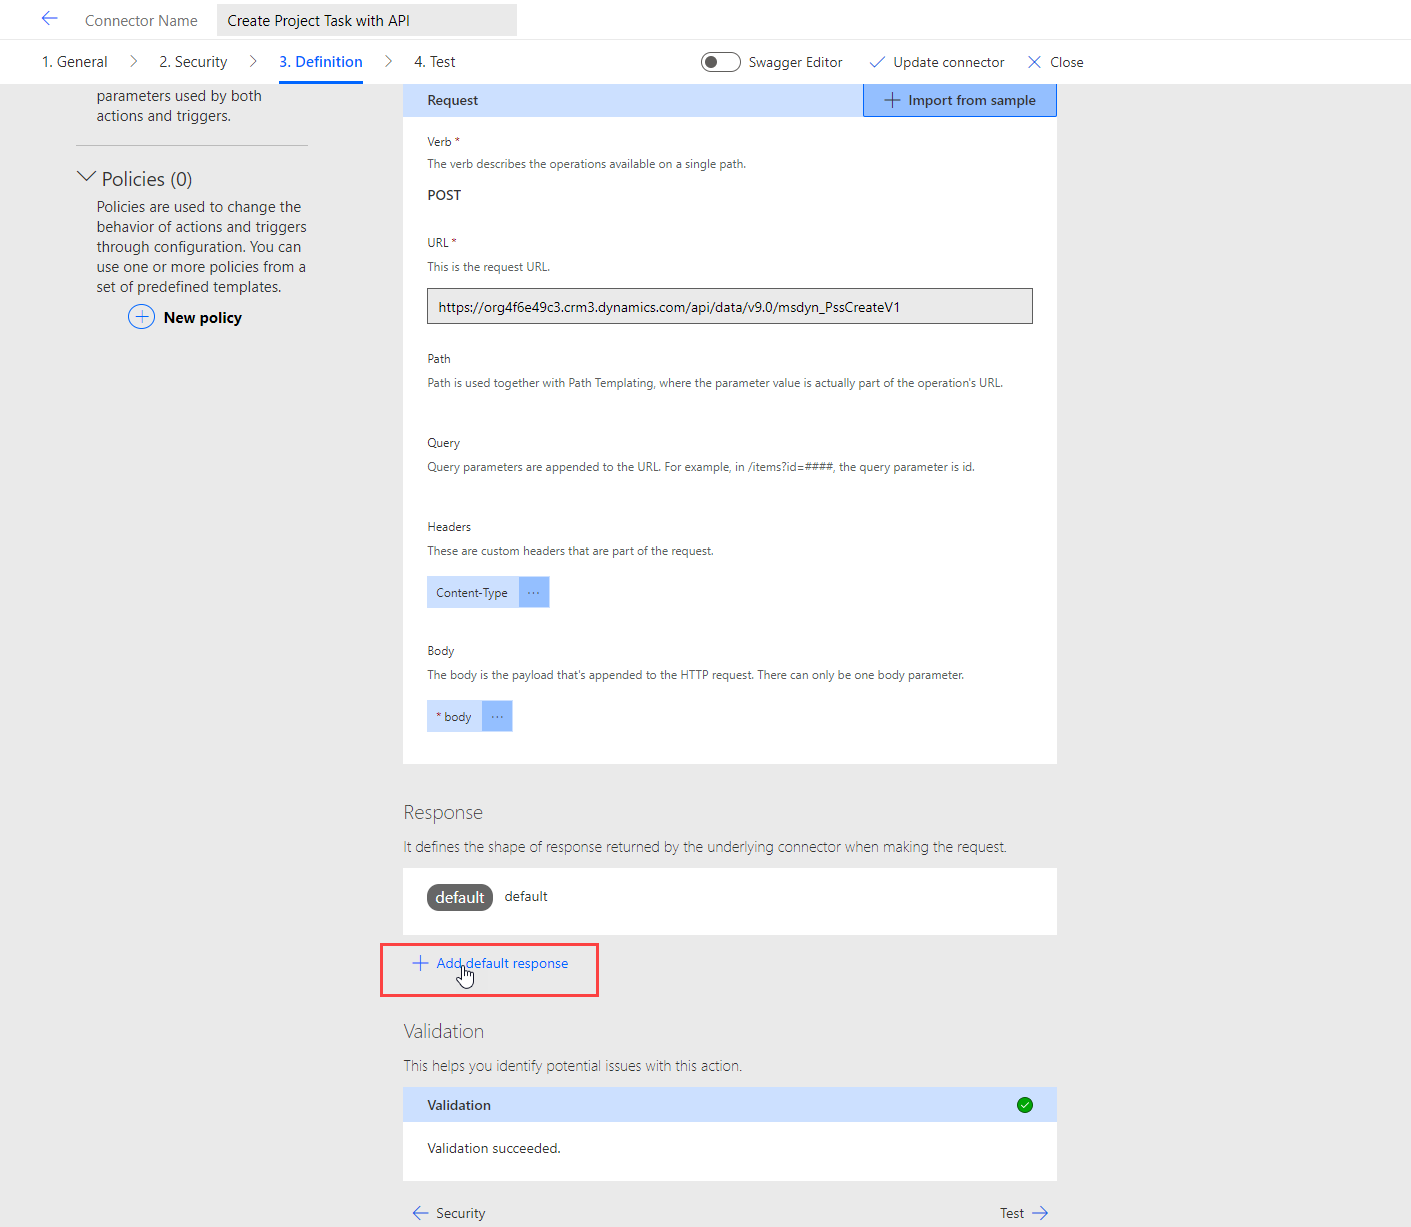
Fill in details under the General section as per your preference. The next step will be to create a request body for the connector.
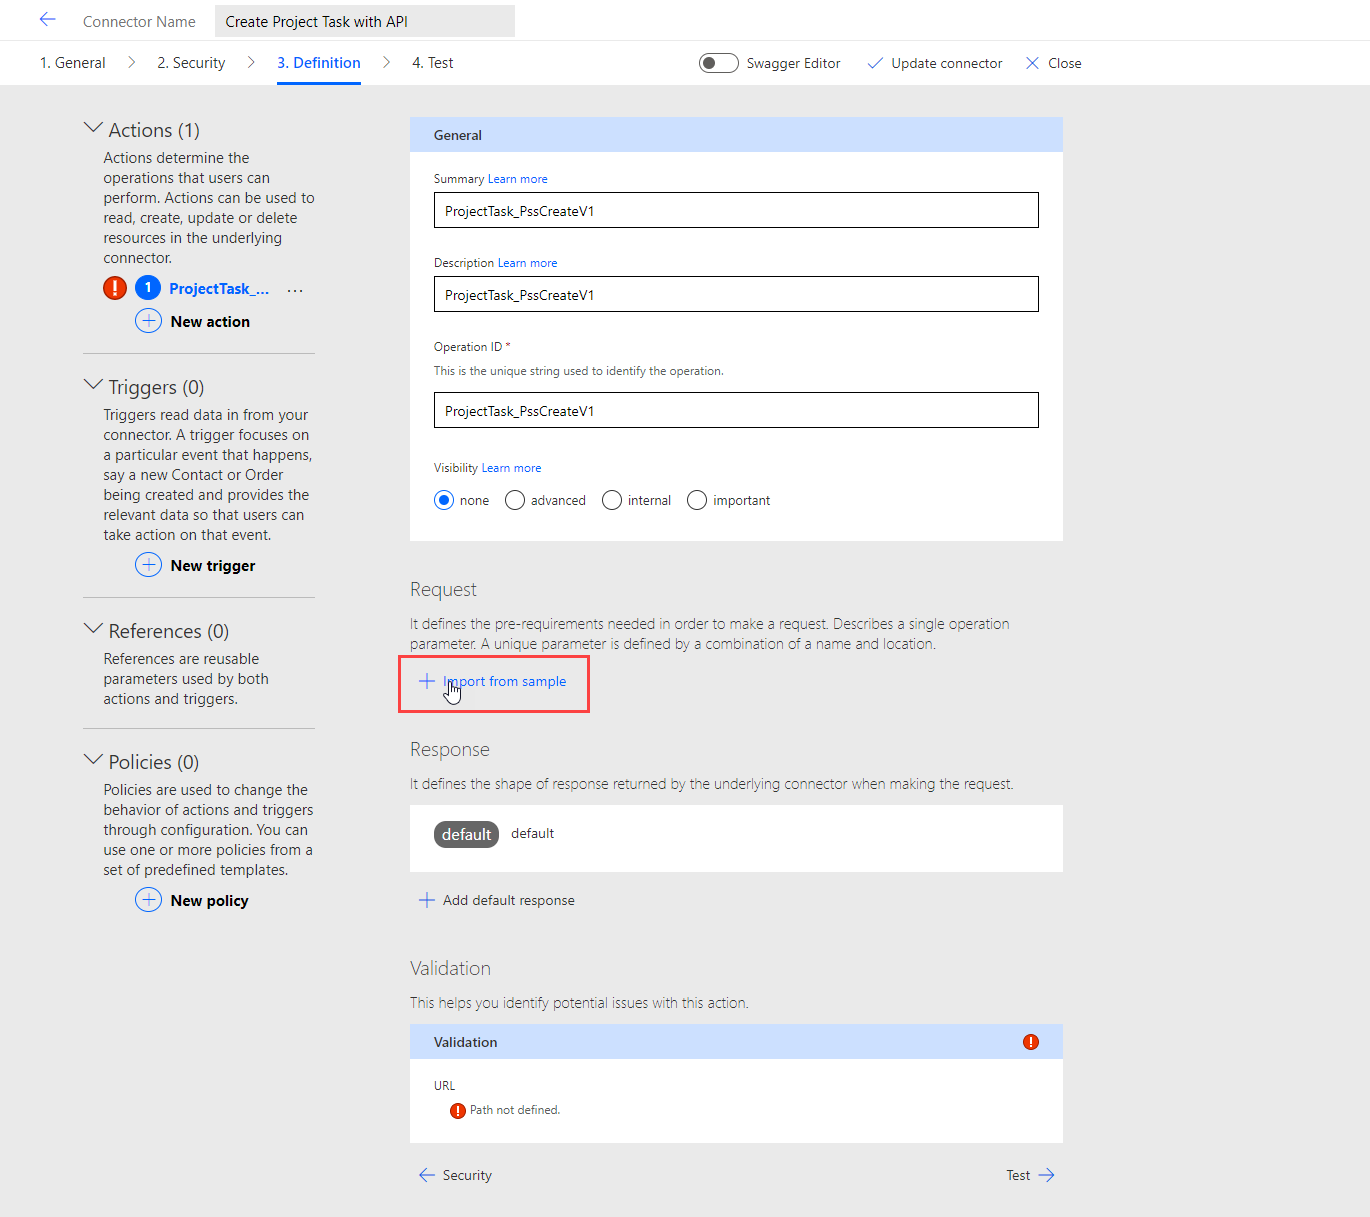
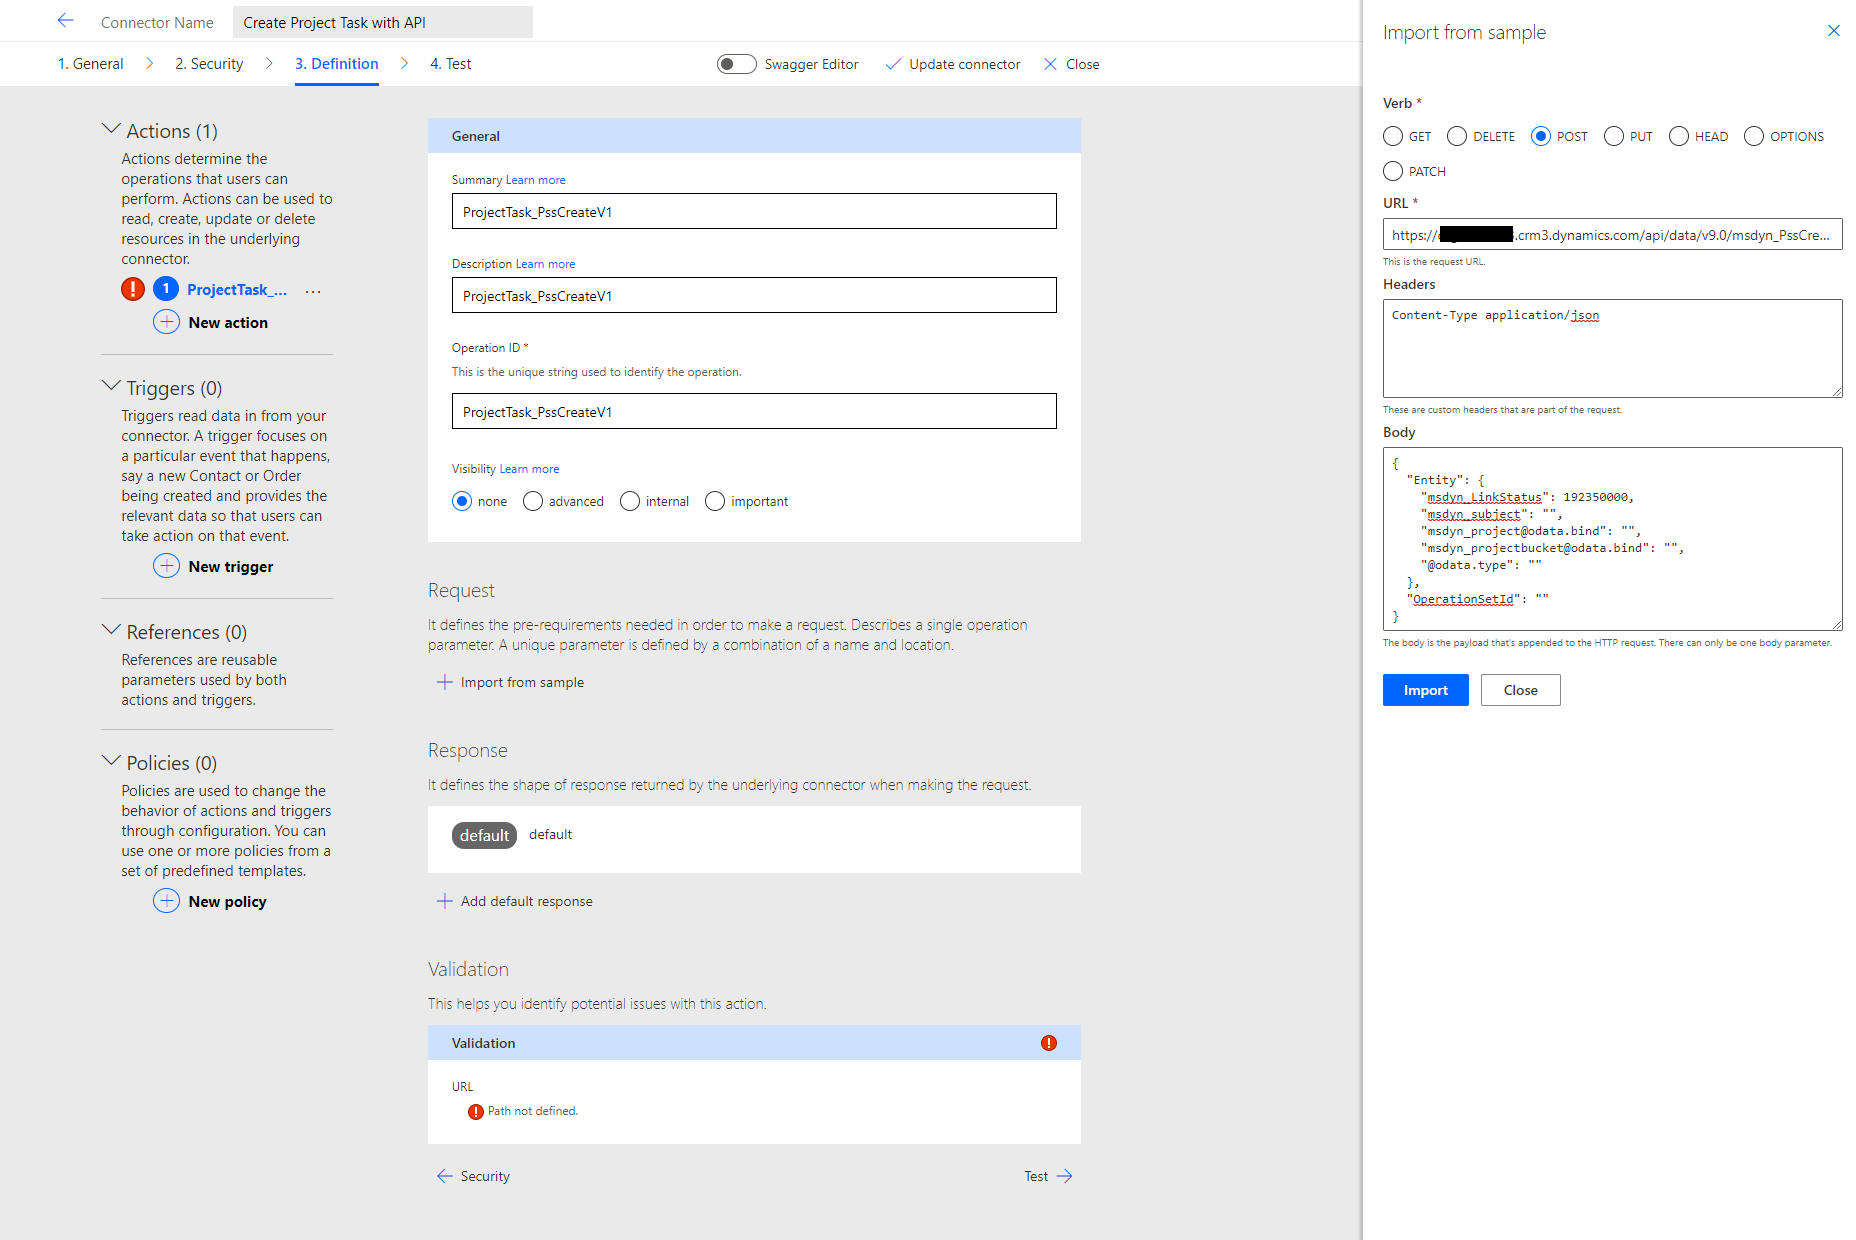
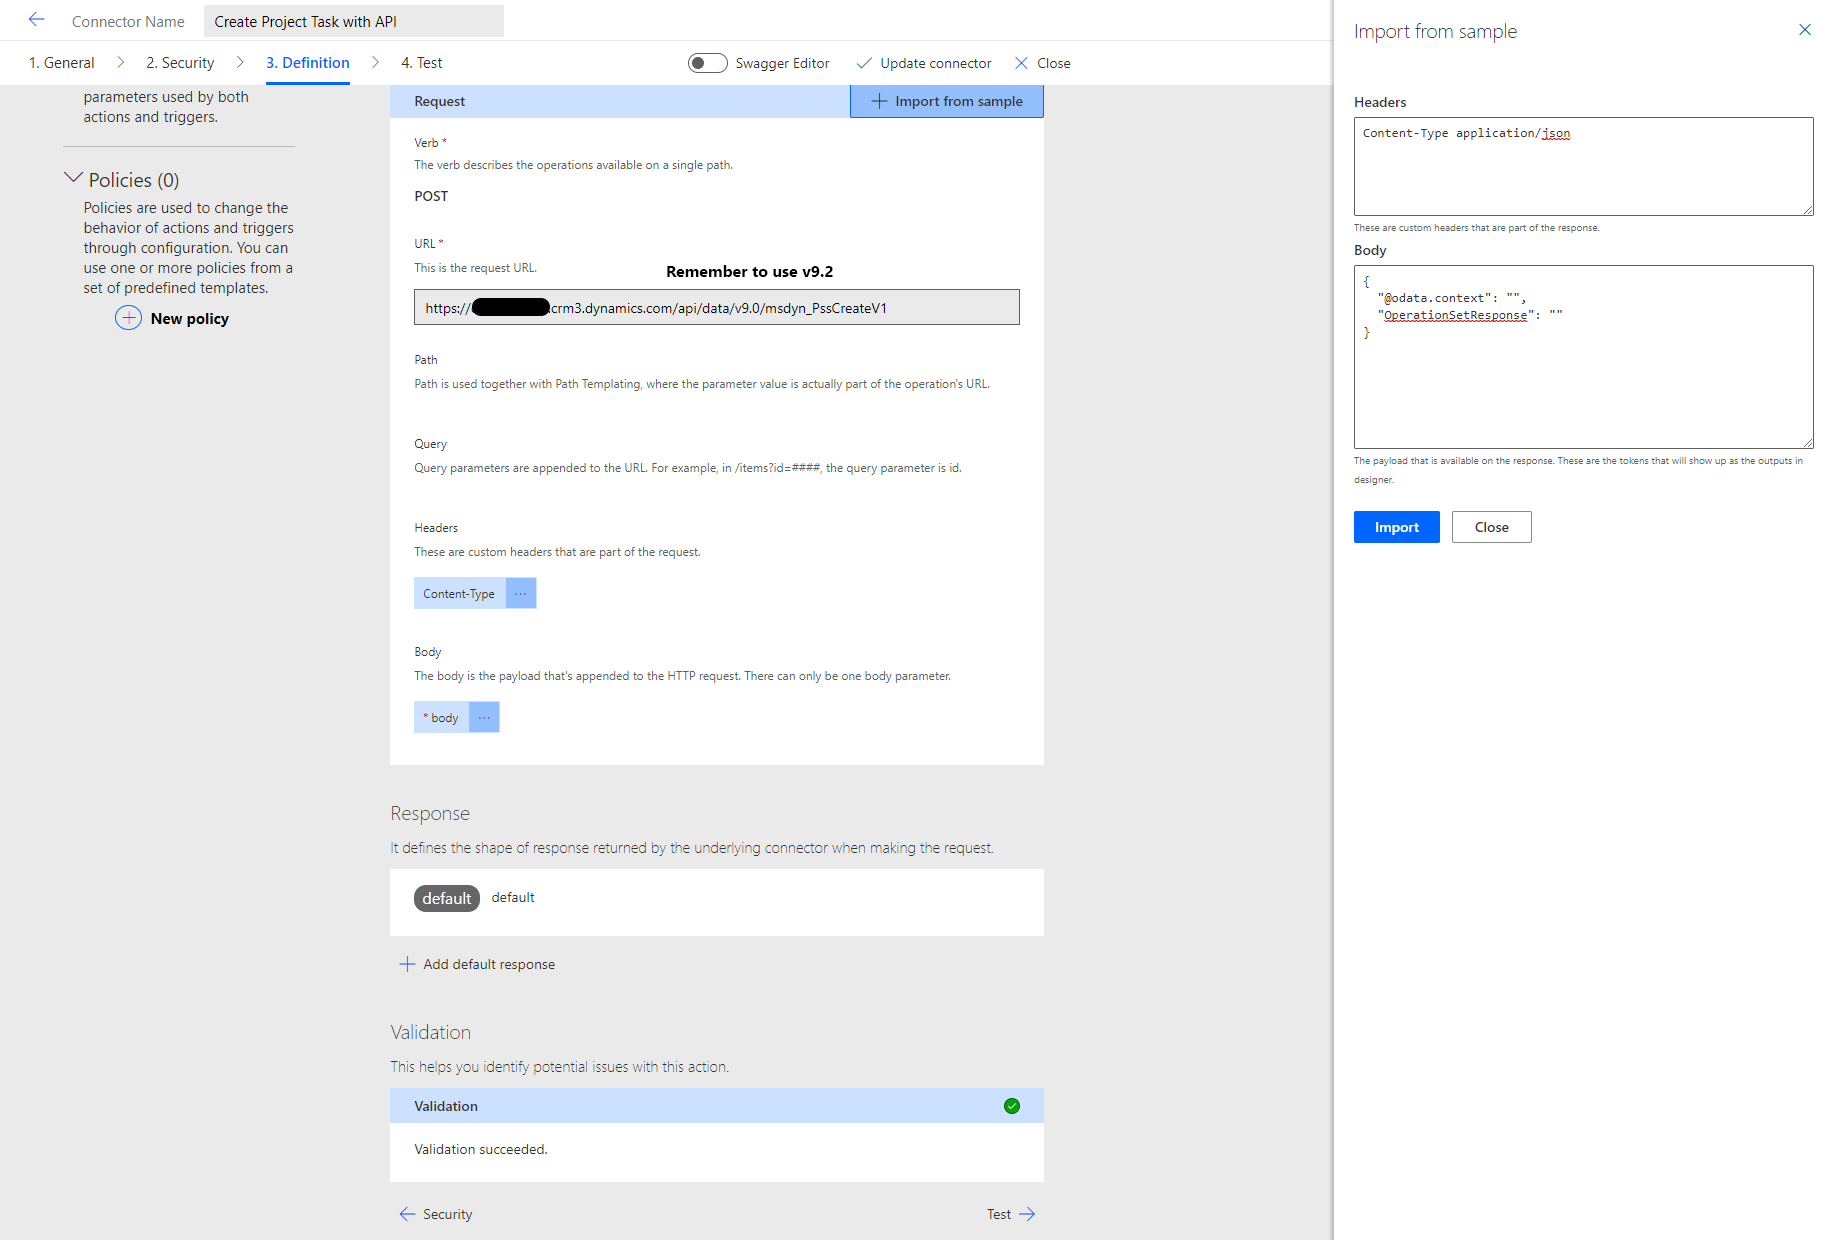
This is where the request body will be filled for the API that will be called. As this connector creates a project task, the used verb is POST. The URL used is:https://yourEnvHere.crmX.dynamics.com/api/data/v9.2/msdyn_PssCreateV1
Be sure to use the latest Web API version, which at the time of writing this blog post is v9.2. The JSON that I’ve used for creating tasks is below. The difference between the code snippet and image 8 is in start and finish values for tasks. When using custom project templates, a reference to parent tasks would also need to be included in the JSON.
{
  "Entity": {
    "msdyn_LinkStatus": 192350000,
    "msdyn_subject": "",
    "msdyn_start": "",
    "msdyn_finish": "",
    "@odata.type": "",
    "msdyn_project@odata.bind": "",
    "msdyn_projectbucket@odata.bind": ""
  },
  "OperationSetId": ""
}
When the request body is created, make the following parameters required and populate them with default values for schema bodies:
Header
Parameter: Content-Type
Is required: Yes
Default value: application/json
Body
Parameter: body
Is required: Yes
Schema Properties under parameter body
Schema Property: @odata.type
Default value: Microsoft.Dynamics.CRM.msdyn_projecttask
Is required: Yes
Schema Property: msdyn_LinkStatus
Default value: 192350000
Is required: Yes
It’s a good idea to also set the following Schema Properties as required:
msdyn_subject
msdyn_project@odata.bind
msdyn_projectbucket@odata.bind
OperationSetId
The next step in the connector creation process is to include a default response.
The JSON for the response is:
{
  "@odata.context": "",
  "OperationSetResponse": ""
}
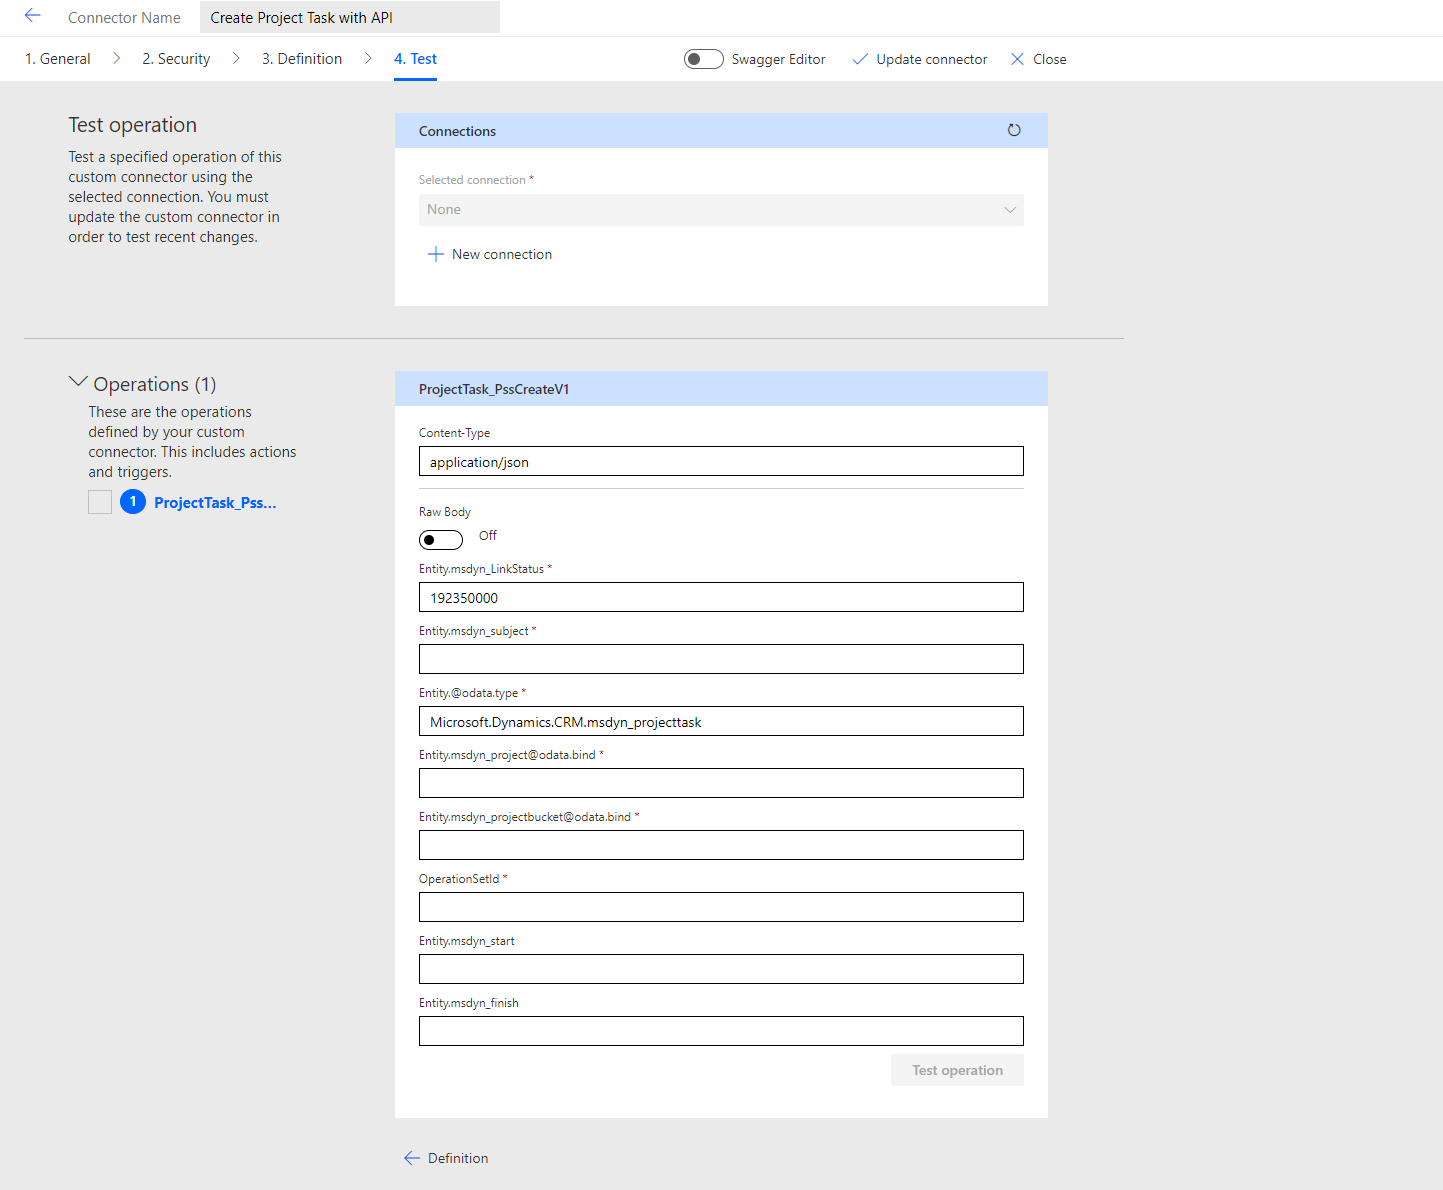
The final step is to jump on the test tab and verify that all required Schema Properties are included, they have default values where required, and critical properties are set as required. The custom connector can’t be tested at this point as a prerequisite for the msdyn_PssCreateV1 action is an existing OperationSetId. I recommend testing the Schedule APIs using Postman.
Creating a project with custom project templates and Schedule APIs
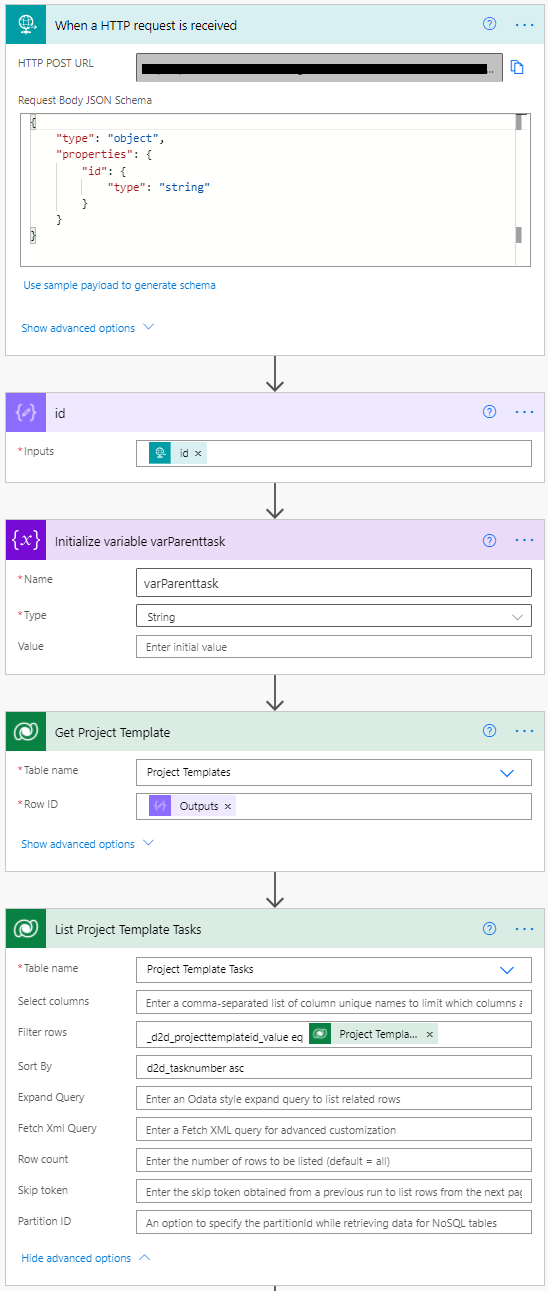
Let’s dissect the cloud flow that creates a new project from the previously mentioned project template by calling Schedule APIs. The flow fires off when a SmartButton on a Project Template row’s command bar is pressed. The initial id compose action stores the GUID of the Project Template from which the flow was fired off. A variable needs to be initialized so that possible task hierarchies can be created later in the flow. Next, we need to get our hands on the Project Template row in question and all Project Template Tasks related to that template are then listed. This way a WBS for a project can be created later in the flow.
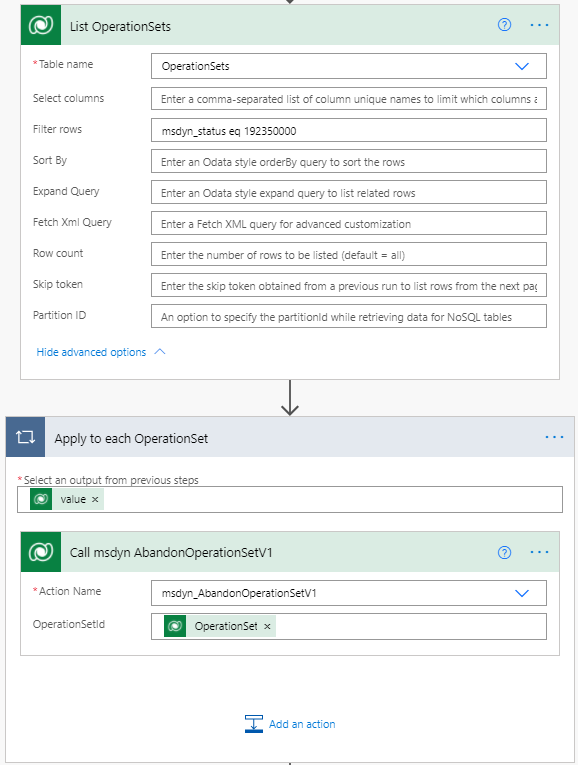
As this flow has required a lot of testing, I’ve had to make sure I can stay below the 10 open OperationSet limit per user. Because of that, I’ve added an action that lists all open OperationSets with a status (msdyn_status) of Open (192350000). Those OperationsSets are then abandoned by calling the msdyn_AbandonOperationSetV1 action. What’s important to remember in this scenario is that I’m the only user in my environment and these actions around OperationsSets are only there as this cloud flow is a demo concept, not a production release.
There’s also an out-of-the-box cloud flow named Project Service Core – Abandon Open Operation Sets, which attempts to abandon open OperationSets 60 minutes after it’s triggered. If you don’t hit the 10 open OperationSet limit in your tests, I’d let the OOTB flow handle abandoning open OperationSets. If you’re after trivial information, then you might enjoy knowing that this specific cloud flow is the first flow the Project Operations product team has put in the product. I’ll leave you guessing what the second flow is.
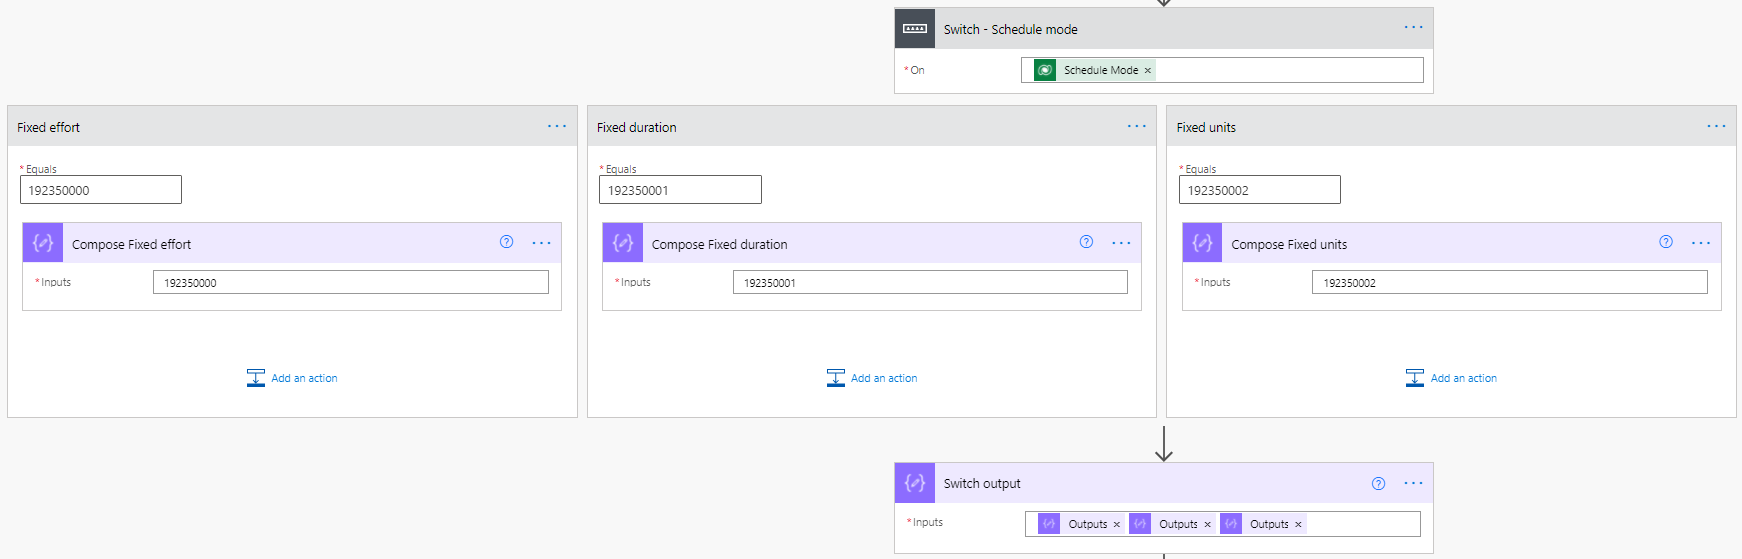
After abandoning unnecessary OperationSet, a switch action runs in different paths, depending on what schedule mode was selected on a project template. Scheduling modes are a feature introduced to Project for the web in the spring of 2021. The values used on the scheduling mode choice column on the project table are included in the switch action’s different paths. The compose after the switch holds the output and is used in the next step seen in image 15, which shows how a project is created.
Creating a project and an OperationSet
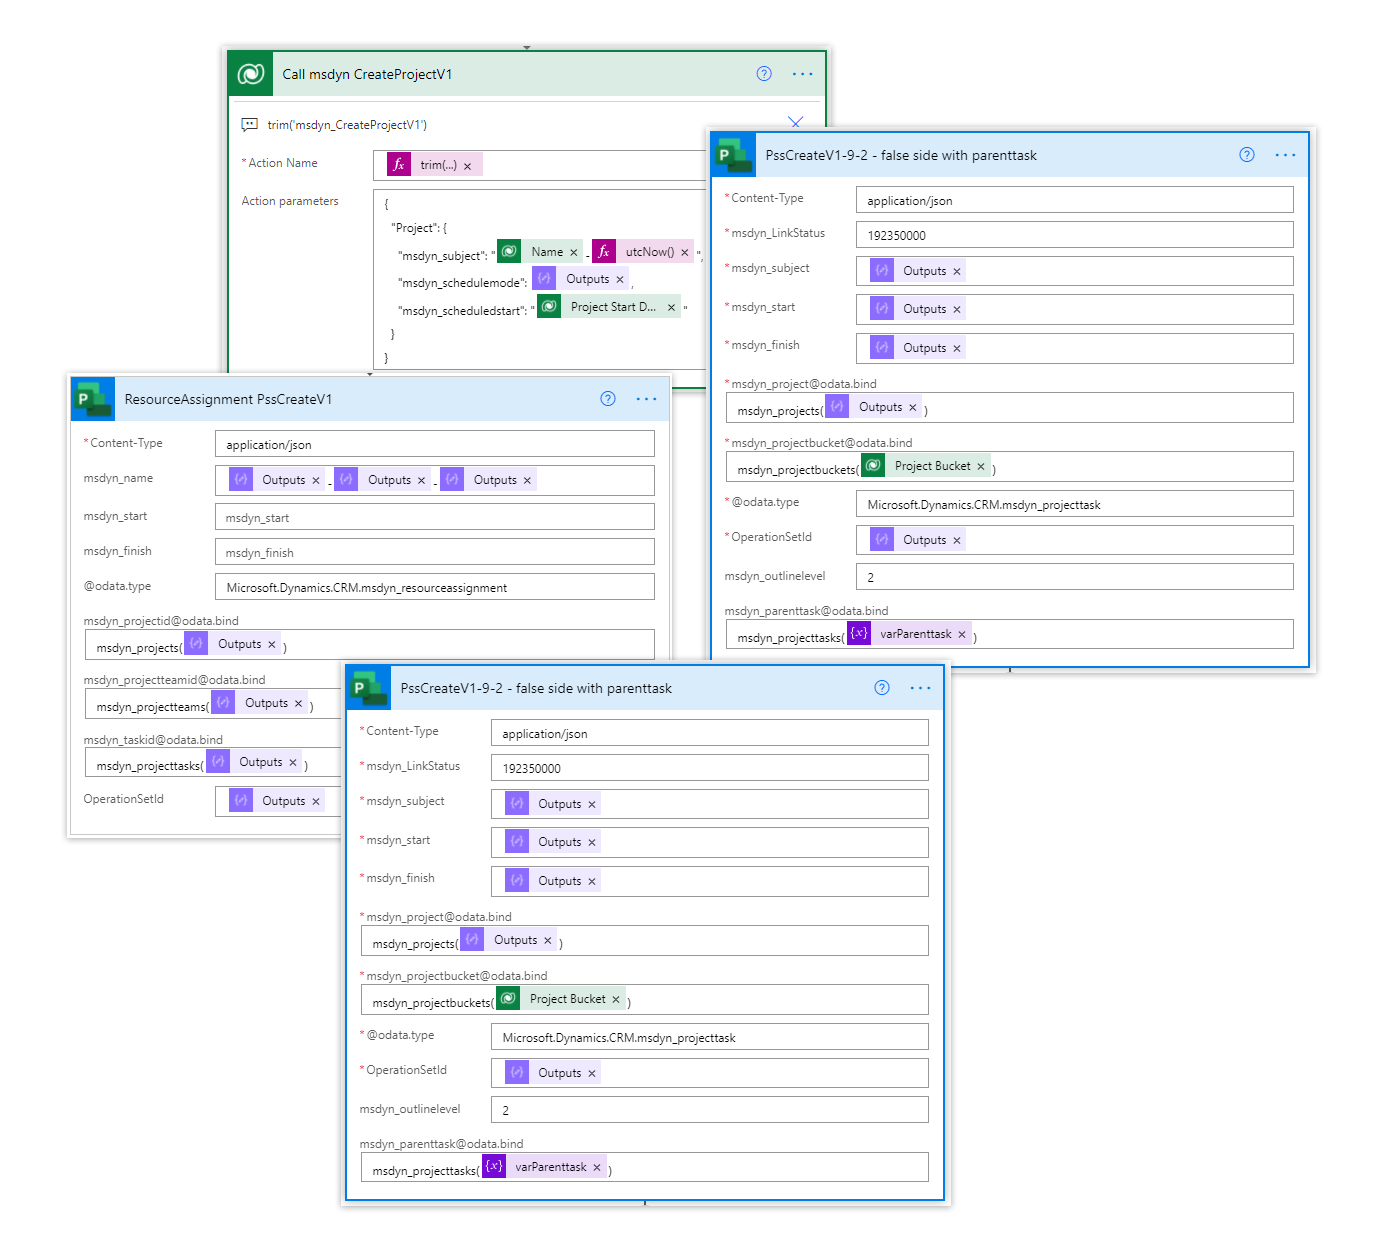
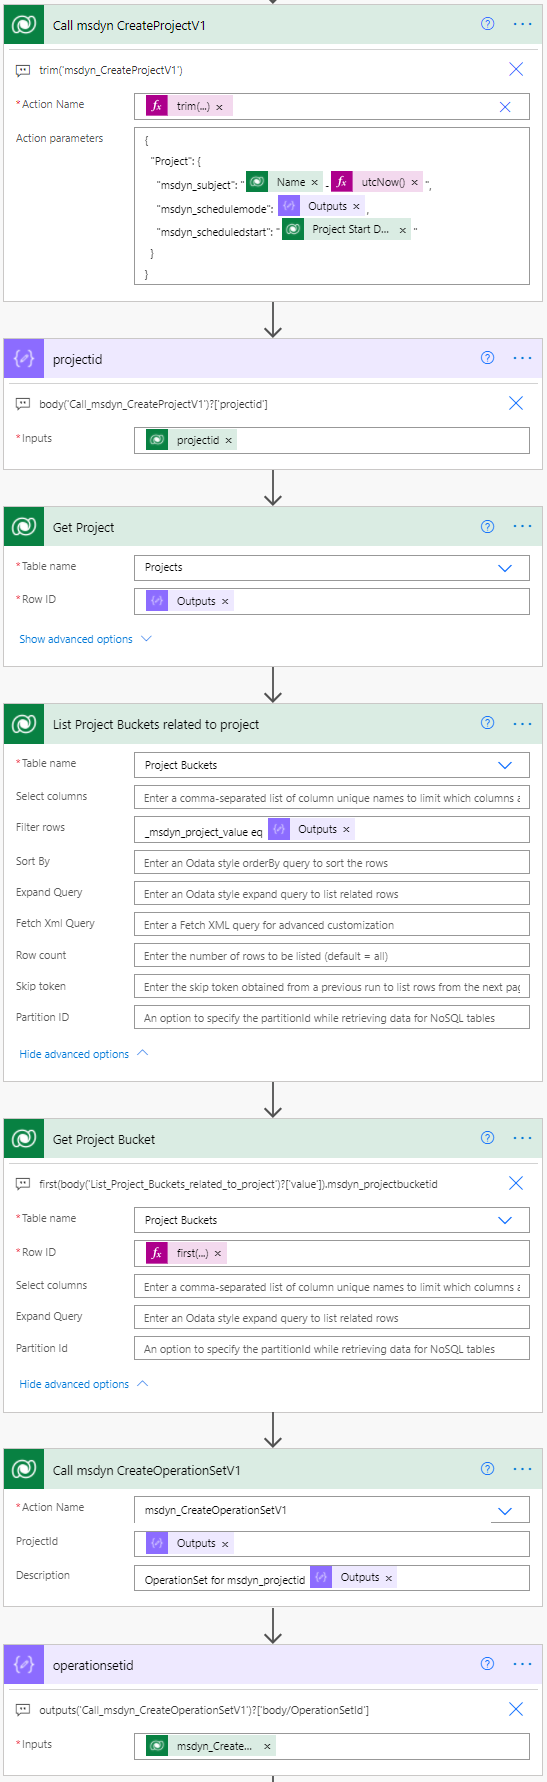
To call Schedule APIs, unbound actions are used. At the moment the unbound actions for Schedule APIs don’t render in a very readable manner in the Power Automate UI so some hacking is required. The goal is to be able to insert the JSON schema directly to the action by using the Action parameters box that’s visible at the top of image 15. That box isn’t normally visible unless we use a trim expression for the action’s name as a custom value. MVP Linn Zaw Win has a fantastic post about the topic here. It was instrumental in getting me forward with the APIs so a huge kudos to Linn.
When a Project (msdyn_project) or Project Team Member (msdyn_projectteam) row is being created, an OperationSet is not required. When creating a project, a default Project Bucket (msdyn_projectbucket) is created so that’s an aspect we don’t have to think about. To create a project with the msdyn_CreateProjectV1 action, I’ve used the JSON schema seen below. Remember to go through restricted fields for the project table to understand the limitations in creating projects.
{
  "Project": {
    "msdyn_subject": "subjectHere",
    "msdyn_schedulemode": valueHere,
    "msdyn_scheduledstart": "dateHere"
  }
}
The following expression is used to get the GUID of the created project: body('Call_msdyn_CreateProjectV1')?['projectid']. Next, we need to retrieve the project row with a get action and after that, we need to get our hands on the default bucket that was created automatically when the project got created. A first expression can be used in the Get Project Bucket action: first(body('List_Project_Buckets_related_to_project')?['value']).msdyn_projectbucketid.
Now that a project has been created and its default buck is known, it’s time to create an OperationSet so that it’s possible to create project tasks based on the custom project template. I’ve used a compose action with the following expression to store the GUID of the created OperationSet: outputs('Call_msdyn_CreateOperationSetV1')?['body/OperationSetId']
Creating project tasks
This part of the flow is where the fun really starts and the logic gets more complicated. As tasks can be summary tasks or subtasks, it takes a bit of design thinking to get the overall logic just right. Resource Assignments can only be created on subtasks and the needed project tasks need to be created as summary tasks or subtasks according to the custom project template.
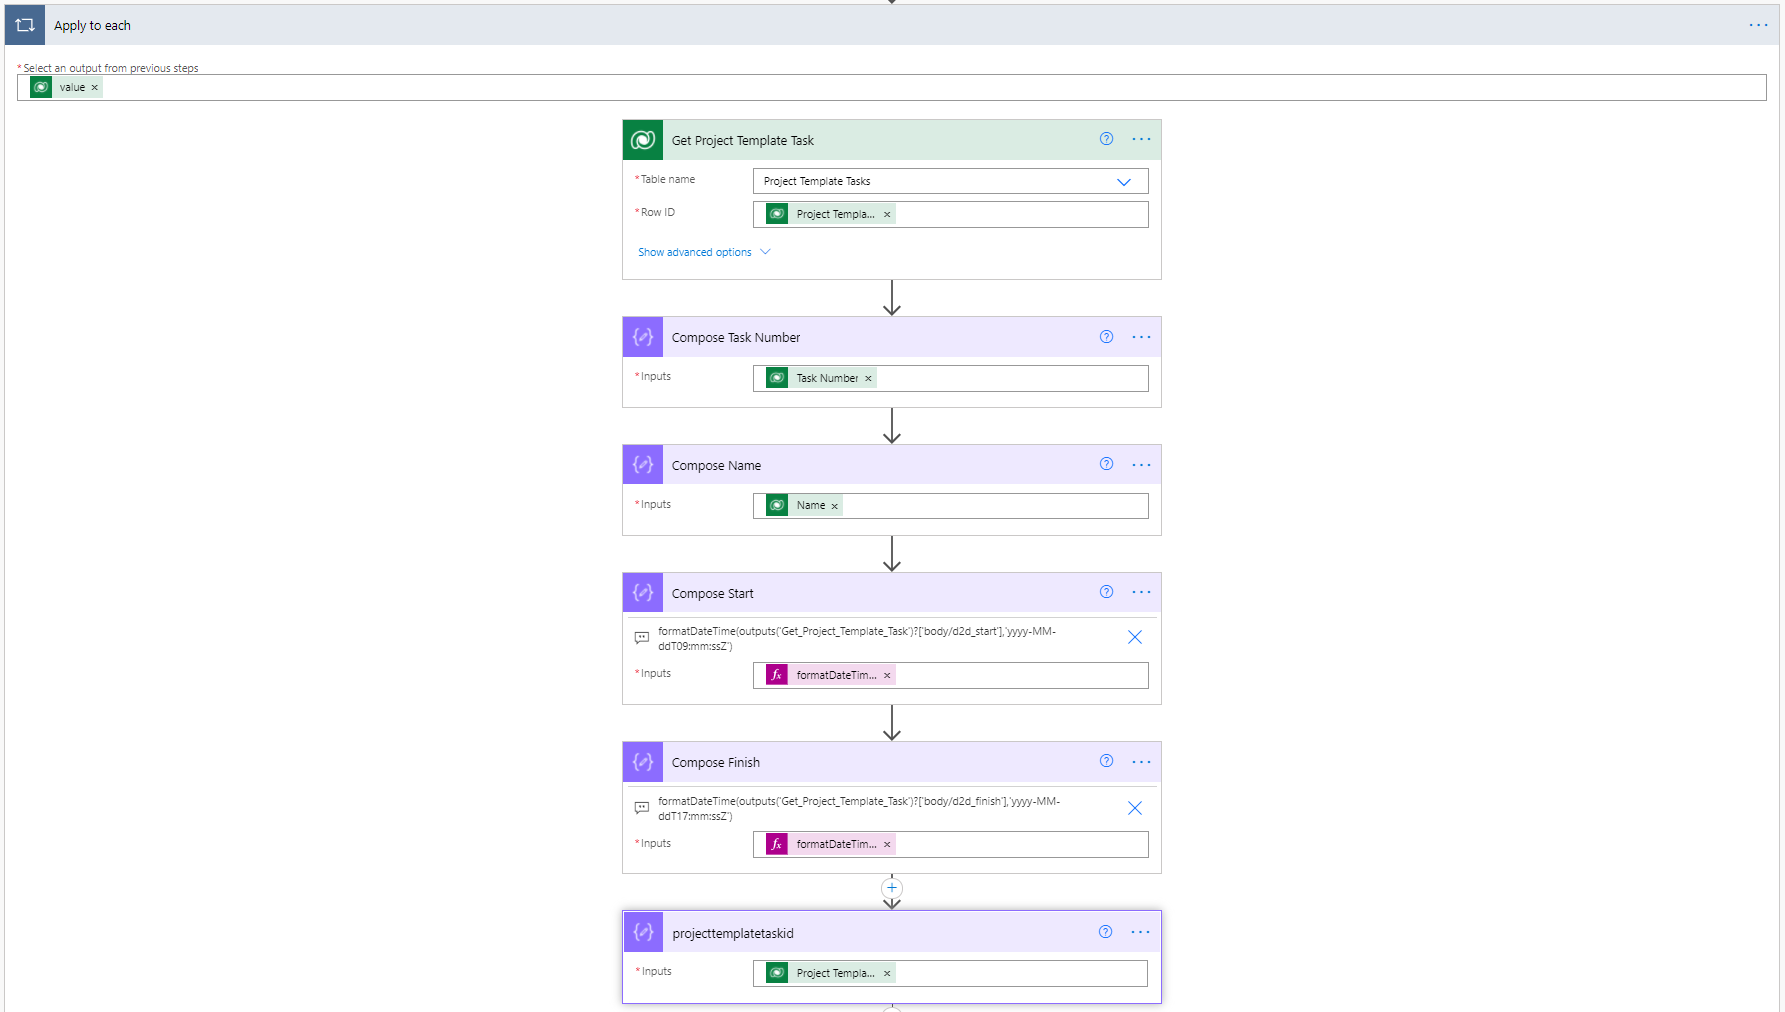
The first thing we need to do at this point in the overall logic is to loop through all Project Template Tasks related to the Project Template in question. This way we can get our hands on the all the Project Template Task rows. From those rows, we can compose the following details so that we can later create actual tasks for the project in question:
- Compose Task Number. Task’s place in task hierarchy for the WBS.
- Compose Name. Name of the task.
- Compose Start. Start date and time and time of the task. Remember that tasks are hard coded in Project fore the web to start at 9 AM and to finish at 5 PM. The expression used is:
formatDateTime(outputs('Get_Project_Template_Task')?['body/d2d_start'],'yyyy-MM-ddT09:mm:ssZ'). - Compose Finish. Finish date and time of the task.
- projecttemplatetaskid. Extra compose I used when testing to hold the GUID of the Project Template Task.
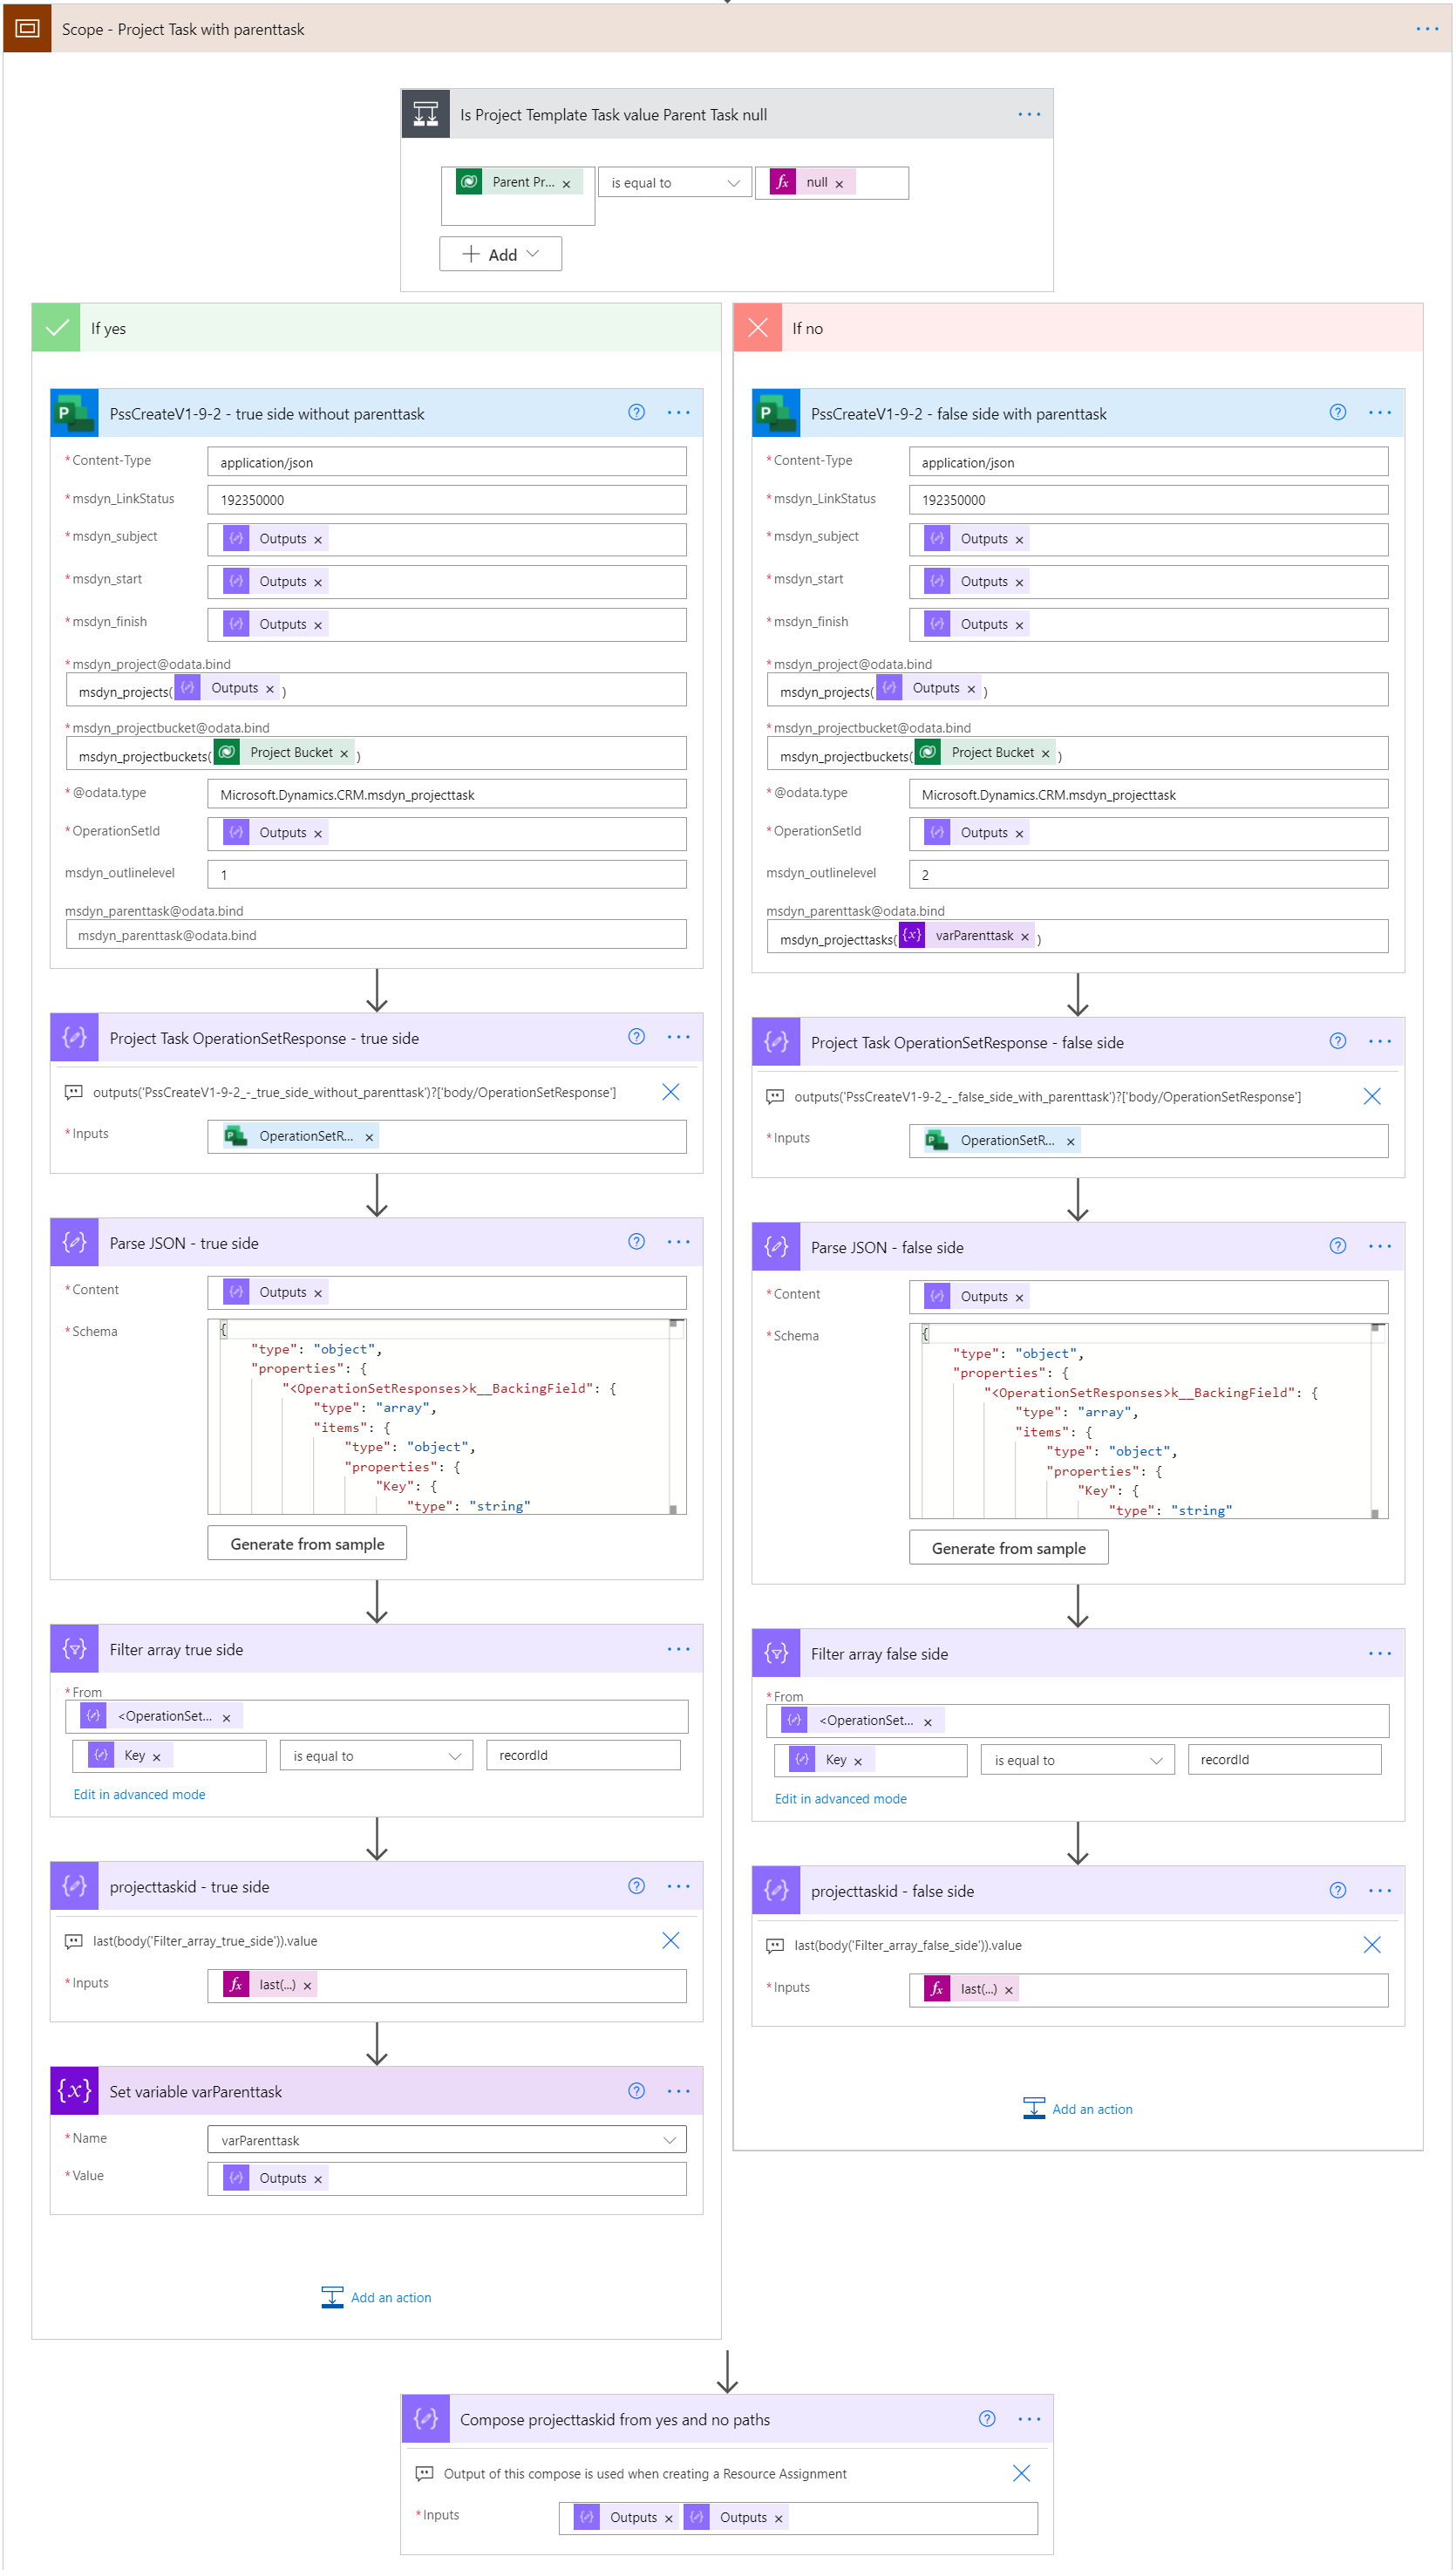
In the following scope, project tasks are created with the custom connector that we dissected earlier. A condition is first used to check whether or not the Project Template Task being looped through has a value in the Parent Project Template Task column. If it doesn’t (i.e it’s null), the condition runs on the Yes side. This means we’re going to create a project task that won’t have a parent task/summary task related to it. Let’s dissect the Yes side of the condition first.
The custom connector is used after the condition to create a project task. Some values are set by default as we set default values when we created the custom connector earlier in this blog post. The values for OData binds for project and project bucket are accessible from the previous steps as is the value for OperationSet. No value is needed for msdyn_parenttask@odata.bind as the task that’s being created doesn’t have a parent/summary task. Outline level will be set to 1.
The next compose actions can be tricky and cause some headache. Even though the OperationSet in question hasn’t been executed, the Schedule APIs provide us with a GUID for the records we’re creating. We need the GUID for the project task so that we can set the variable varParenttask with the GUID of the task that was created on the Yes side of the condition. The variable is needed because the next task that will be created in the apply to each loop might be defined as a subtask. That means that the task that was just created will become a parent/summary task.
After creating a task with the custom connector, we need to get our hands on the resulting OperationSetResponse. To do this, the following expression is used: outputs('PssCreateV1-9-2_-_true_side_without_parenttask')?['body/OperationSetResponse']. The JSON of the OperationSetResponse is then parsed. The JSON schema used is:
{
    "type": "object",
    "properties": {
        "<OperationSetResponses>k__BackingField": {
            "type": "array",
            "items": {
                "type": "object",
                "properties": {
                    "Key": {
                        "type": "string"
                    },
                    "Value": {
                        "type": "string"
                    }
                },
                "required": [
                    "Key",
                    "Value"
                ]
            }
        }
    }
}
The JSON schema isn’t very obvious but what we need from the parsed JSON is the value of a Key that equals recordId. To do that, a filter array is used against the parse JSON action. A compose with the following expression is then used to get the GUID of the project task that was created by the custom connector: last(body('Filter_array_true_side')).value. The Yes path of the condition ends in setting the variable varParenttask with the GUID of the project task.
The No side of the condition is almost identical to the Yes side. The only differences are:
- Custom connector creates tasks as subtasks with outline level set to 2.
- The OData bind for parent tasks comes from the variable that was just set.
- The variable is not set on this side of the condition. It’s only set when creating parent/summary tasks.
The final action in the scope composes the GUID of task that has been created in this iteration of the apply to each loop. The input of the compose has to be set to hold the outputs of the project task GUID actions from both sides of the condition. It will naturally only have a single GUID as the condition only runs in one of two paths per apply to each iteration. This final compose is instrumental as it’s output is needed in the following scope, in which Resource Assignments are created.
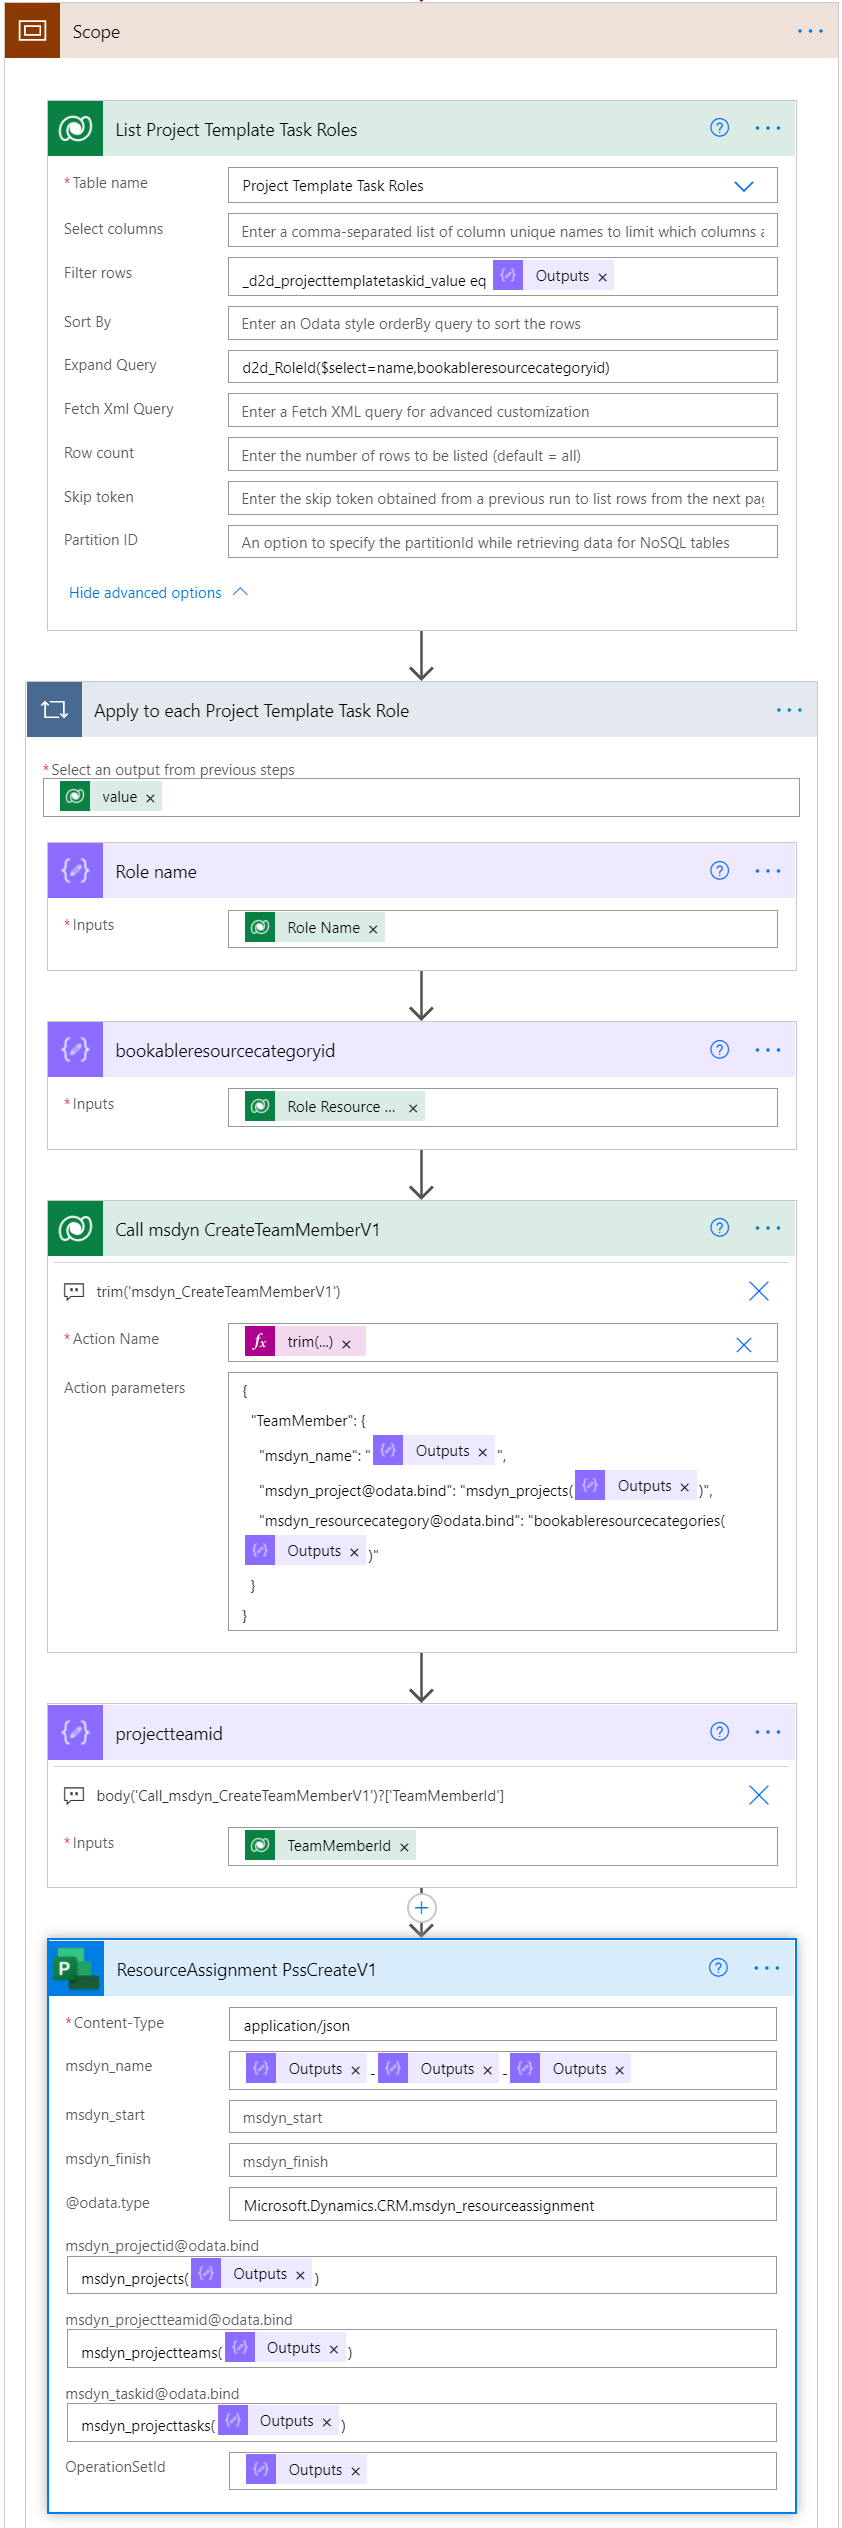
Creating project team members and resource assignments
In the following scope we’re creating Project Team Member and Resource Assignment rows according to the project template. A list records action is used to get all Project Template Task Role rows related to Project Template Tasks. An expand query will get the name and GUID of the Role i.e the Bookable Resource Category related to the Project Template Task Role. This way a Project Team Member row for a correct role can be created.
A trim expression is once again needed for the msdyn_CreateTeamMemberV1 action. The JSON schema I’ve used in the action is is below. A following compose action then stores the GUID of the created Project Team Member row. The expression used is below the JSON schema.
{
  "TeamMember": {
    "msdyn_name": "roleNameHere,
    "msdyn_project@odata.bind": "msdyn_projects(guidHere)",
    "msdyn_resourcecategory@odata.bind": "bookableresourcecategories(guidHere)"
  }
}body('Call_msdyn_CreateTeamMemberV1')?['TeamMemberId']The final action in the scope creates a Resource Assignment. Start and finish dates for Resource Assignments can’t be populated as those columns are on the restricted columns list. I originally added them in the custom connector for Resource Assignments and never took them out so they’re visible in image 18. The OData bind for project task is populated with the output from the previous scope (last compose action in image 17). The JSON schema that I’ve used for the resource assignments custom connector is as follows:
{
  "Entity": {
    "msdyn_name": "nameHere",
    "@odata.type": "Microsoft.Dynamics.CRM.msdyn_resourceassignment",
    "msdyn_projectid@odata.bind": "msdyn_projects(guidHere)",
    "msdyn_projectteamid@odata.bind": "msdyn_projectteams(guidHere)",
    "msdyn_taskid@odata.bind": "msdyn_projecttasks(guidHere)"
  },
  "OperationSetId": "guidHere"
}
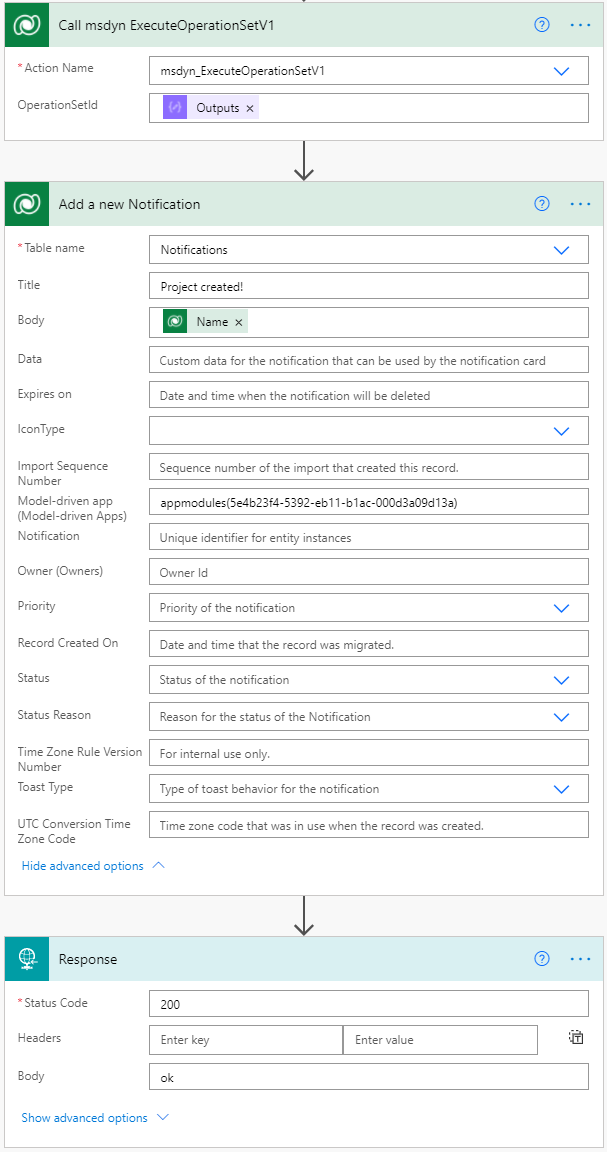
When all necessary Schedule APIs have been called, the final step is to call the msdyn_ExecuteOperationSetV1 action. When the OperationSet is executed, all rows from the previous steps will get created. I’ve also added a model-driven app notification to the end of the flow to notify that a project has been created.
The final action is a response to SmartButtons. I’ll leave it up to you whether or not to use a response action in a cloud flow. If you are building synchronous flows, you might want to read this blog post by MVP Alex Shlega first.
With that, we’ve gone through PSS, custom connectors, custom project templates, and a flow calling Schedule APIs to create a project with tasks, team members and resource assignments.
Hi Anttii,
Many thanks for sharing those details!
I wonder whether this Flow/Powerautomate/Dataverse integration works for larger projects with 200+ people working on projects where multiple tasks and their durations are changed on a daily basis. The process illustrated uses Powerautomate and sequentially processes the data, right? Do you have some insights how it might take to process let’s say 200 of those changes?
Also, if entry mistakes occur. How could one make corrections? Would you need a two-way interface and does this require some professional coding rather than using a low-code / no-code approach?
Hi Ludwig. I think of the Schedule APIs as something that are used for incremental changes to a project plan or for creating a project from scratch (like the custom template approach I provided in the blog post). An example of an incremental change could be task(s) created from a CR for example. I don’t think the APIs are optimal to process a batch operation to the entire project plan i.e to CUD hundreds of tasks. We also have a hard limit of 100 operations per OperationSet.
Hi Anttii,
Thanks for your article.
We are trying to create tasks via Scheduling entities API. We use examples provided here https://docs.microsoft.com/en-us/dynamics365/project-operations/project-management/schedule-api-preview#additional-samples.
We use the following code:
var description = $”Task creation”;
var operationSetId = CallCreateOperationSetAction(projectRef.Id, description);
var task1 = GetTask(“1WW”, projectRef);
CallPssCreateAction(task1, operationSetId);
CallExecuteOperationSetAction(operationSetId);
Functions GetTask, CallPssCreateAction, CallExecuteOperationSetAction are copied from the Scheduling entities manual (the link is provided above). projectRef is an EntityReference to an existing project. Project bucket exists in this project.
We obtain the following excecption, even though the user is System Administrator and has write access to all entitites.
System.ServiceModel.FaultException`1[Microsoft.Xrm.Sdk.OrganizationServiceFault]: {“code”:”Forbidden”,”message”:”Permissions required: Write.”,”innerError”:null} (Fault Detail is equal to Exception details:
ErrorCode: 0x80040224
Message: {“code”:”Forbidden”,”message”:”Permissions required: Write.”,”innerError”:null}
TimeStamp: 2021-11-10T09:54:46.0422626Z
OriginalException: PluginExecution
ExceptionSource: PluginExecution
—
).
Probably you have also obtained this issue or have any ideas why in may occur. If yes, we would be grateful for any advice.
Regards,
Elena
Hi Annti,
Million thanks for sharing a great post.
Do you know the “How and when” to execute Active OperationsSets in Dynamics 365?
We have created the records but are stucked with records created in Active OperationsSets and the “Executed On” and “Completed On” columns are left blank.
What is the time schedule for running these?
Any action we can do to start executing active OperationsSets?
I look forward to be hearing from your.
Kind regards¨
Karsten
Hi Karsten,
Operation Sets should be executed when all the changes that you want to push to PSS should be executed. It’s usually the final action in a scope that consists of:
– Create Operation Set
– CUD actions you want to make
– Execute Operation Set
The action to execute is msdyn_ExecuteOperationSetV1.
Hello Antii. Thanks for the post. I have a question that sidetracks a bit:
“A developer can call the APIs with a significantly lower amount of work than what it takes to achieve proper results in low-code.”
About project scheduling apis, do you know any good sources about developers except Microsoft documentations? They have sample code there but no real examples and tutorials with screenshots.
Hi John. Unfortunately, there aren’t any C# examples beyond docs that I know of. There is a GitHub initiative that will hopefully see more samples in the future.
Hi Antti,
Great post!
I have followed your instructions, created a custom connector but I am getting an error when creating tasks using the connector. The error is “Resource not found”. Any suggestions how this issue could be solved?