

Tested on:
Dynamics 365 CE version 9.1, PSA solution version 3.3, Unified Interface
The October ’18 update of Dynamics 365 Project Service Automation has introduced many much needed features to PSA. One of these features is the new Custom Control based Time Entry grid. For one, it makes submitting Time Entries a lot faster. With the new CC grid the customization experience around Time Entries has also changed slightly. Everything is still fairly straightforward but there are some new nuances that need to be taken into consideration.
This blog post will cover the high level steps needed to customize the new Time Entry experience. Our goals are:
- Create a new Time Entry view.
- Use a CC grid with the new view.
- Include custom fields on the new CC grid.
- Enable editing of the custom fields on the CC grid’s rows and cells.
Customizing the Time Entry grid
To achieve our goal we will create a new view with a custom field and a new Task Flow. We’ll also associate a Time Entry Grid Custom Control with our view. Let’s get started.
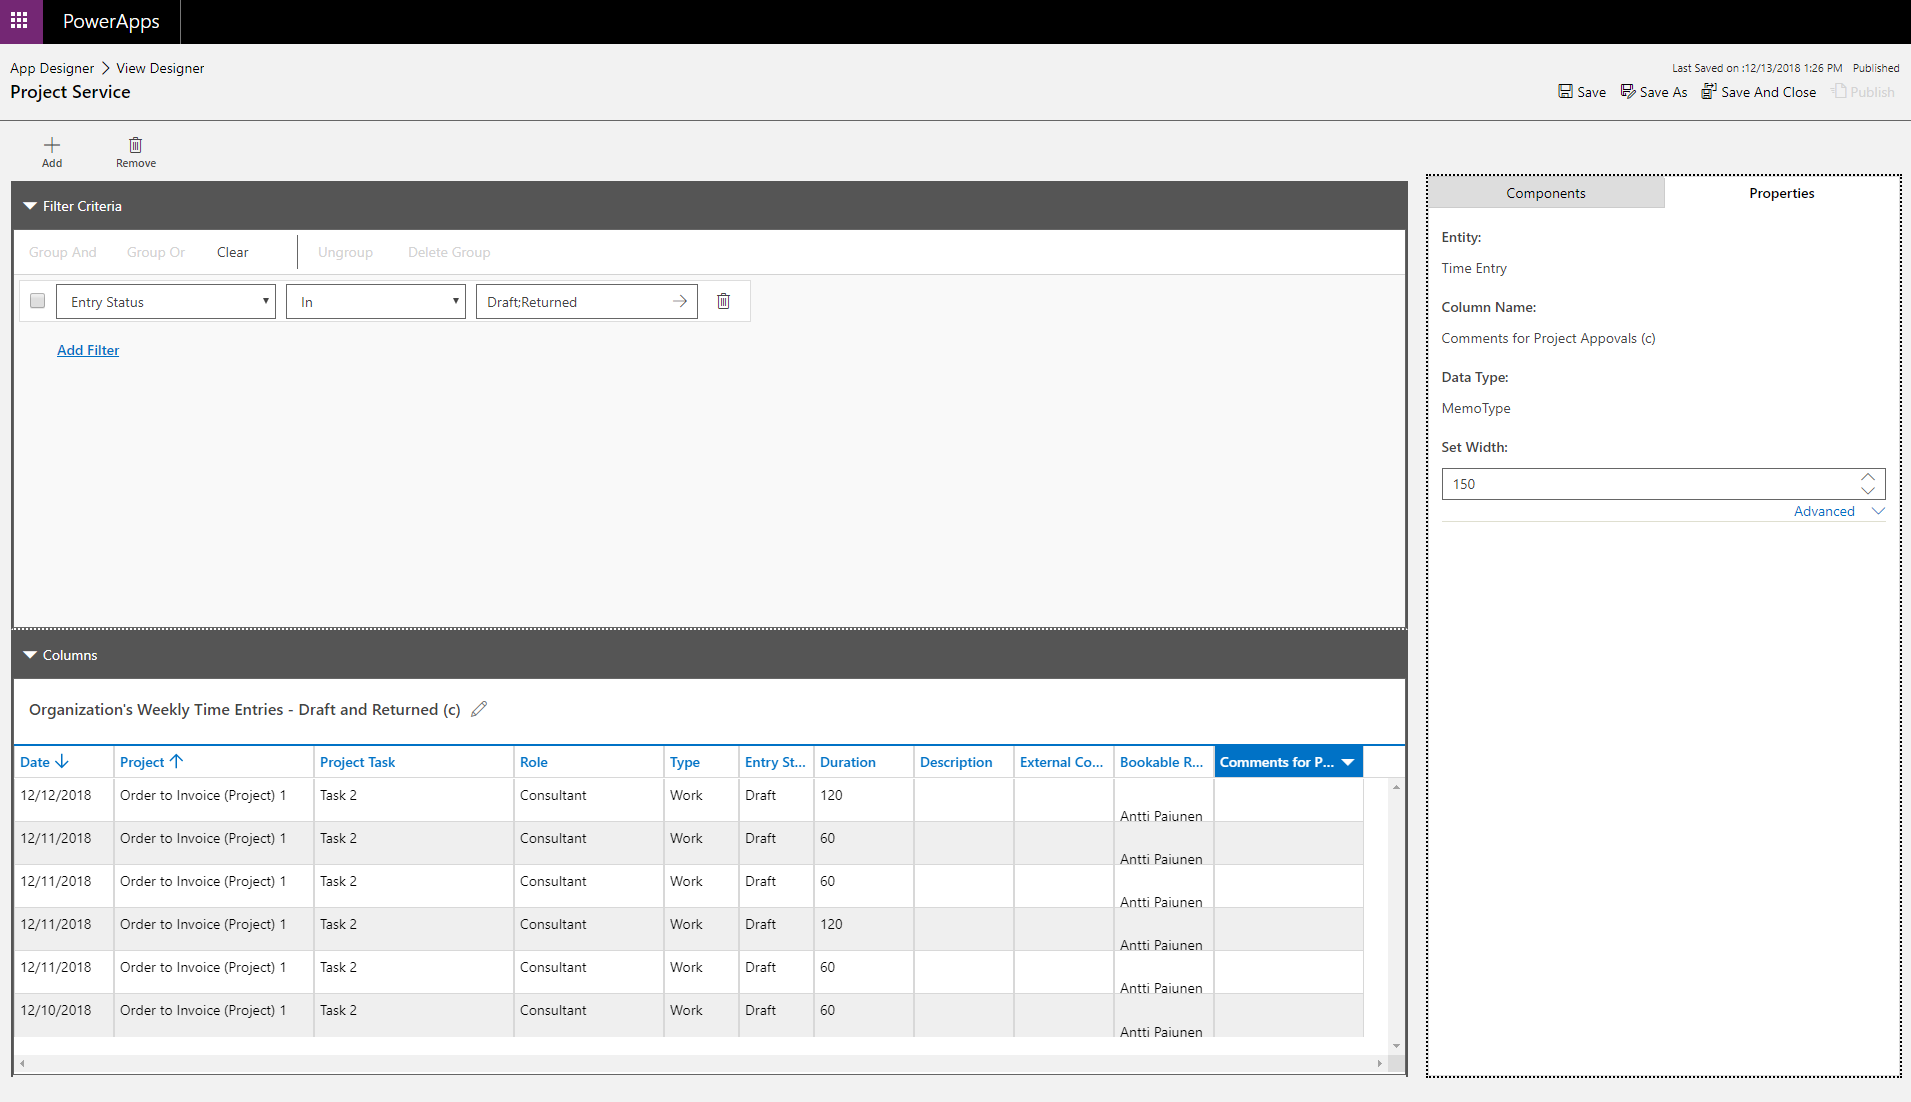
1. Create a new view
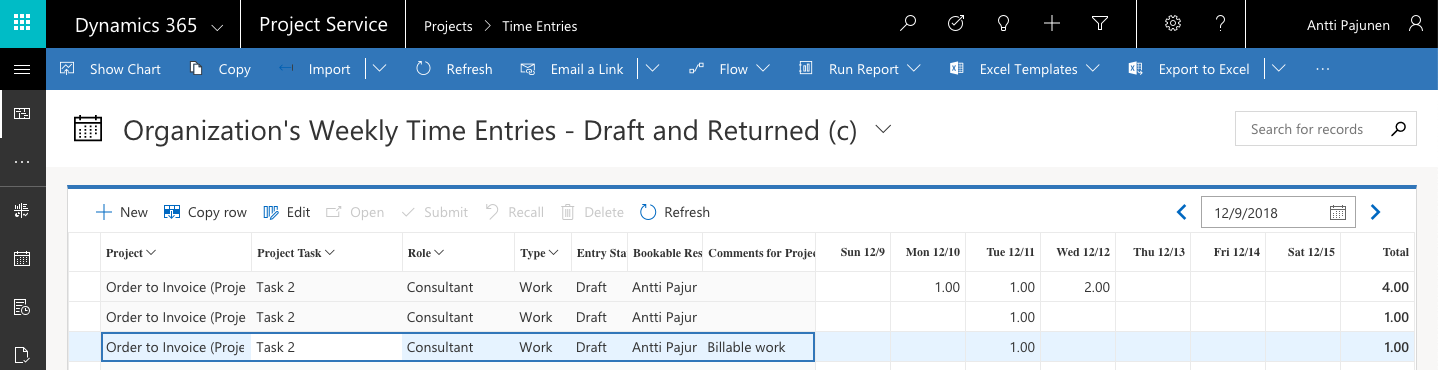
The custom field I will add on the view in this example will be named Comments for Project Appovals (c). I will also include the OOTB field Bookable Resource on the view.
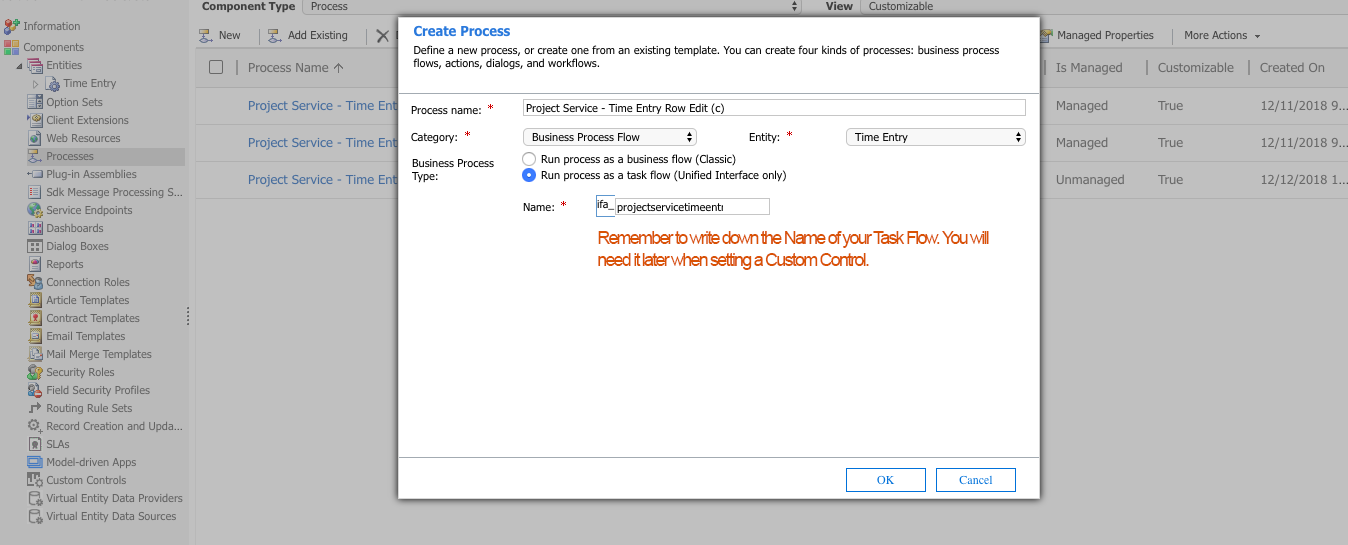
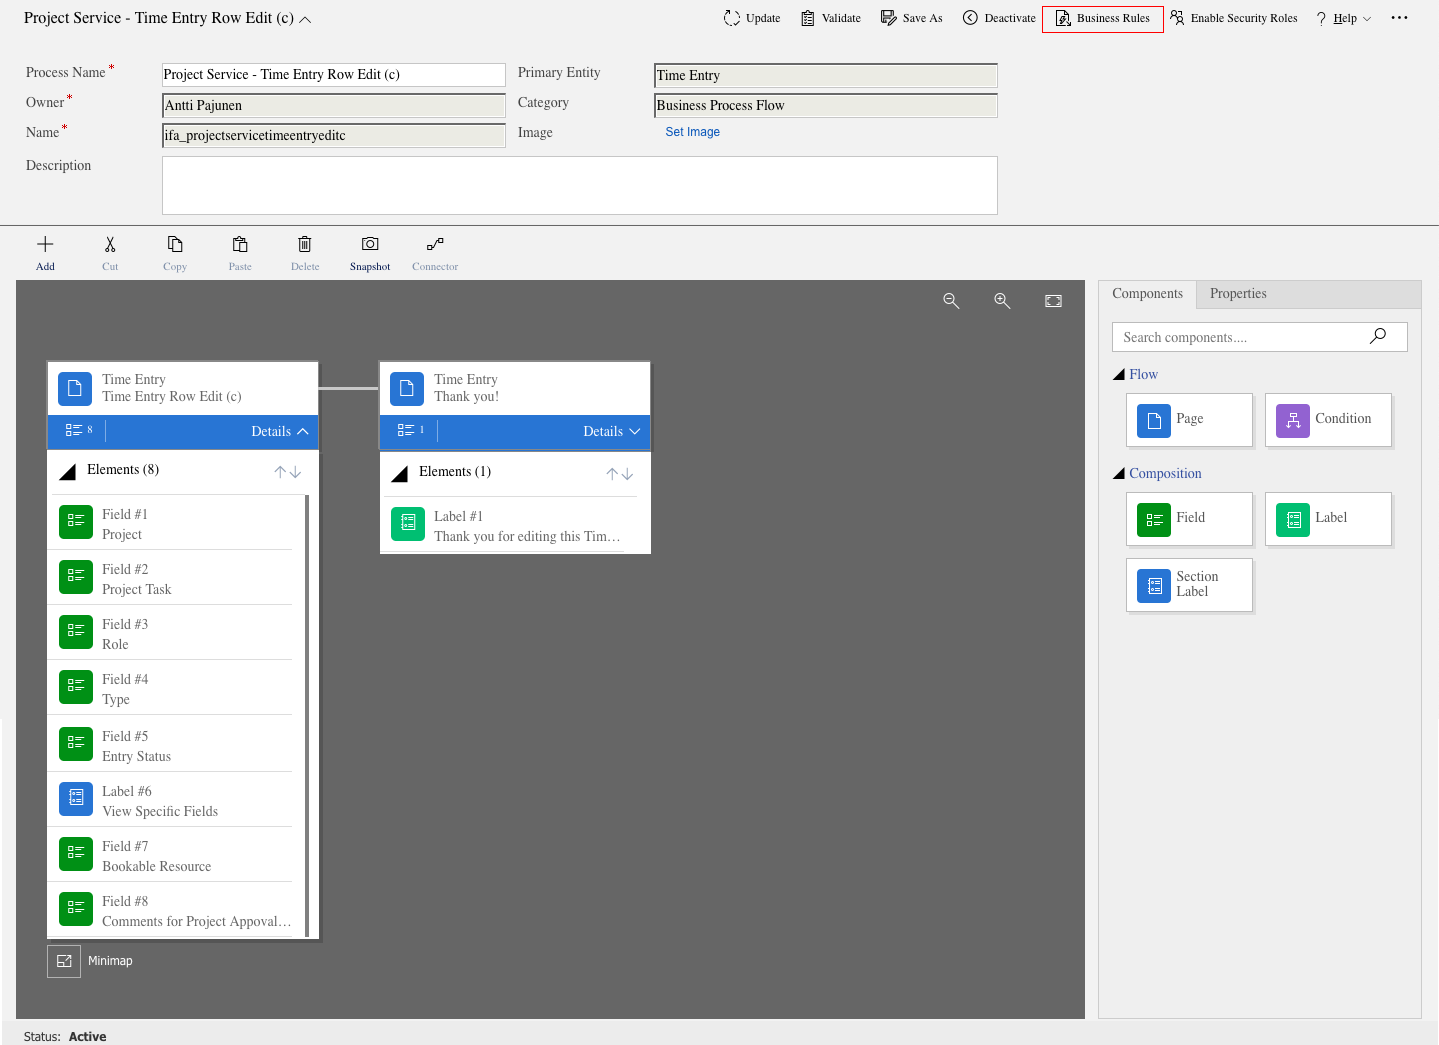
2. Create a Task Flow and a Business Rule
The Time Entry grid leverages Task Flows for editing rows and cells on the grid. While the OOTB Task Flows could also be edited to include our fields, I’ve decided to create a new one to illustrate how Task Flows are built and what they can do. You can associate a different Task Flow with all your different Time Entry views. A Task Flow is tied to a view’s Custom Control in step 3.
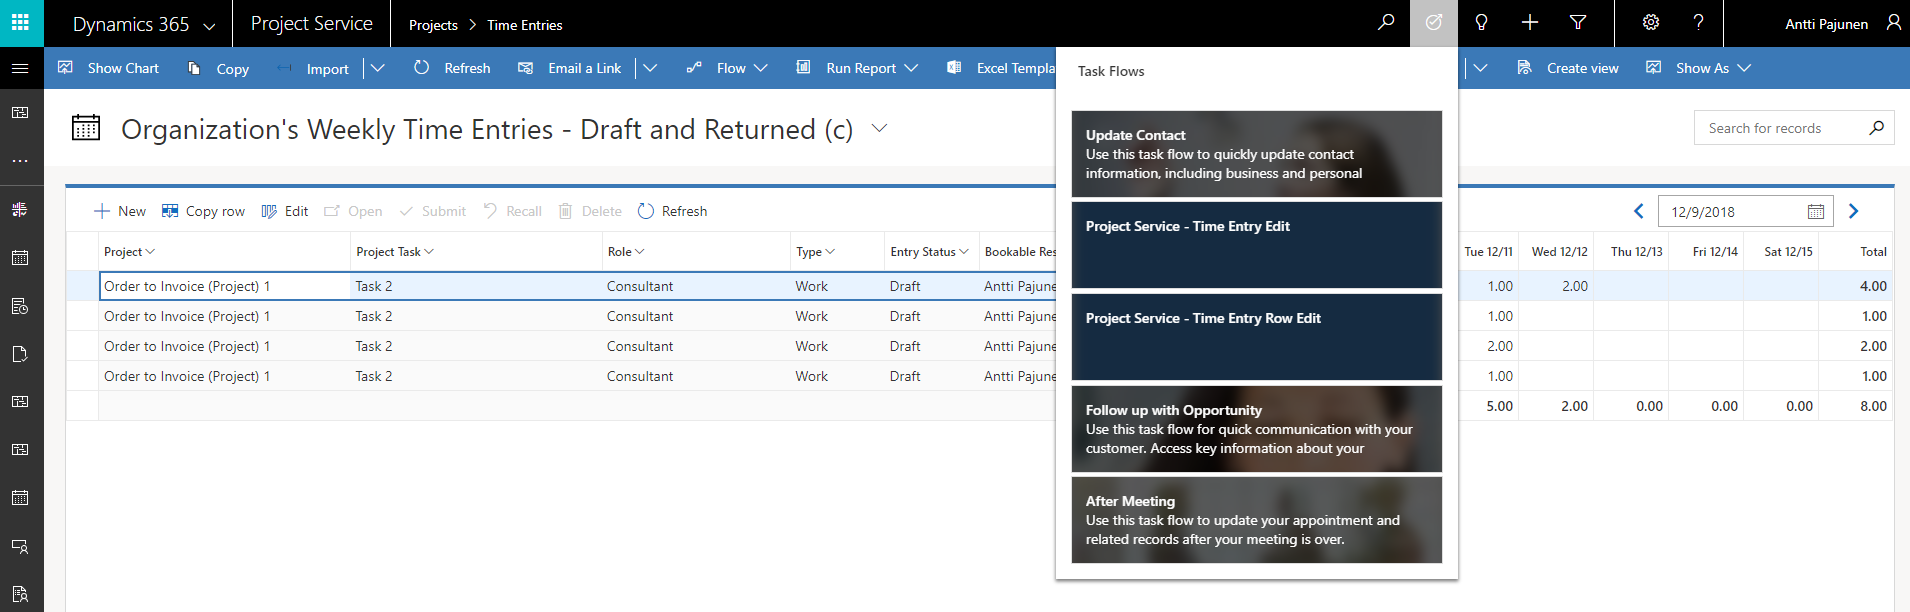
To keep the example simple and short, the Task Flow I’m making will be a very close match to the OOTB box Task Flow named Project Service – Time Entry Row Edit (msdyn_timeentryrowedit). The other OOTB Task Flow for editing cells is named Project Service – Time Entry Edit (msdyn_timeentryedit) but that one we’re not touching in this example.
The editor for Task Flows is the same that we are used to from “normal” Business Process Flows and Business Rules. When all the details and fields have been set, we’ll look under the Business Rules button on the top of the editor.
This next screen that pops up will not show any records. Even if you made a copy of an OOTB Task Flow, no Business Rules will be found for our new custom made Task Flow. The OOTB PSA Task Flows do have Business Rules associated with them so if you want to maintain the logic built into the OOTB Task Flows, you have to build the Business Rules from scratch. I wasn’t able to find a way to leverage the existing Business Rules because once a Business Rule is created for a Task Flow, the scope of the Business Rule is locked to the Task Flow in question. If a Business Rule doesn’t need to be Task Flow specific, one option is setting its scope to All Forms.

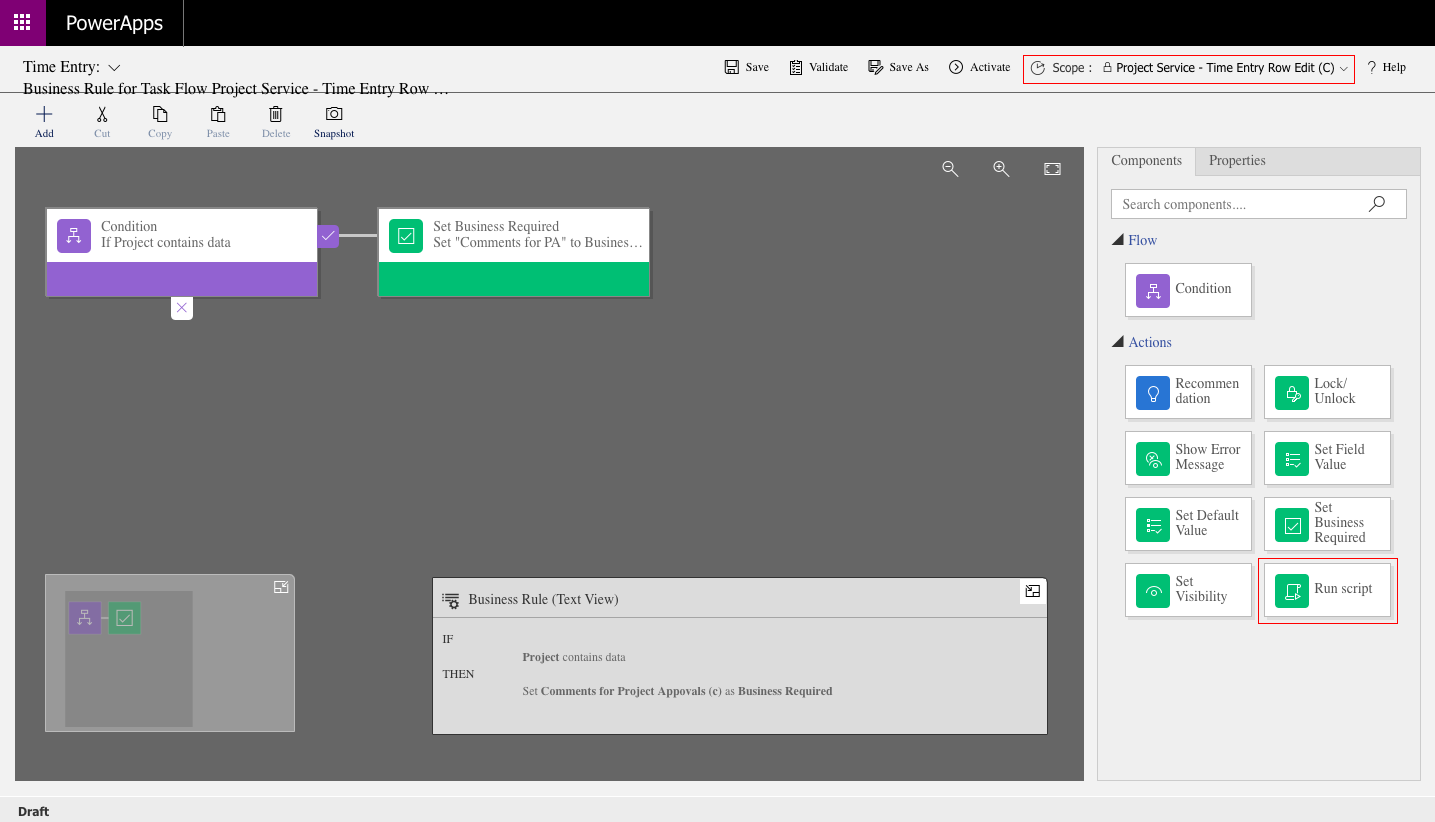
The Business Rule editor that opens up looks the same as the one we’re used to but there are two notable differences: The scope is locked to the Task Flow we just created and we can run scripts. The OOTB Business Rule Project Service – Filter Project Tasks to Project is an example of a Task Flow specific Business Rule that has a Run Script action defined.
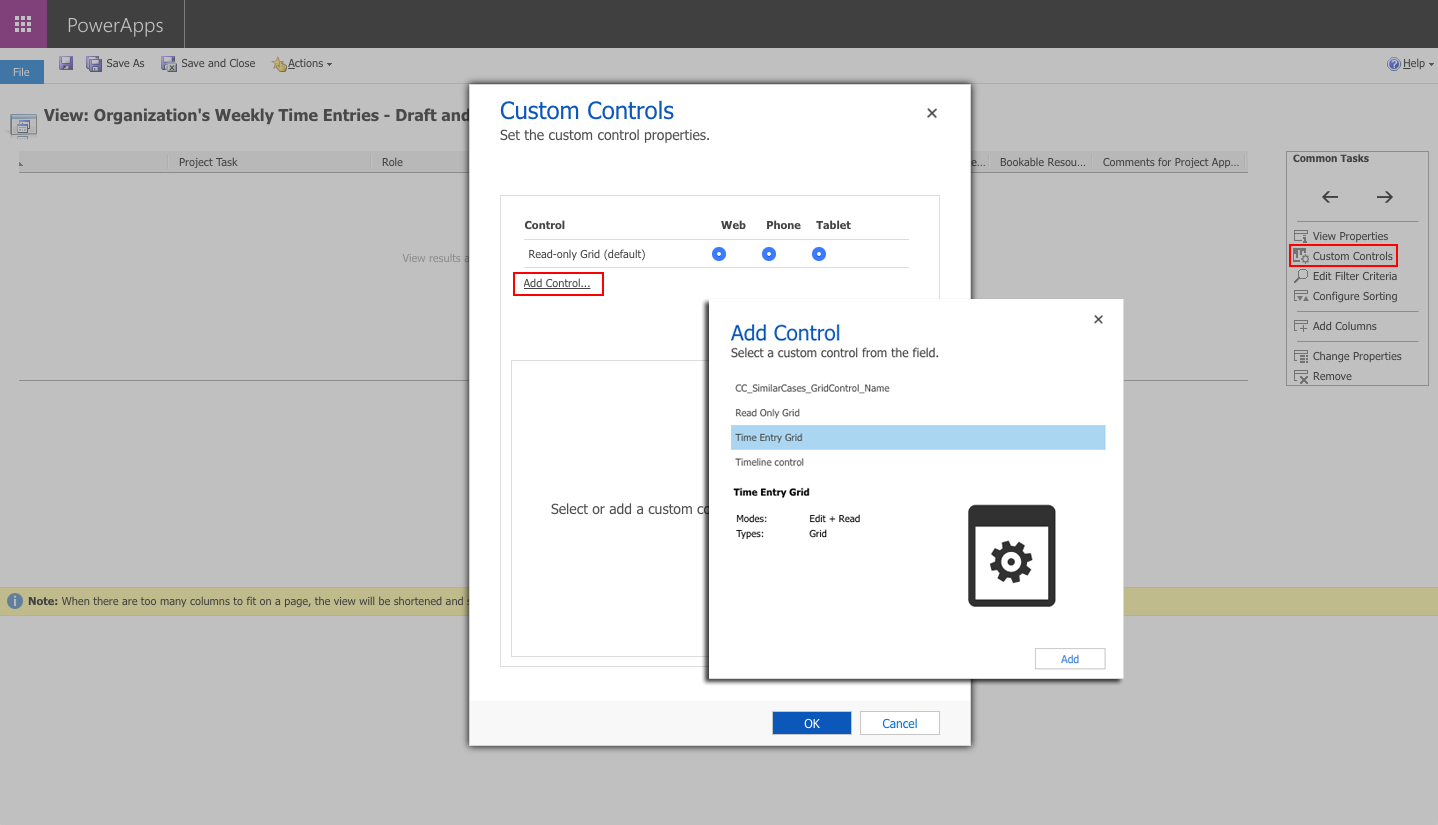
3. Add a Time Entry Grid Custom Control on the new view
The next step is to add the Custom Control named Time Entry Grid on our new view. As I’m writing this blog post, editing views from the App Designer (step 1) causes an associated Custom Control to disassociate from the view. So if changes to a view having a Time Entry Grid CC associated with it are needed, those changes are to be made on the “classic” Solution Explorer. This way the CC stays associated with your view. I will edit this section of the blog post as I learn more if this is a bug or a feature.
As the Time Entry Grid is added, several Business Required properties are displayed. I’m adding the values of the OOTB Custom Control with the only exception being the Row Edit Task Flow property. This will hold the value of the custom Task Flow created in step 2.
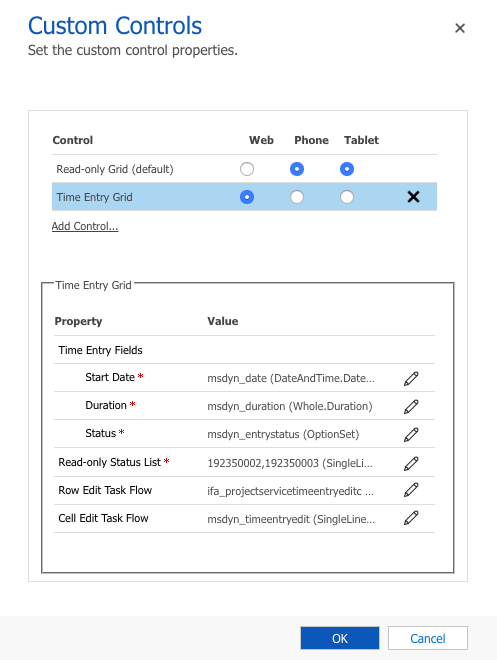
As a comparison the OOTB values for the My Weekly Time Entries view are the following:
| Property | Value |
| Time Entry Fields | My Weekly Time Entries |
| Start Date | msdyn_date (DateAndTime.DateOnly) |
| Duration | msdyn_duration (Whole.Duration) |
| Status | msdyn_entrystatus (OptionSet) |
| Read-only Status List | 192350002,192350003 (SingleLine.Text) |
| Row Edit Task Flow | msdyn_timeentryrowedit (SingleLine.Text) |
| Cell Edit Task Flow | msdyn_timeentryedit (SingleLine.Text) |
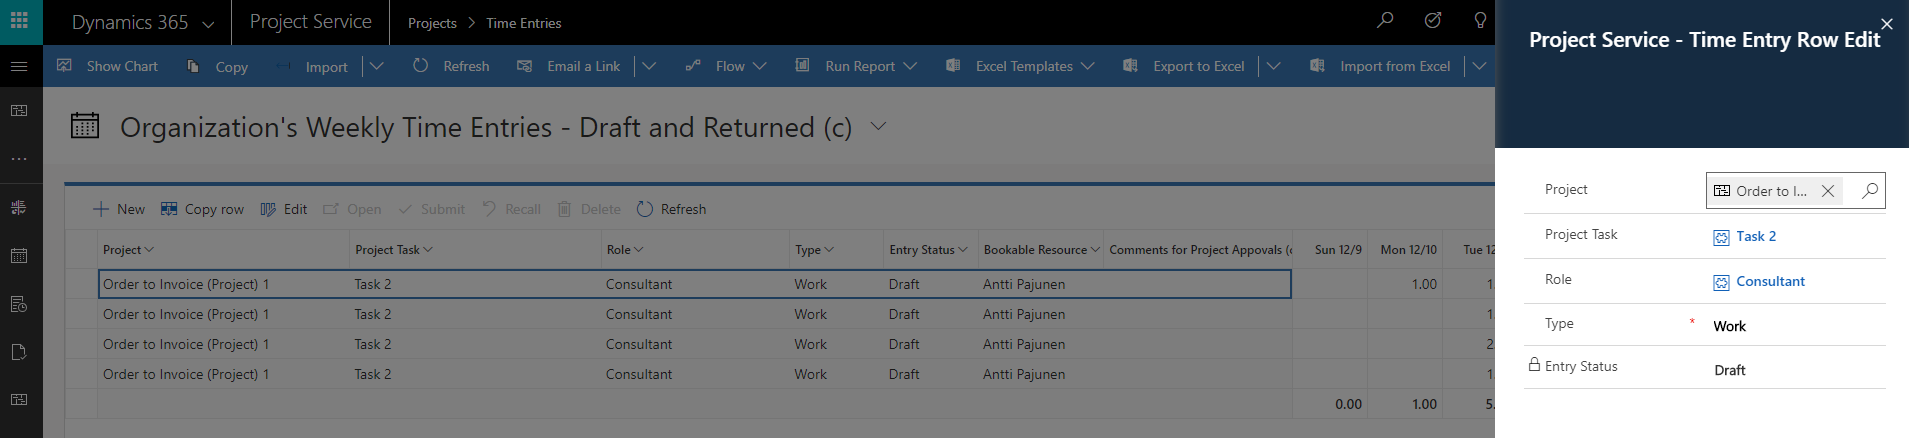
4. Test the new Task Flow
Our last step is to test the new Task Flow from the new custom view created in step 1.
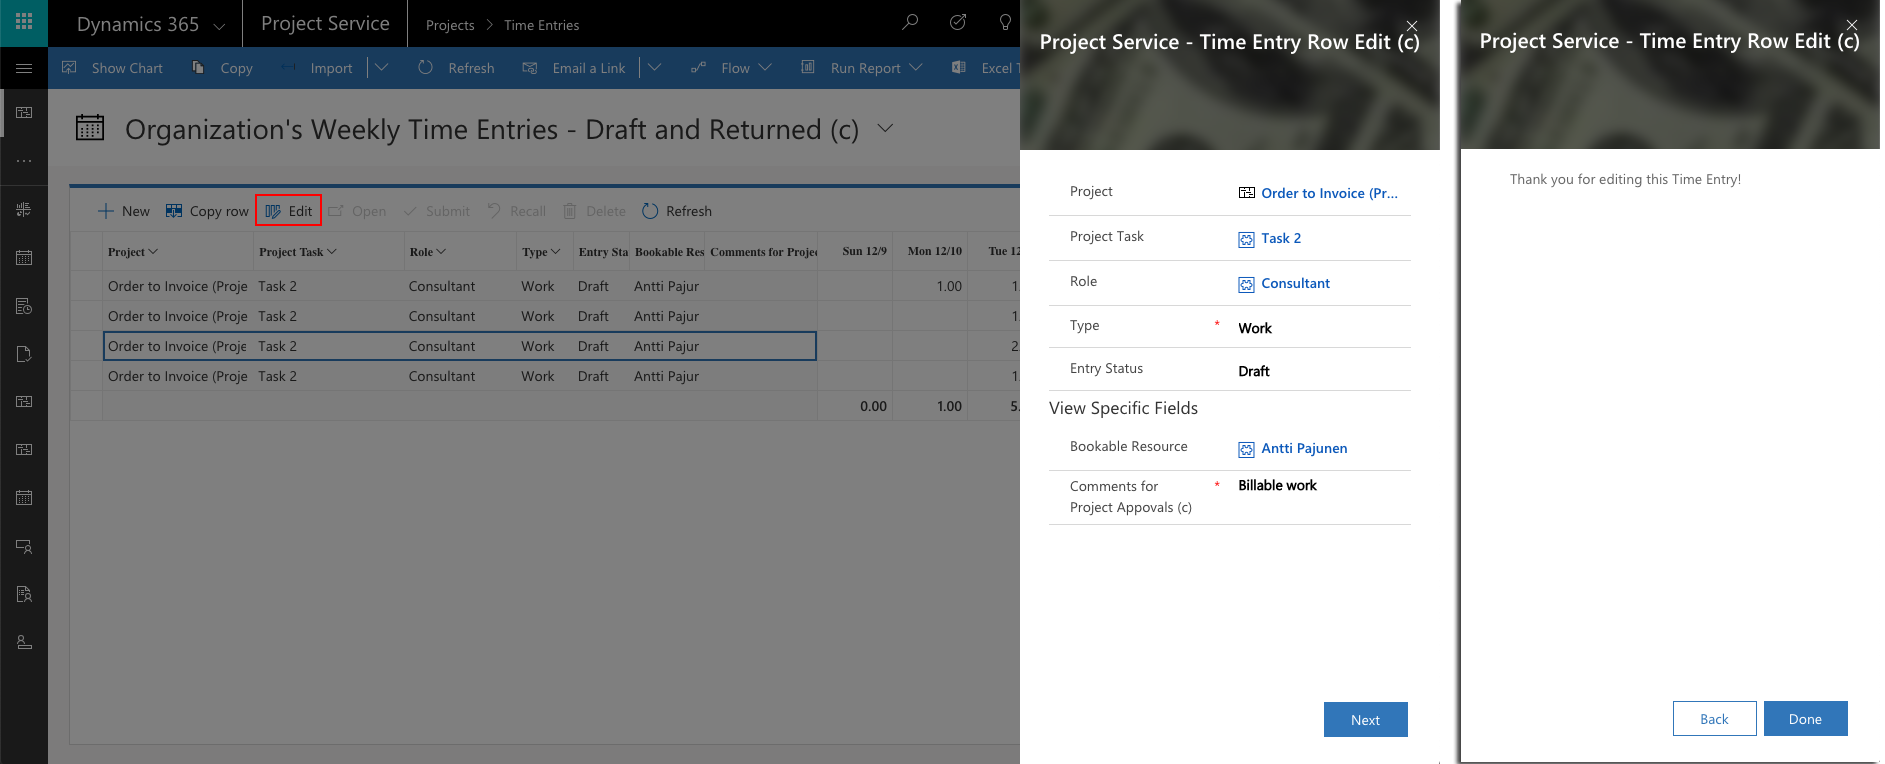
I hope this blog post helps you leverage the new Time Entry Grid with Custom Controls and Task Flows. Remember that you can have a Task Flow of its own for editing rows and cells on every single view. After creating a view and a Task Flow we associated the Task Flow with a view’s Custom Control.
Disclaimer:
All my blog posts reflect my personal opinions and findings unless otherwise stated.
Great article and a real shortcut to get going on an area that was unclear but critical to upgrading to 3.3 You absolutely ROCK! I am certain this saved many hours of pain.
Thanks 🙂