
Tested on Project Operations on Dataverse version 4.28.0.120 (February 2022)
Do I always have to use quick create to create a new Time Entry? Is there a way to automatically fill the Time Entry grid with all projects a resource is on? Is there a way to see all projects automatically on the Time Entry grid?
If you work with Dynamics 365 Project Operations then you’ve most likely been asked very similar questions. Customers moving to Project Operations from different time tracking tools are sometimes used to a concept of timesheets vs. time entries. What’s the difference? The way I always explain it is that timesheets are something users fill and send as a single whole, usually prefilled with their projects. I.e. users submit a single sheet that’s then reviewed by a manager/approver, and that sheet includes entries for a defined period of time – usually a workweek. A time entry on the other hand is a single entry that’s submitted and reviewed as an individual entry.
Many time tracking tools have a concept of timesheets whereas Project Operations has a granular concept of time entries. The downside of such granularity is that users need to create a new row in the database for each individual time entry. While the current Time Entry grid allows for simply punching in numbers per project per day, getting the grid to accurately display the projects and tasks a user is working on can be a manual effort.
Faster Time Entries
The big question is how can we make the process of adding new projects to the Time Entry grid faster? Here’s what we can do OOTB:
- Add a new project to the TE grid by creating a new Time Entry with quick create.
- Copy a week to another week.
- Import from Resource Assignments.
- Import from Bookable Resouce Bookings.
- Import Exchange appointments.
What’s the problem with the OOTB options then? The challenge is specifically with Resource Assignments. They are added to the TE grid based on a Resource Assignment’s msdyn_effort. While this is in theory exactly what’s on many occasions desirable, assignments still present a problem: As assignment contours can’t be edited (GA September 2022), it’s nearly impossible to have realistic assignment contours for resources. This can lead to situations where a resource might have tens of hours of work per day “on paper” while the reality is something different.
One approach, which isn’t available OOTB, is adding projects to the TE grid based on Project Team Member rows. As some customers opt out of using bookings and assignments, they’re only left with PTM rows as a means of listing project resources. This is a scenario that’s not supported by the TE grid’s import feature. The approach covered in this blog post can be adapted to fit such a PTM specific scenario.
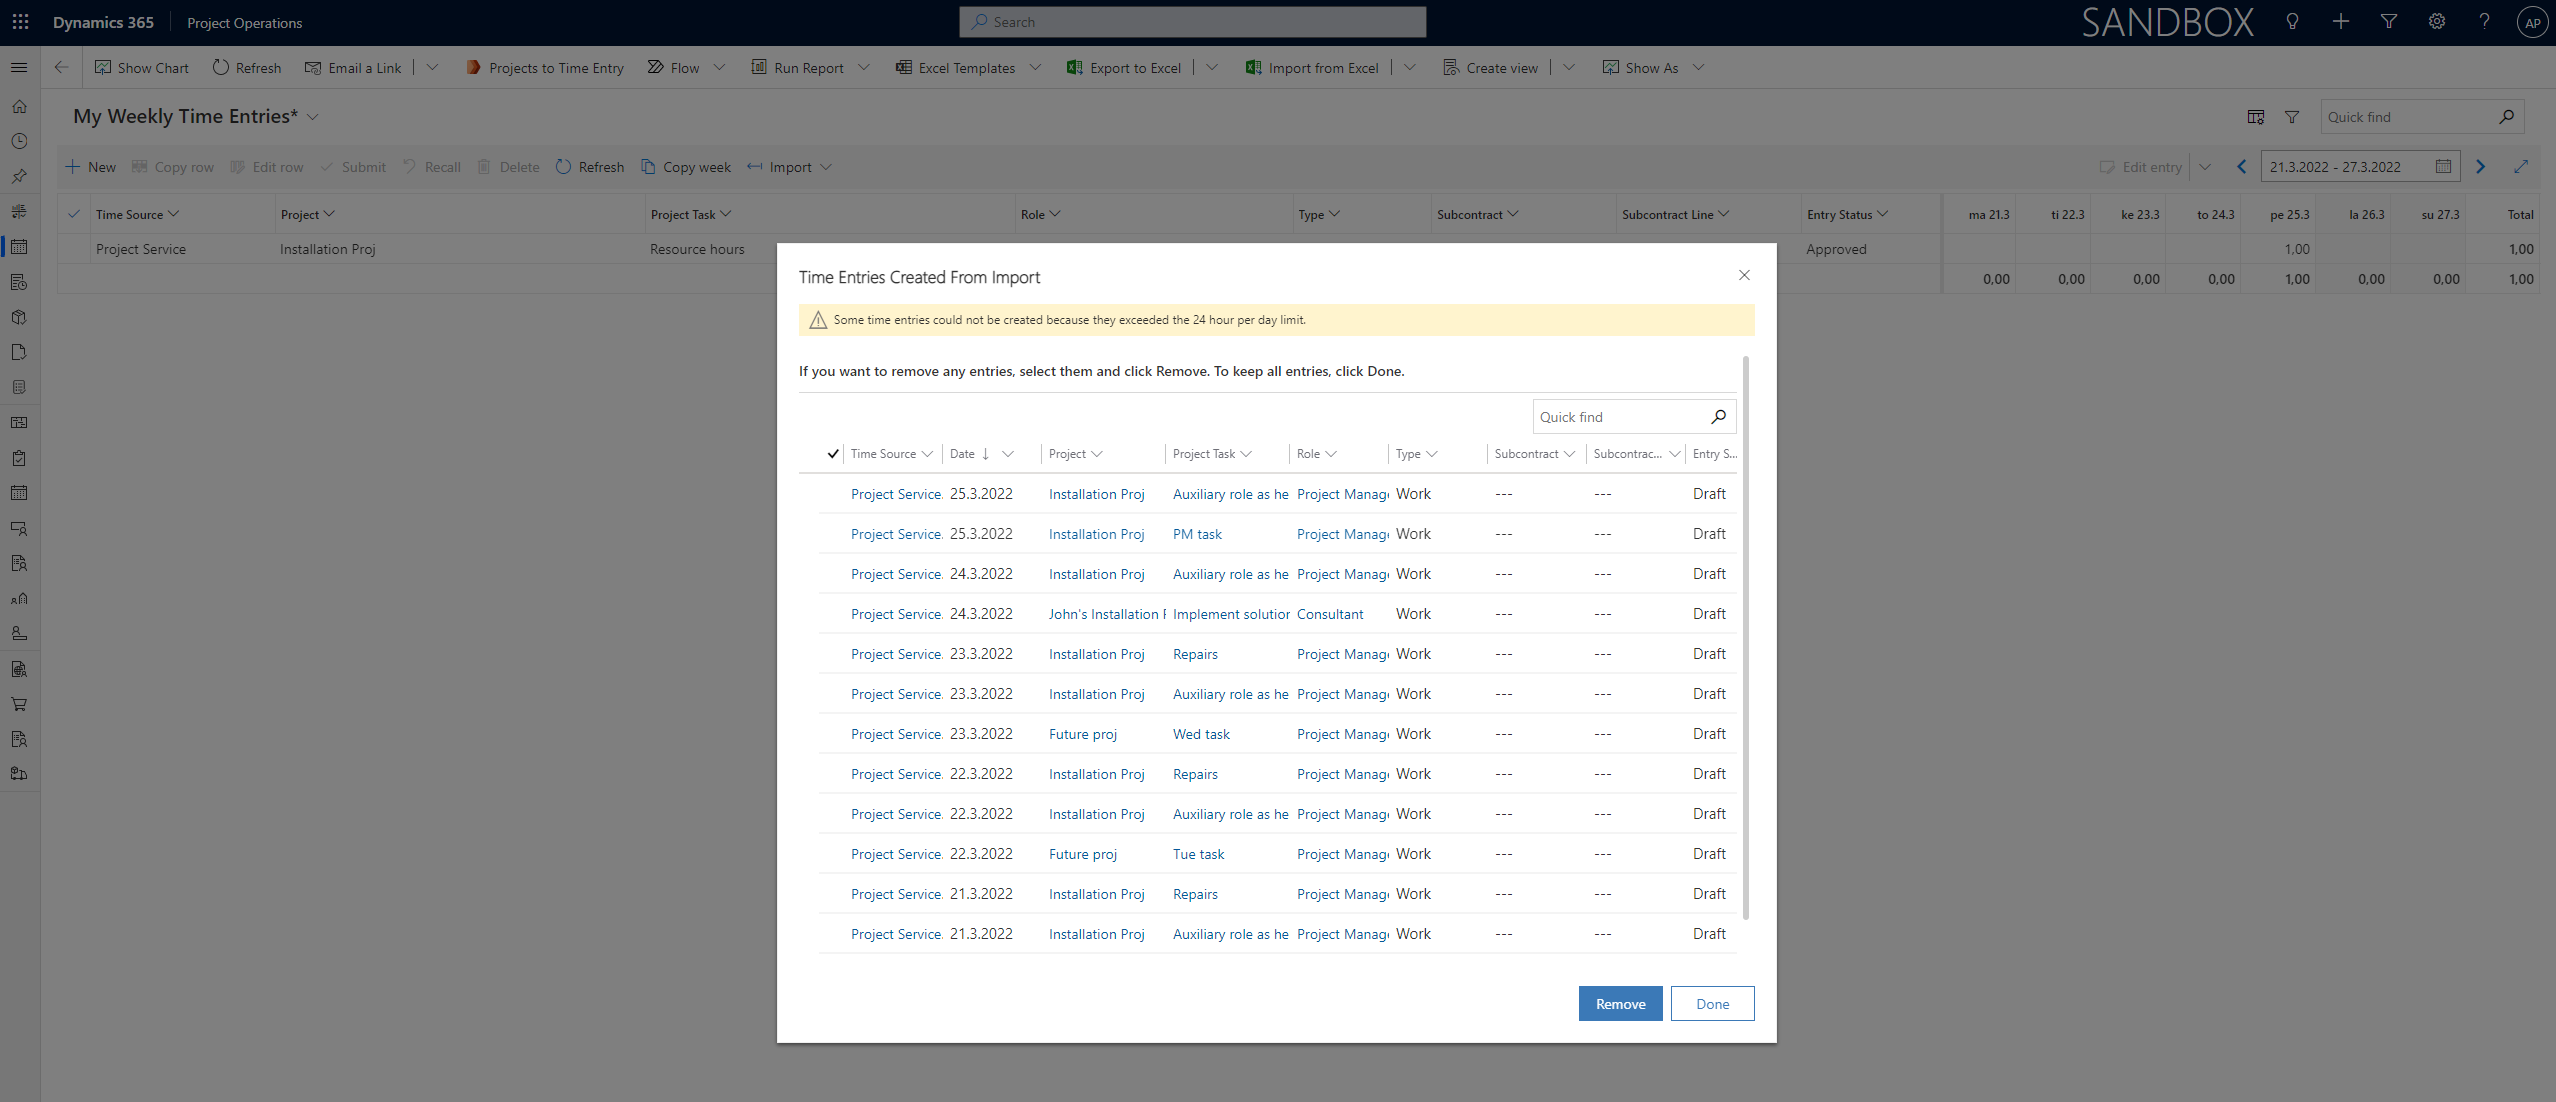
Back to Resource Assignments. Let’s look at an example. If John Doe and Jane Doe are on a 1-day task that has a Total Effort (msdyn_effort) of 8 hours, the total of 8 is split between John and Jane. Multiply this with a few other tasks they’re on and we hit numbers that go beyond 24 h a day. This also happens to be the limit that we can punch in the TE grid. Simply put, the challenge is that we won’t get all tasks a resource is assigned on in the TE grid. The error that ProjOps produces when importing Resource Assignments in excess of 24 h per day can be seen in image 1 below.
Automatically filling the Time Entry grid
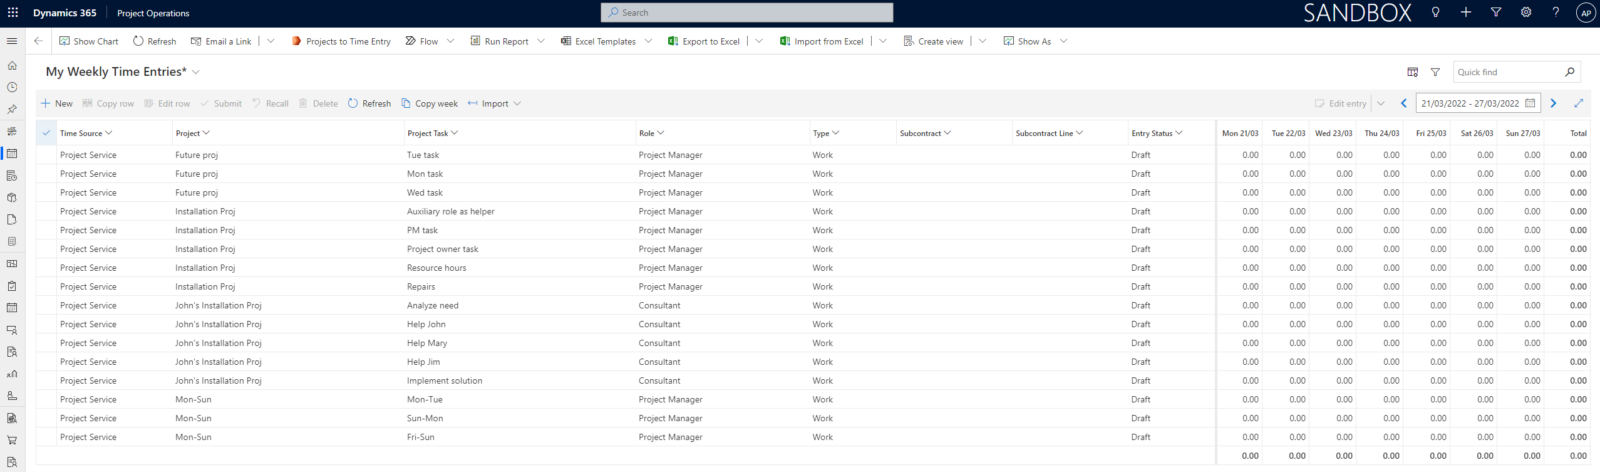
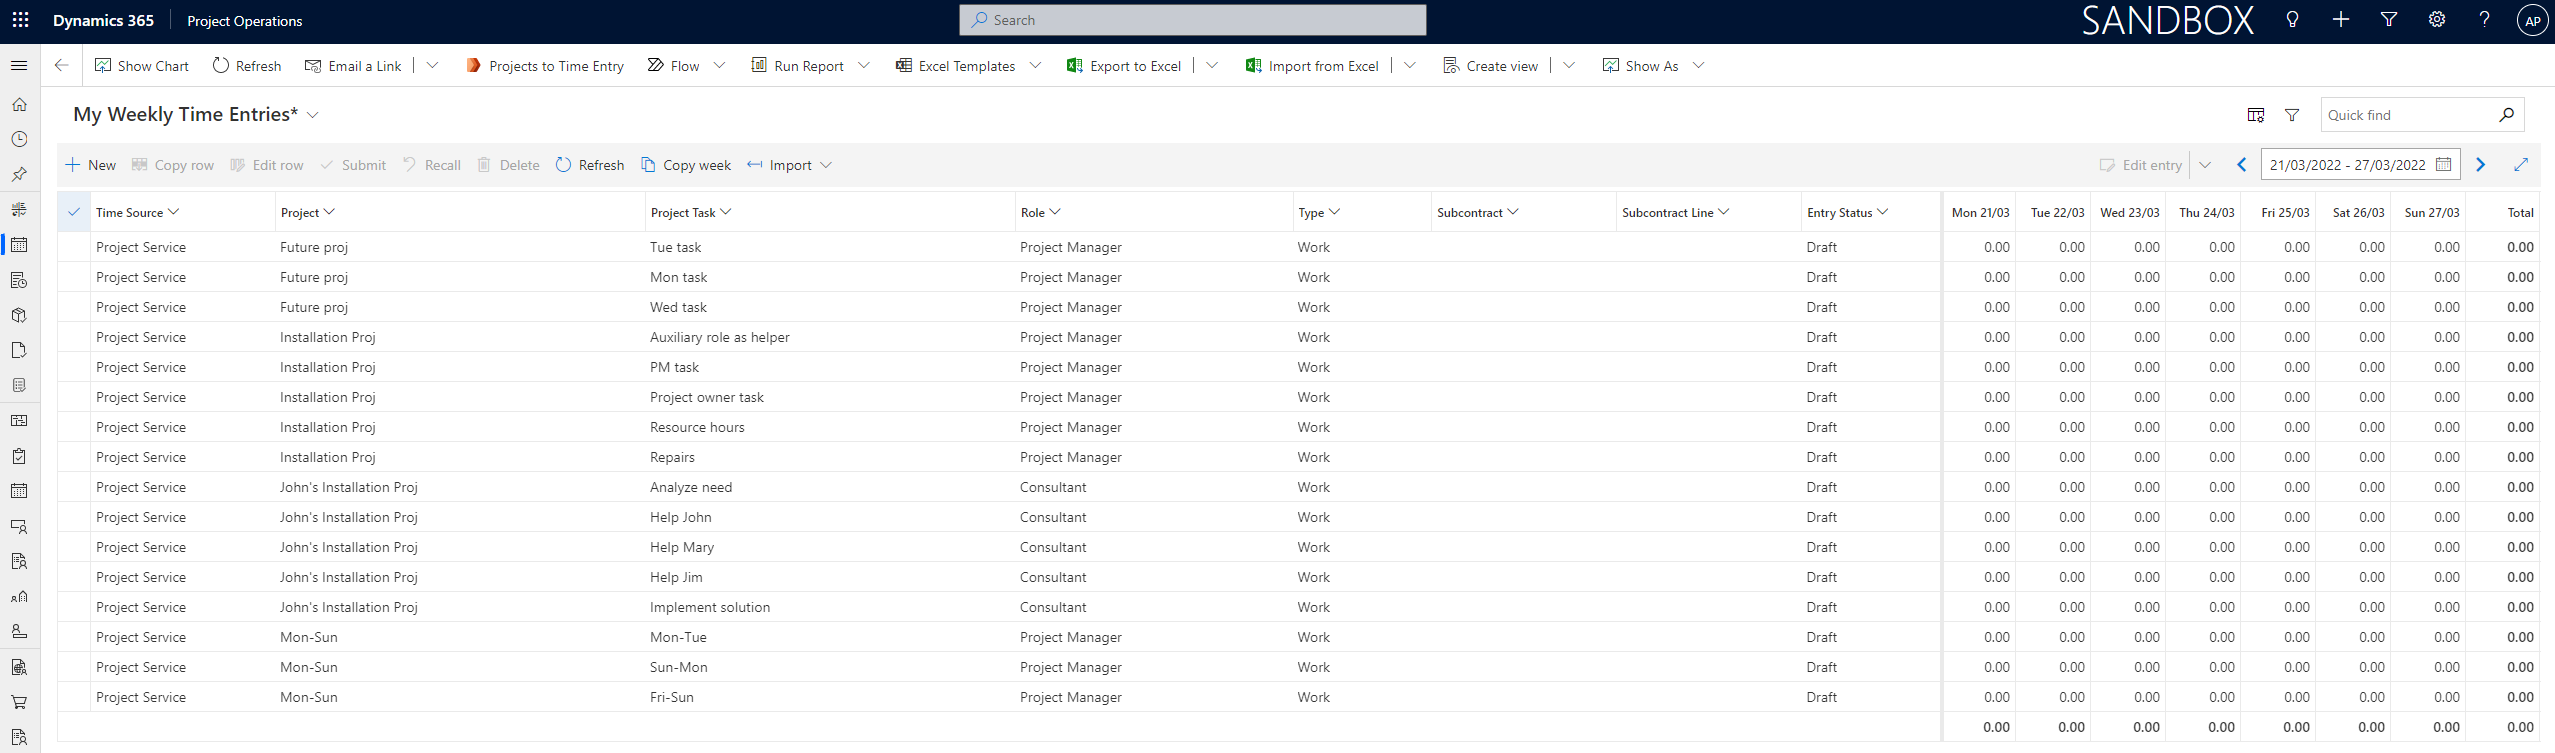
Now that we’ve established that ProjOps has a concept of individual Time Entry rows vs. timesheets, we can look at how the Time Entry grid displays Time Entry rows. It’s actually pretty obvious: Every cell that’s under a date column and has a duration in the cell is a Time Entry row of its own. If a cell doesn’t have a value for duration for a given date, no Time Entry row exists for that specific project+task combination in the grid. Image 2 below illustrates this.

A means of creating Time Entries faster is of course to have the TE grid populated with the projects a user is on. A user can be considered “being on a project” when they have a Bookable Resource Booking, a Resource Assignment or when they’re simply added as a Project Team Member on a project. This blog post focuses on Resource Assignments as a means of “being on a project”.
In a nutshell, the solution covered in this blog post is simple. If a user has a Resource Assignment that starts on or before a Monday and ends on or after a Sunday, Time Entries are created for the related week for Mon, Tue, Wed, Thu, Fri, Sat, and Sun. Let’s look at an example with dates. Let’s say that automation (flow/code) is fired off on Monday 21.3 to populate the TE grid. Resource Assignments for the user exist for dates ranging from Sunday 20.3 to Monday 28.3.
| Resource Assignment dates | Sun 20.3 | Mon 21.3 | Tue 22.3 | Wed 23.3 | Thu 24.3 | Fri 25.3 | Sat 26.3 | Sun 27.3 | Mon 28.3 |
| Time Entries created | X | X | X | X | X | X | X |
Power Automate and Resource Assignments
Let’s look at a way of automatically populating the TE grid with Power Automate. Before we jump in the flow, we need to consider how it can be fired off. The most convenient option is to use a custom ribbon button. Modern commanding with Power Fx isn’t quite there yet for running flows from the ribbon so a Smart Button with Ribbon Workbench is the route I chose. The downside of this is that the flow needs to be triggered with a When a HTTP request is received trigger. This means that to get the GUID of the user who calls the flow we need to use JavaScript to pass user context from the ribbon button to the flow. As the JS will contain the URL of the flow’s trigger, ALM with environment variables becomes a full-fledged pro-dev experience. Another downside with flow is that informing users of the status of the flow (fired off vs. rows created vs. failed) is clunky. More reason to just let a friendly dev make all this happen in an actual customer implementation. For this post, flow is a great concept and starting point.
Smart Button with Ribbon Workbench
Let’s look at the Smart Button that is used to fire off the flow. I’ve used a Quick JS button so that I’ve been able to escape having to create a web resource for the JavaScript I’ve used. Instead of hard coding the flow’s URL to the JS like I’ve done, consider using environment variables. MVP Joe Griffin has a blog post about getting their values in JS here. Image 3 shows the Ribbon Workbench configuration I’ve used for the Smart Button and the JS I’ve used can be found below. I’m not a dev but the JS did get me what I was after. Feel free to do better with your JS!
var data = {"UserId": "", "UserName": ""};
var globalContext = Xrm.Utility.getGlobalContext();
data.UserId = globalContext.userSettings.userId;
data.UserName = globalContext.userSettings.userName;
var requestUrl = "yourTriggerUrlHere";
var req = new XMLHttpRequest();
req.open("POST", requestUrl, true);
req.setRequestHeader("Accept", "application/json");
req.setRequestHeader("Content-Type", "application/json; charset=utf-8");
req.send(JSON.stringify(data));
alert("Processing for "+ data.UserName +" but remember that this doesn't catch+finally or respond back!");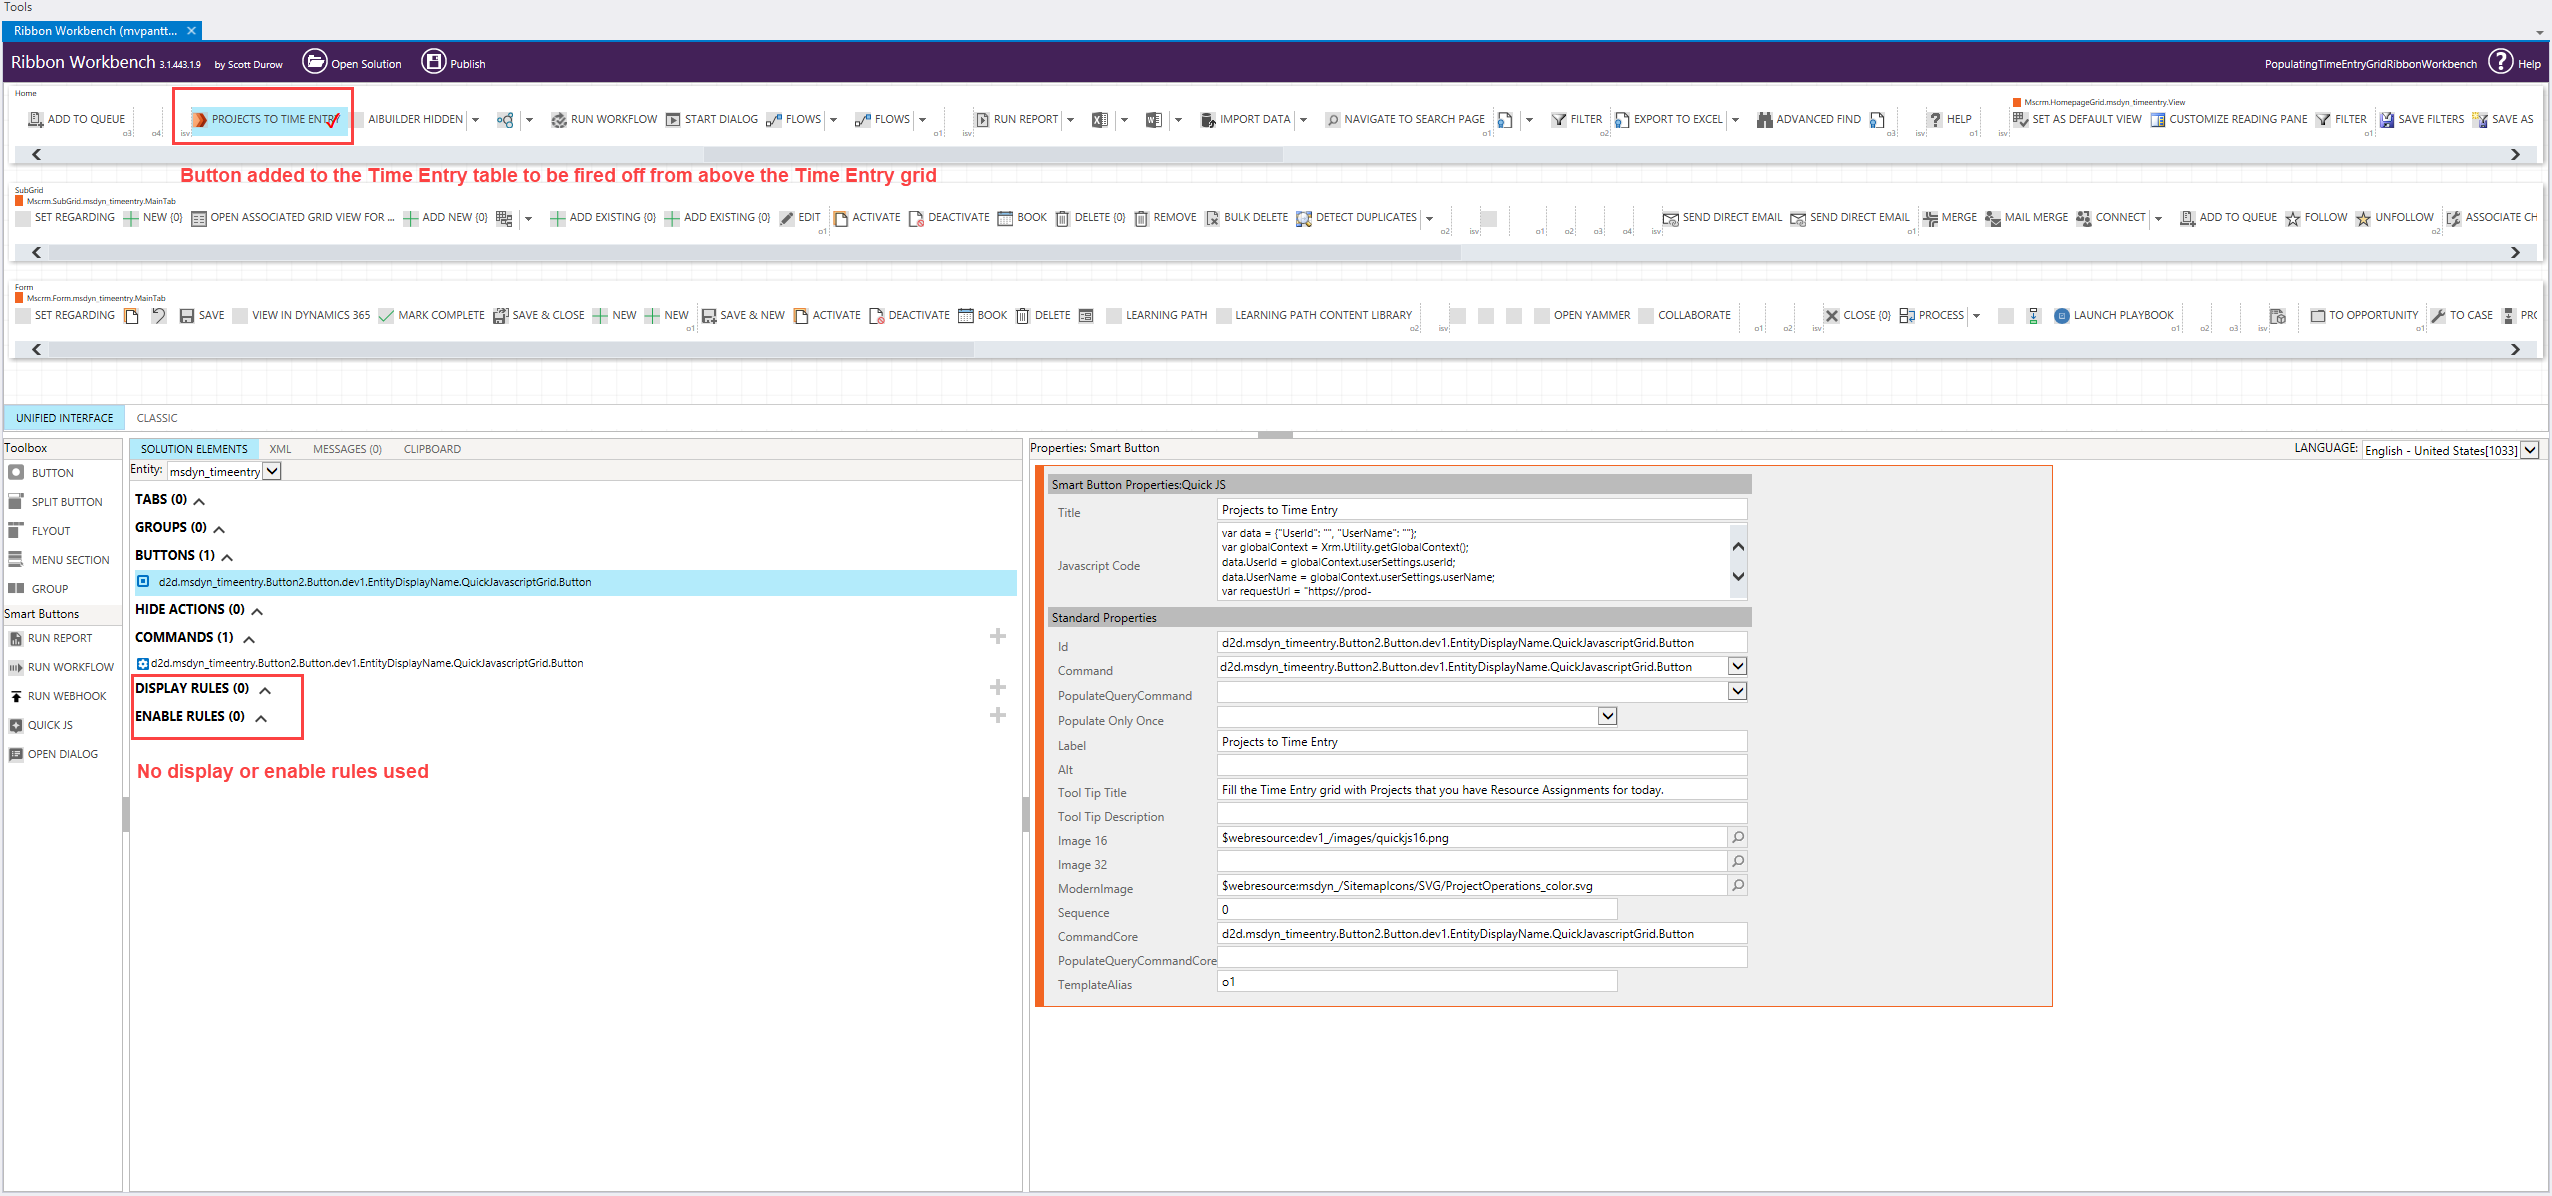
Image 4 below shows the JS alert that’s displayed when the custom ribbon button is pressed.

Projects to Time Entry Grid Flow
Time to dissect the flow. Again, this is a means of delivering a quick win or a PoC to illustrate what can be done. Depending on the exact scenarios and variables, I would consider creating this as a synchronous process, to factor in ALM in the JS when necessary, and create UI alerts when automation is fired off and when the process succeeds or fails. This flow also lacks error handling as it’s meant to be more of a demo concept than a customer implementation.
Initial actions
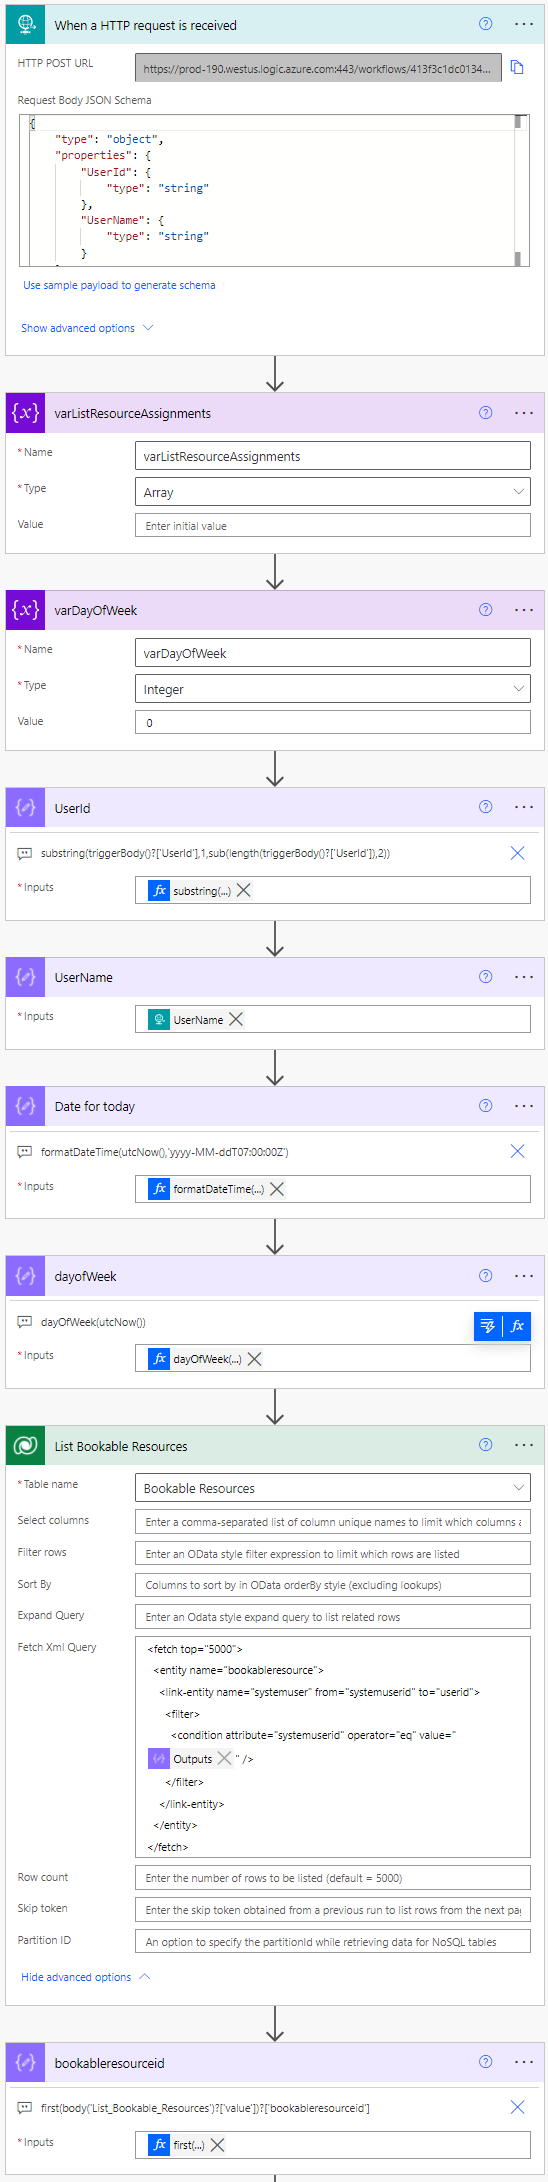
Let’s start by looking at the Projects to Time Entry Grid Flow’s initial actions. The flow is fired off from the ribbon button and its JS. The JSON schema for the trigger is:
{
    "type": "object",
    "properties": {
        "UserId": {
            "type": "string"
        },
        "UserName": {
            "type": "string"
        }
    }
}
Next, variables are initialized to hold Resource Assignments and the current day of the week. More about these down the line. The UserId property’s value will have curly brackets (I didn’t really figure out why but oh well) so the following expression is used to take them out: substring(triggerBody()?['UserId'],1,sub(length(triggerBody()?['UserId']),2)). UserName is optional in this flow but today’s date with formatDateTime(utcNow(),'yyyy-MM-ddT07:00:00Z') and current day of week with dayOfWeek(utcNow()) are needed. Note the timestamp in the formatted utcNow. I’m in UTC +2 so task start time (msdyn_start) will always be 07:00:00 and task finish (msdyn_finish) 15:00:00. In my DST (UTC +3), start will be 06:00:00 and finish will be 14:00:00. Make sure the timestamp formatting is correct for your time zone! For my time zone it has no impact on the flow as the flow is built with winter time (UTC +2) in mind.
Bookable Resources are listed with Fetch XML in this example. There’s no specific need to use fetch as an OData filter query can be used as well. My original design thinking has called for Fetch XML and I’ve thus left it in the action instead of using an OData filter. The query I’ve used is:
<fetch top="5000">
  <entity name="bookableresource">
    <link-entity name="systemuser" from="systemuserid" to="userid">
      <filter>
        <condition attribute="systemuserid" operator="eq" value="@{outputs('UserId')}" />
      </filter>
    </link-entity>
  </entity>
</fetch>
The final initial action is for storing the bookableresourceid of the user who has fired off the flow. It can be stored in a compose with the following expression to avoid an apply to each loop: first(body('List_Bookable_Resources')?['value'])?['bookableresourceid'].
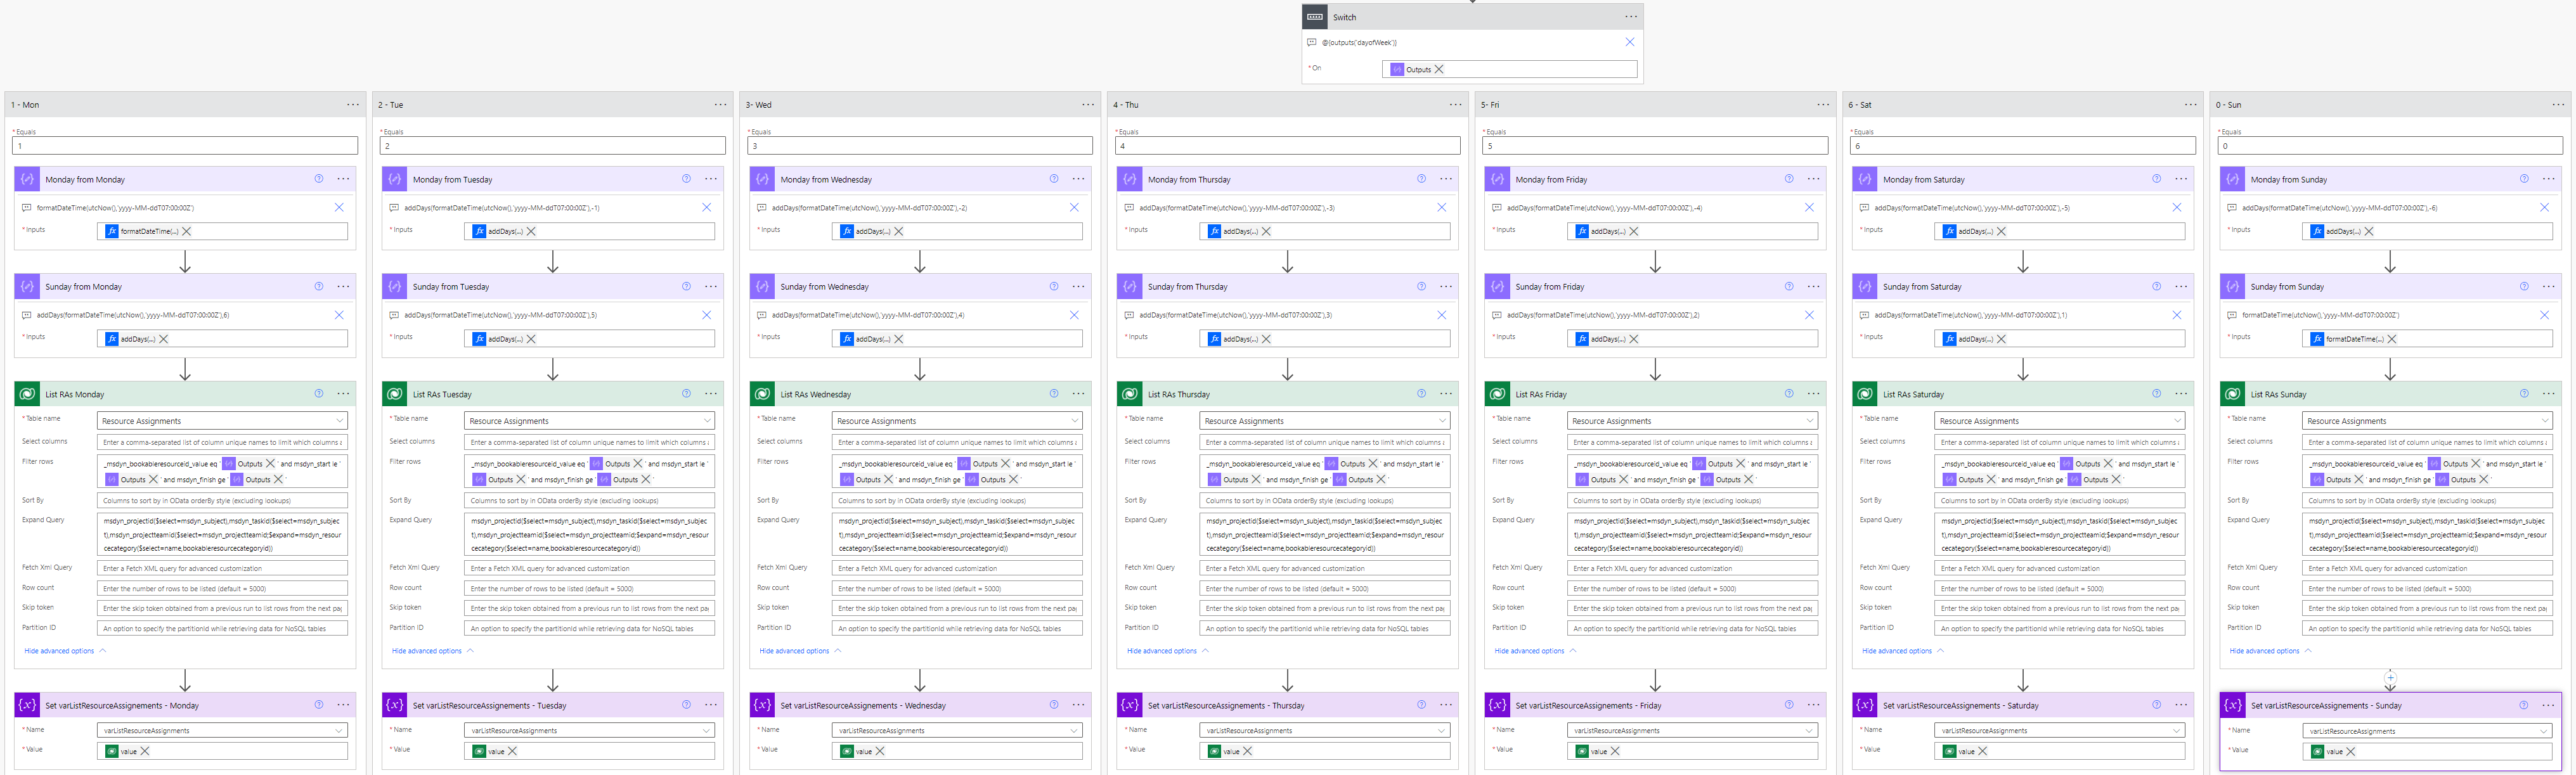
Switch action
A switch action follows the flow’s initial actions. The switch runs based on the output of the dayOfWeek compose. This way we’re able to discern the day of the week that we’re currently in when running the flow. Each branch of the switch contains similar logic for determining the dates for a week’s Monday and Sunday. This way we have the date range for which Time Entries are to be created.
If dayOfWeek is 1, the flow is fired off on a Monday. If it’s 2, it’s fired off on a Tuesday. Sunday is an exception as its value is 0 instead 7. The first compose in each of the branches stores the value for a given week’s Monday. The second compose stores the value for the week’s Sunday.
Now that we know the dates for a given week’s Monday and Sunday, Resource Assignments with a Start (msdyn_start) date less than or equal to (le) the week’s Sunday and a Finish (msdyn_finish) date greater than or equal to (ge) the week’s Monday can be listed for the user/Bookable Resource who has fired off the flow. We are specifically looking for a Start less than or equal to Sunday so that we can get all start dates for the given week. We’re also specifically looking for a Finish greater than or equal to Monday so that we can get all finish dates for the given week.
The OData filter query used when calling the flow on a Monday (the switch runs in 1 – Mon) is:
_msdyn_bookableresourceid_value eq '@{outputs('bookableresourceid')}' and msdyn_start le '@{outputs('Sunday_from_Monday')}' and msdyn_finish ge '@{outputs('Monday_from_Monday')}'We also need to use a nested expand query to get our hands on the GUID for the Role that the Bookable Resource has on the project. We’re going from Resource Assignments to Project Team Members to Bookable Resource Categories to get it. This example also expands to the Project and Project Task tables for their msdyn_subject columns. These columns are not used elsewhere in the flow. The entire expand query used is:
msdyn_projectid($select=msdyn_subject),msdyn_taskid($select=msdyn_subject),msdyn_projectteamid($select=msdyn_projectteamid;$expand=msdyn_resourcecategory($select=name,bookableresourcecategoryid))The final action in each of the branches sets the variable varListResourceAssignments with the value property @{outputs(‘List_RAs_Monday’)?[‘body/value’]} from the previously listed Resource Assignments. Why not store the value property in a compose? The reason is that the property needs to be referenced down the line in an apply to each. A variable is the easiest way to use a value based on the branch that runs. Image 6 below shows the switch action with all its branches.
Final actions
We’re nearing the end of the flow. The next thing to do after the switch is to compose the date for the Monday of the related week. We’re able to compose that value by using the outputs from the branches as the input for the Monday of current week compose action. One of the branches always runs so a single value will be composed.
The apply to each holds the key to new Time Entry rows based on the listed Resource Assignments. The apply to each runs through the variable varListResourceAssignments, which holds a value from listed RAs based on the switch branch that ran. The first action in the apply to each is a Do until loop. It looks at the variable varDayOfWeek, which originally holds a value of 0. The do until loop then runs until the variable holds a value of 7. A week has 7 days so essentially the do until loop runs 7 times to create Time Entries for each day of a given week.
A condition in the do until loop checks if the variable holds a value of 7. If it does, the variable is set back to 0. After all, a week doesn’t have 8 days and we only want to make Time Entries for 7 days. If the variable holds a value other than 7, the condition runs in the false path and proceeds to the following action, which is Date for Time Entries. This action is a compose that holds a value for the date of a Time Entry that will be created a few steps down the line. An expression adds whatever the variable currently holds to the output of Monday of current week. In other words, we’re taking the current week’s Monday and adding days to that from the varDayOfWeek variable. This way we can create a Time Entry for each day of the given week. The expression used is addDays(outputs('Monday_of_current_week'), variables('varDayOfWeek')).
Next, Time Entries are listed. Why? Well, we only want to add new Time Entries to be displayed in the TE grid if we already have Time Entries with a duration greater than 0 for the Resource Assignments we’re evaluating. In other words, if you’ve pressed the button on the ribbon and populated the TE grid, you don’t want the grid to populate with duplicate entries for a duration of 0 on another click of the button. If the duration is greater than 0 and you click the ribbon button then you most likely need to create a new Time Entry in addition to the existing one, and the grid should populate. This logic is optional and can be easily removed if every click of the ribbon button should create a new Time Entry row, whether or not rows for the given week already exist for any duration. The OData filter query used in the List Time Entries action is:
_msdyn_bookableresource_value eq '@{outputs('bookableresourceid')}' and _msdyn_project_value eq '@{items('Apply_to_each_listed_RA')?['_msdyn_projectid_value']}' and _msdyn_projecttask_value eq '@{items('Apply_to_each_listed_RA')?['_msdyn_taskid_value']}' and msdyn_date eq '@{outputs('Date_for_Time_Entry')}' and msdyn_duration eq 0 and msdyn_entrystatus eq 192350000If the action doesn’t return anything a Time Entry with a duration of 0 doesn’t exist and a new one is created for the day and week in question. If the action does return something then a Time Entry for the day and week in question with a duration of 0 exists and a new one shouldn’t be created to avoid duplicate 0 duration Time Entries in the TE grid. The expression used in the condition is
empty(outputs('List_Time_Entries')?['body/value'])
If a new Time Entry row shouldn’t be created (false path) then the variable varDayOfWeek is incremented by 1. If a new row is to be created then the true path of the condition runs and a Time Entry row is created in Dataverse. Expressions are needed to access values for Project, Project Task, and Bookable Resource in the variable varListResourceAssignments that we’re looping through. Dynamic content isn’t available when looping through a variable. We also have a nested expand query in the original list rows actions for Resource Assignments so we’re in need of expressions in any case. These expressions are:
items('Apply_to_each_listed_RA')?['_msdyn_taskid_value'] // items('Apply_to_each_listed_RA')?['_msdyn_projectid_value'] // items('Apply_to_each_Resource_Assignment')?['msdyn_projectteamid/msdyn_resourcecategory/bookableresourcecategoryid']With a new time Entry row created all that’s left is to increment the variable varDayOfWeek by one to either create a new Time Entry row for another day of the week or to move to the next Resource Assignment in the apply to each loop.

The only thing that’s left is to look at what the Time Entry grid looks like after the flow has run and Time Entry rows have been created. Image 8 illustrates a TE grid that has been populated with new TE rows, which all have a duration of 0.
Sample flows
Sample solutions with flows are available on GitHub.
Author’s Effort and References
| Build and Write Effort | Community Blogs and Forums | MVPs Consulted | Product Group Interactions | Support Requests |
| Approximately 3 days | 0 | 2 | 0 | 0 |
All my blog posts reflect my personal opinions and findings unless otherwise stated.