
A frequent ask from a user assigned to a project is “Which tasks am I assigned to?”. In Project for the web’s (later P4W) and PSA’s terms, this translates to “What are my Resource Assignments?”. Out-of-the-box, there isn’t a straightforward experience to get such a list, unless a new view for Resource Assignments is created in P4W’s or PSA’s Model-driven app. Another solution would be a Power BI report. I’ve always been a fan of comprehensive Power BI reports and dashboards that show the most relevant information, but at least for now I’ve let “the BI people” create them.
I’m not a huge fan of automated and forced emails that flood my inbox daily, so to me the only valid solution is something that’s on-demand – be it email or something else. As I’ve gone through some ideas around extending P4W, there’s a specific delivery method that I keep coming back to: Adaptive Cards. Despite it being a really cool tool, Adaptive Cards require quite a bit of knowledge in composing cards in JSON so that’s ruled out as it’s not a no-code/low code approach.
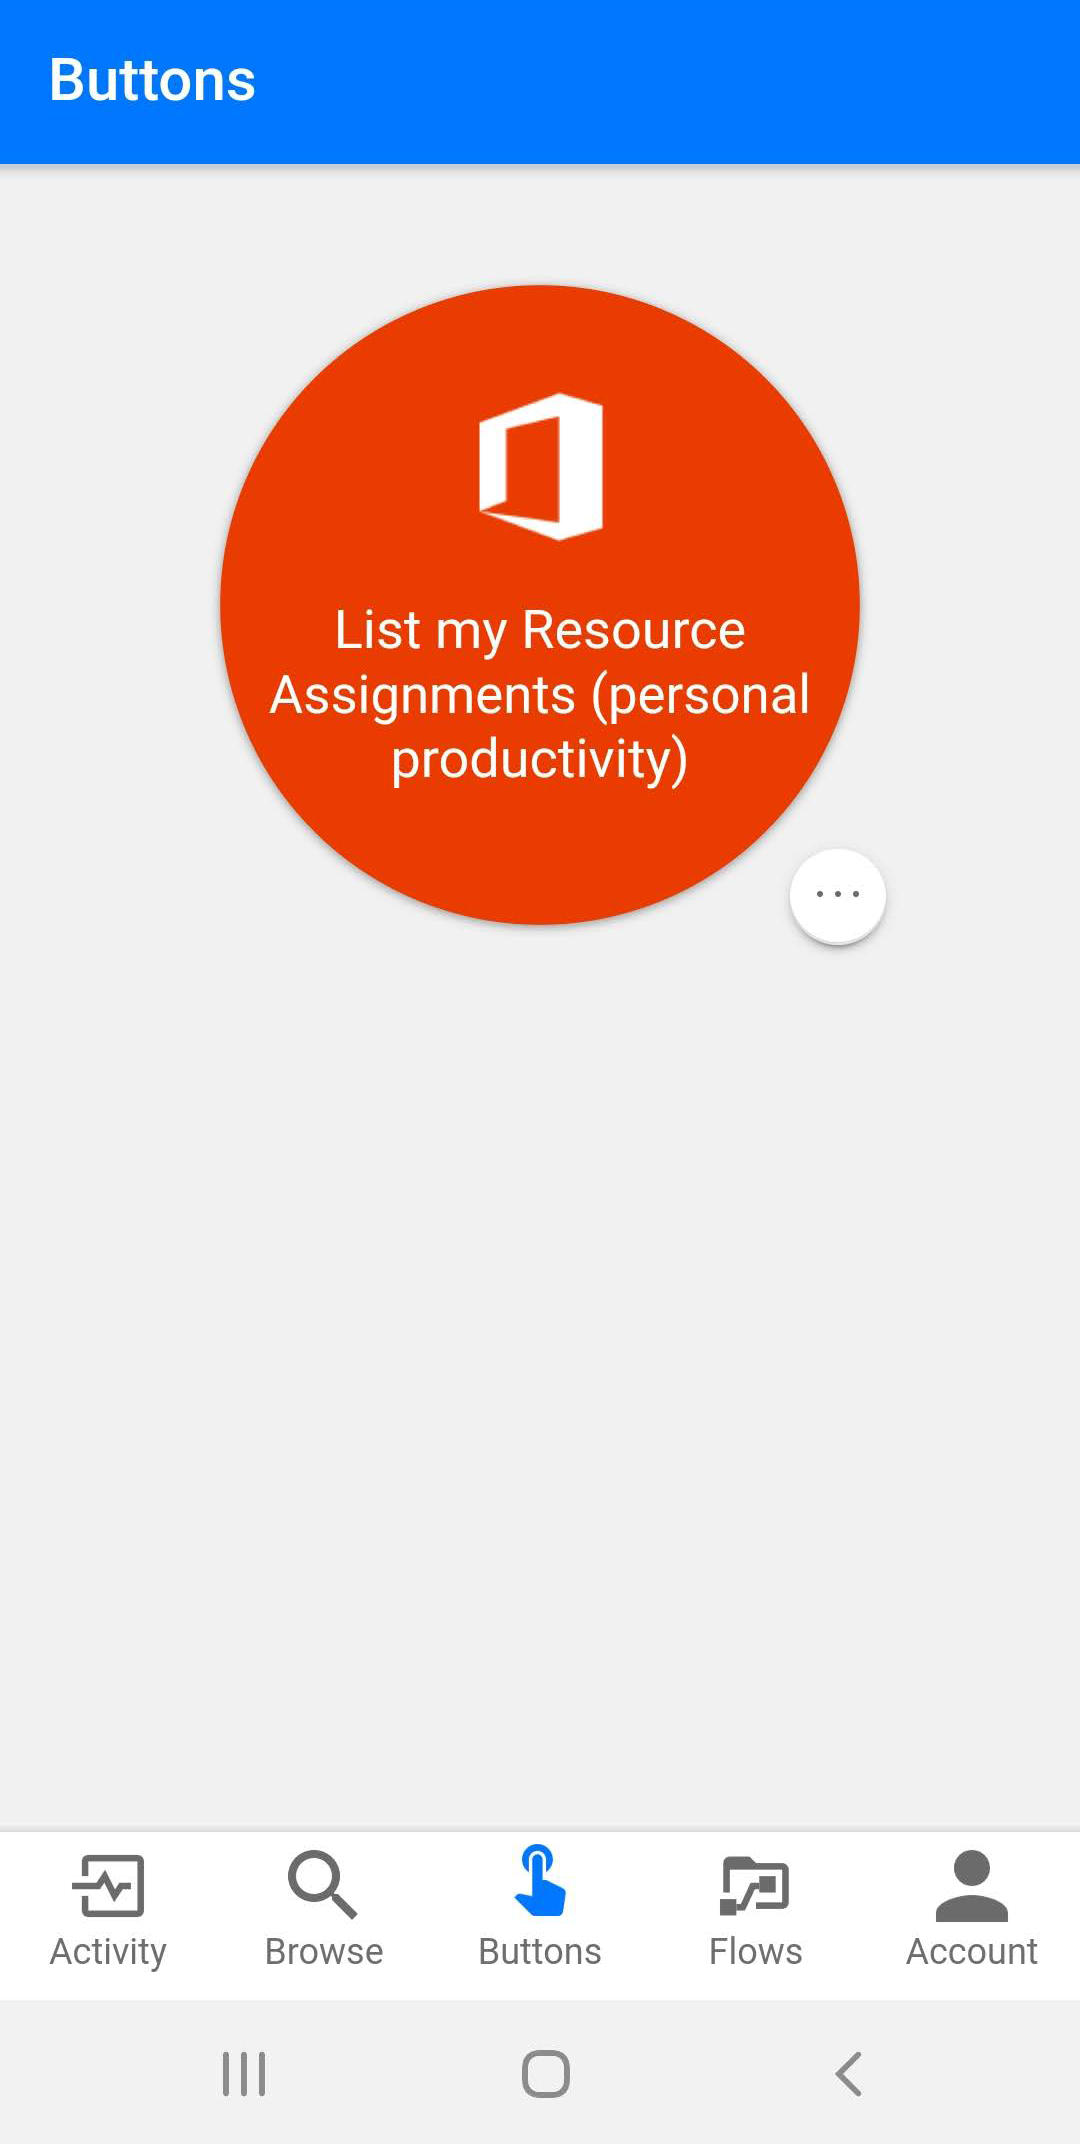
So what is an alternative method for easily listing a user’s Resource Assignments? Enter Power Automate. As the goal is to list user specific Resource Assignments, the Flow that needs to be built is a personal productivity Flow. To get it working as an on-demand Flow, it will be based on Flow Buttons: A user can fire the Flow off on their mobile. The delivery mechanism is email – this is the only component I’m not a huge fan of but it’s the easiest to get up and running. The upside is that by changing the Flow’s final actions, anyone can change the delivery mechanism to their liking. Be it Adaptive Cards, Flow Bot on Teams or something else.
Important background information
So you want to create a personal productivity Flow and make it available for all your users? Great idea! Its just that… it’s easier said than done. There is a vast amount of small details that can throw you off when you’re creating a Flow like this. You actually need to know a lot to get a Flow like this working and distributed easily. You also need to be aware of compromises that need to be made, because trust me, there are some. I’ve listed some of the small details that you need to be aware of:
- ALM. Button Flows don’t seem to be visible on mobile if they’re in a solution.
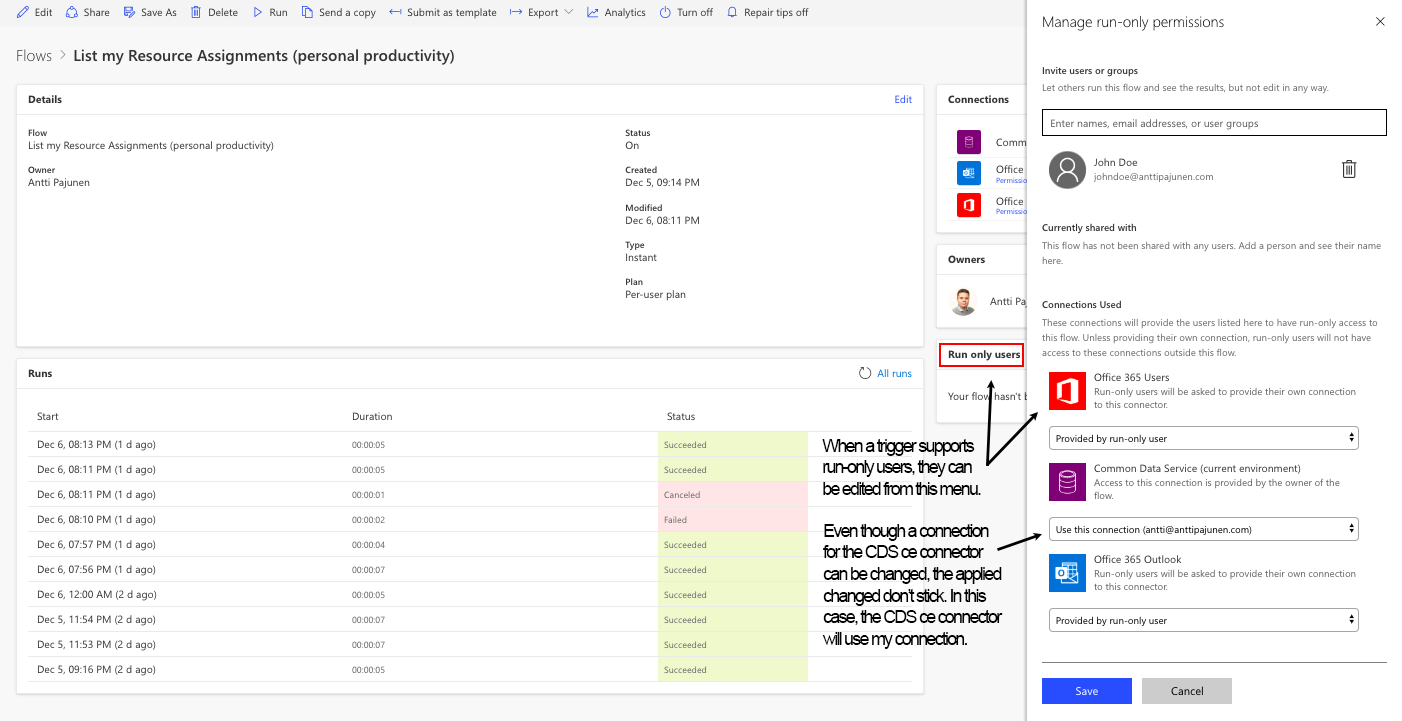
- Owner vs run-only user. Do you want to make everyone an owner (I wouldn’t recommend this) or a run-only user?
- Run-only users can fire off the Flows on their mobile as the Flow in question is a button Flow. Run-only users won’t see the Flows under “My Flows”.
- Distributing the Flow. How do you easily share the Flow if you have 1000 users? Not a great experience to click through 1k users.
- Use the Modify Run-Only Users connector to distribute the Flow. Note that the connector won’t pick up Flows that are in solutions.
- Check here for a post that covers creating a Flow that leverages the Modify Run-Only Users connector. There are some tricks to getting it to work.
- Thinking of letting users import a Zip of the Flow themselves? I’m not a huge fan of such idea…
- Administration of the Flow. Who owns the Flow and where does the Flow reside?
- My approach to this specific case is that an administrator creates the Flow under “My Flows” so that the Flow is a “personal productivity” Flow. This is because button Flows won’t work in solutions. The admin then distributes the Flow to all users in the organization. This can be done with another Flow that leverages the Modify Run-Only Users connector. Again, check here for a post about such a Flow.
- Connectors. Make sure run-only users provide their own connections when they run the Flow. Otherwise they’re not seeing their own Resource Assignments but the creator’s/admin’s. The CDS current environment connector will need to be accessed with the creator’s/admin’s credentials. Run-only user credentials are not supported for that connector.
For more information on owners vs. run-only users, I recommend reading the following blog posts by Chaks and Kent Weare.
The Flow for listing a user’s Resource Assignments
Let’s dive into the Flow. If you’re wondering why I’ve mentioned both P4W and PSA at the beginning of this post, it’s because the entities used in the Flow are present in both P4W and PSA. The Flow can be used with both applications. Getting starter, the Flow is fired off on Flow mobile or as a widget on Android or iOS (if you can get Flow widgets to work).
Flow’s initial actions
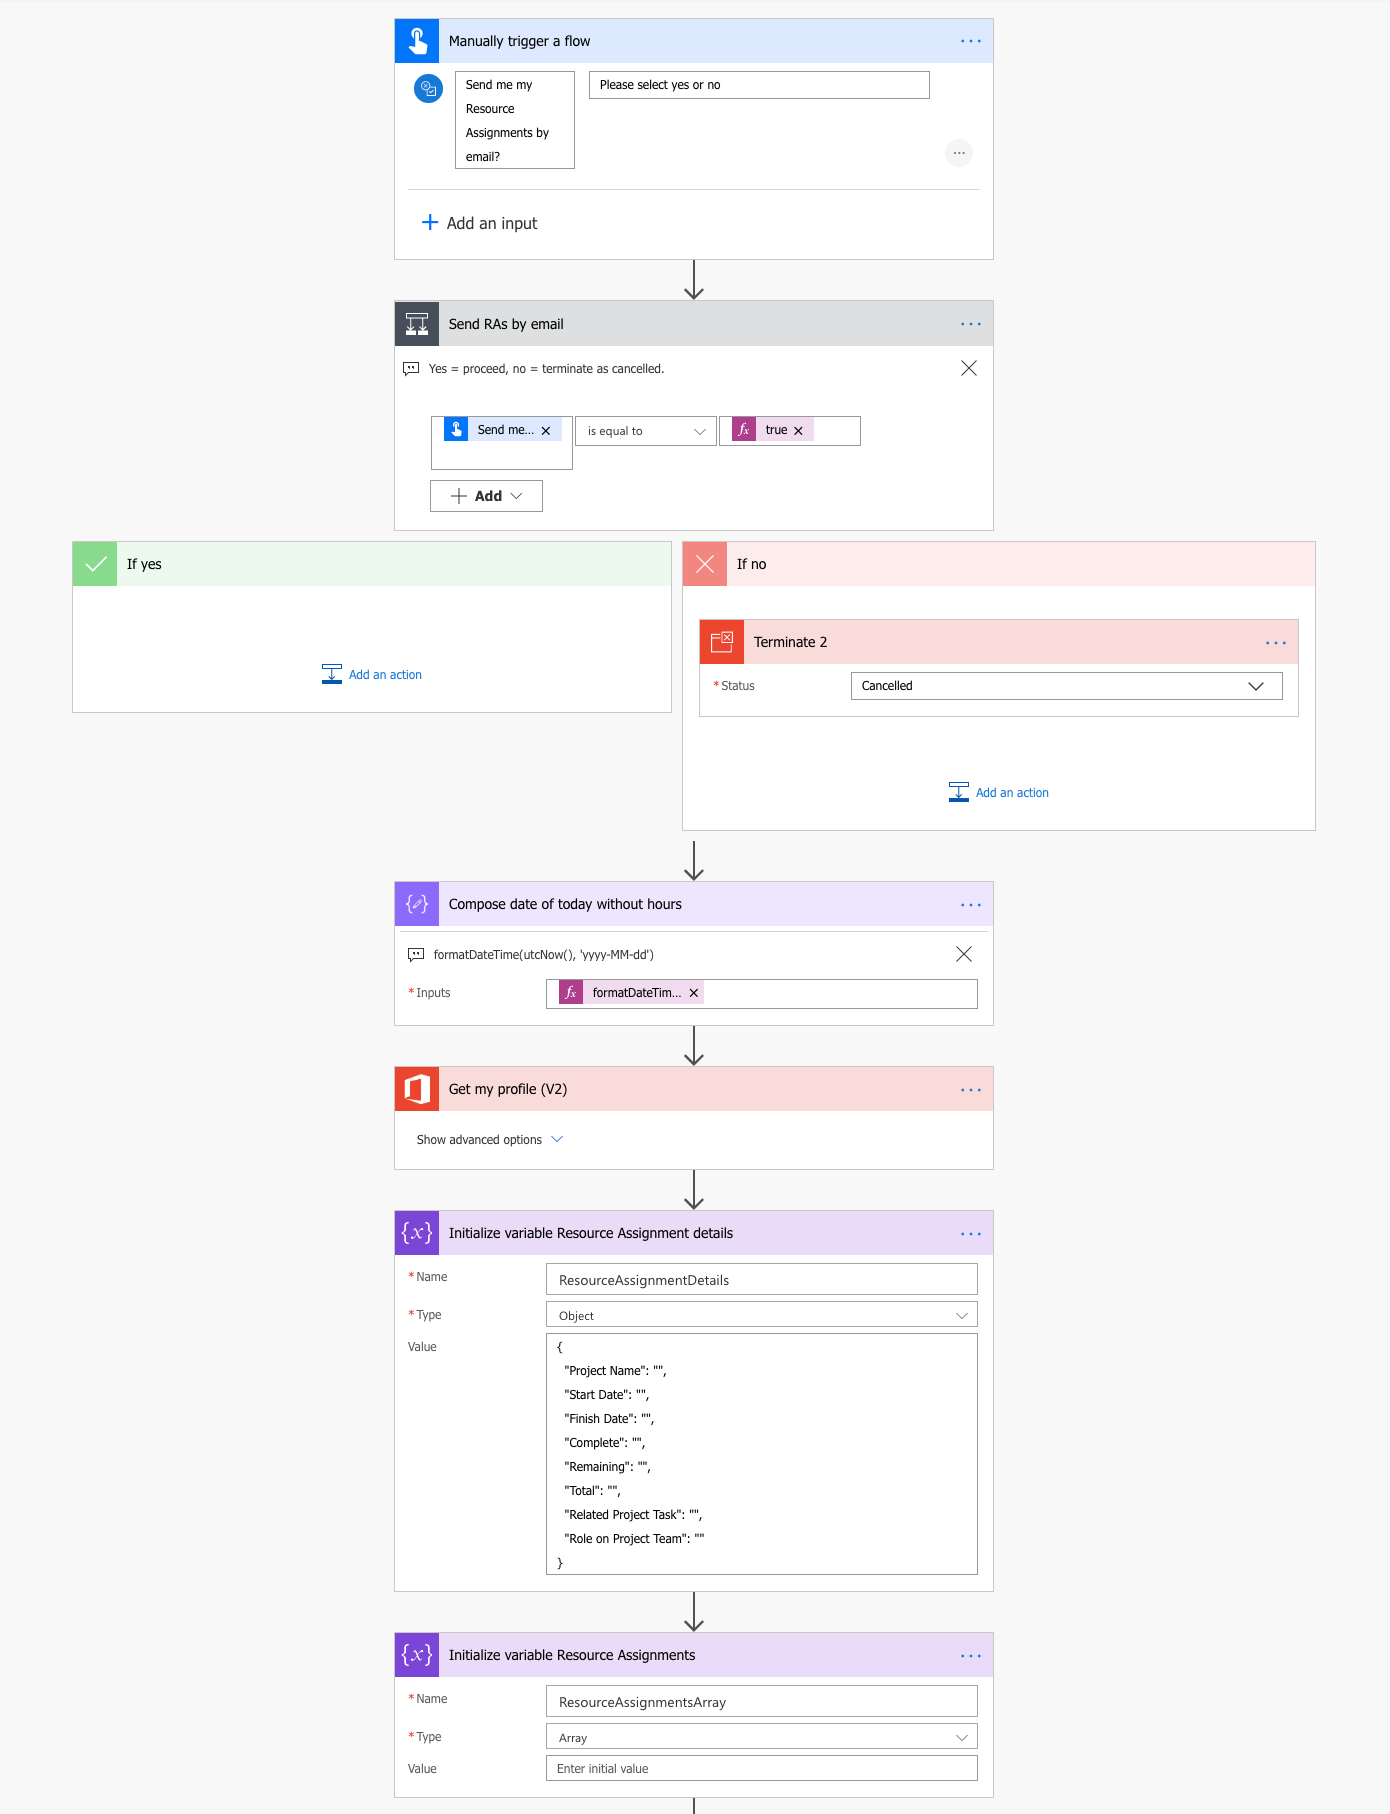
Next, let’s look at how the Flow is built. When then Flow is triggered, a condition checks whether a user wants Resource Assignments (later RA for singular and RAs for plural) sent to his/her email. Kind of silly to choose no at this point but we nevertheless have to take that choice into account.
The first compose action of the Flow composes today’s date without a time component. The output of the compose is used later on, when we’re looking at finish dates for RAs. A finish date of an RA must be greater than the value of this compose action’s output. Based on my tests, that will be true in a scenario where the Flow is fired off at any hour on an RAs finish date. Example: An RA’s finish date is today. Whether the Flow is fired off at 6AM or 11 PM, the email summary will include the RA that has a finish date for today. The expression used in the compose is:
formatDateTime(utcNow(), 'yyyy-MM-dd')The Get my profile action will give us values for details such as id, email and given name. These are needed later on in the Flow. The ResourceAssignmentDetails variable will be used later on to define which details will eventually be sent to a user in an email. I’ve initialized the variable with a value to remember the JSON that I want to use later on, when setting a value for the ResourceAssignmentDetails variable. ResourceAssignmentDetails are later on appended to the ResourceAssignmentsArray. That’s why that variable needs to be initialized at this stage in the Flow.
The JSON for the ResourceAssignmentDetails variable is:
{
  "Project Name": "",
  "Start Date": "",
  "Finish Date": "",
  "Complete": "",
  "Remaining": "",
  "Total": "",
  "Related Project Task": "",
  "Role on Project Team": ""
}
Listing User and Bookable Resource records
Next up is a scope that includes list and compose actions. A list users action will get us the value for systemuserid. This is a user’s id/GUID in CDS. A filter query is used to narrow the results down to just a single record when azureactivedirectoryobjectid matches id from the Get my profile‘s output. Normally Flow will throw in an apply to each loop, when dynamic content from a list records action is used. To get around this, a compose action with a first expression is used. There is only a single record that we’re after so this trick works well. The expression used is:
first(body('List_Users_to_get_GUID')?['value']). systemuseridThanks to MVP Dave Yack for teaching me this expression at D365 Saturday Stockholm 2019.
As we now have the id/GUID of a user, a list records action is used to get the id/GUID of a user as a Bookable Resource. The approach is the same as in the previous steps: List records and narrow down the results with a filter query and then compose the Bookable Resource id/GUID by using a first expression. The idea behind the expression is exactly the same as in the previous step, where a user’s id/GUID was composed. The expression used is:
first(body('List_Bookable_Resources_to_get_GUID')?['value']). bookableresourceidThe final list records action is for listing a user’s RAs. This is where the output of the Compose date of today without hours action comes into play. The list records action returns all RAs that are for the Bookable Resource in question (i.e the user that has fired off the Flow) and have a finish date that is greater than today’s date (i.e utcNow() without a time component). The filter query used is:
_msdyn_bookableresourceid_value eq 'insert your dynamic content here' and msdyn_finish gt 'insert your dynamic content here'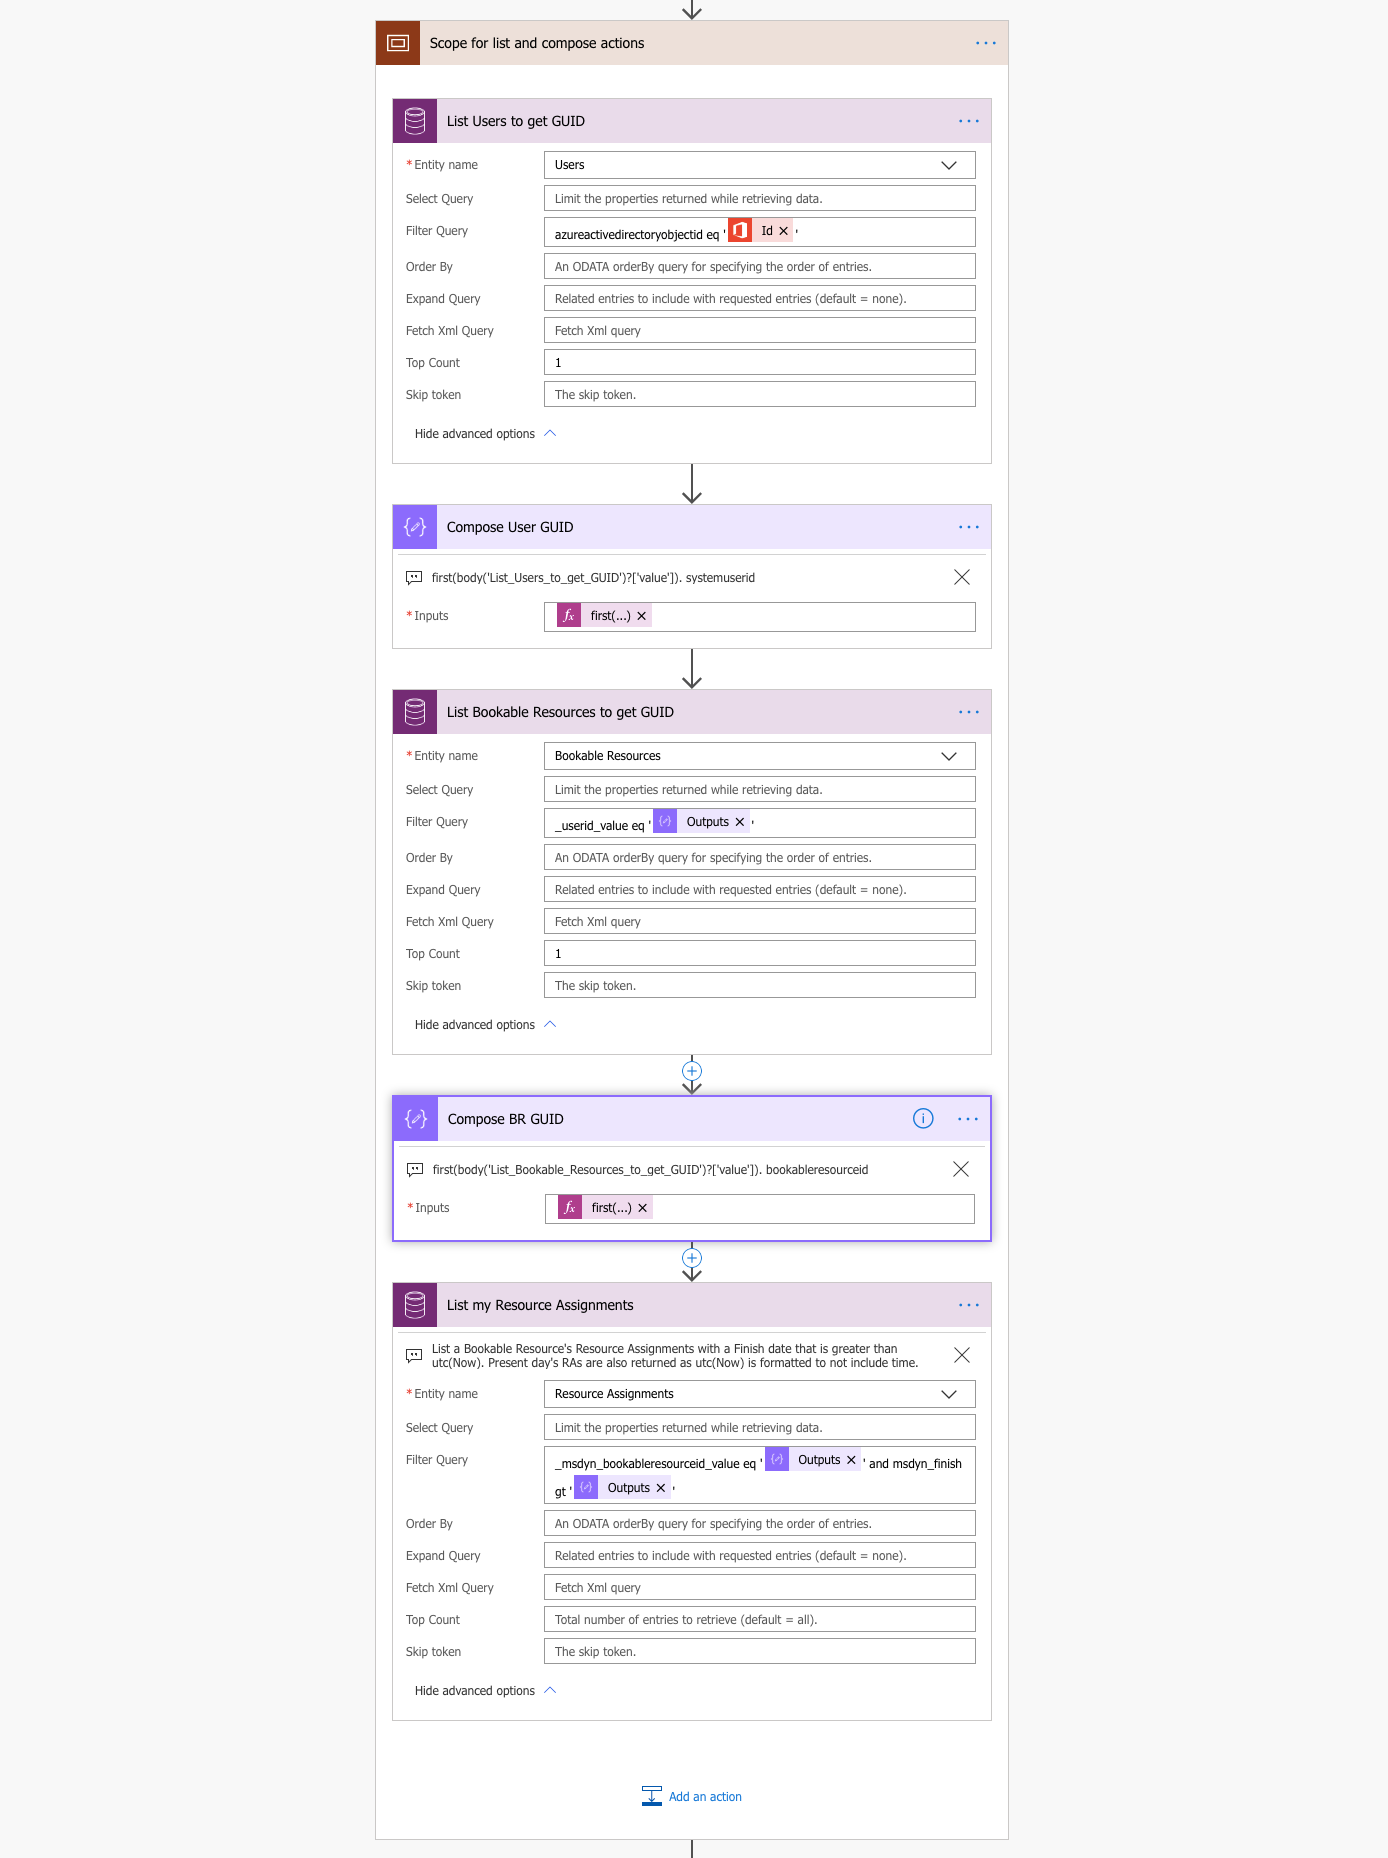
Next, a condition is used to check whether or not any RAs are returned or not. If a user doesn’t have any RAs that meet our criteria, the Flow is cancelled as succeeded. If RAs are found, we’re jumping into the Flow’s first apply to each loop to iterate through the previous list records action for RAs. Imagine if those first expressions were not used in the previous steps. We’d have a pretty loopy Flow by now. The empty expression used in the Does List my RAs return values condition is:
empty(outputs('List_my_Resource_Assignments')?['body/value'])Scopes for get records, composes and variables
The apply to each loop consists of three scopes: The first scope includes get records actions, the second scope includes compose actions and the third and final compose includes actions around variables. Let’s look at each scope in detail.
Scope for get records actions
As we have now have a list of all relevant RAs, it’s possible to get details of records related to those RAs. The get records scope gets us details for Project, Project Task and Project Team Member records. I’ve also included a get records action for Resource Assignments to get the details of the RA that’s being looped through. The query of the Project Team Member get records action is expanded so that we can get our hands on a Role that is related to the Project Team Member record. OOTB for P4W it is currently either Project Manager or Team Member. For PSA it depends on your PSA configuration. The expand query used is:
msdyn_resourcecategory($select=name)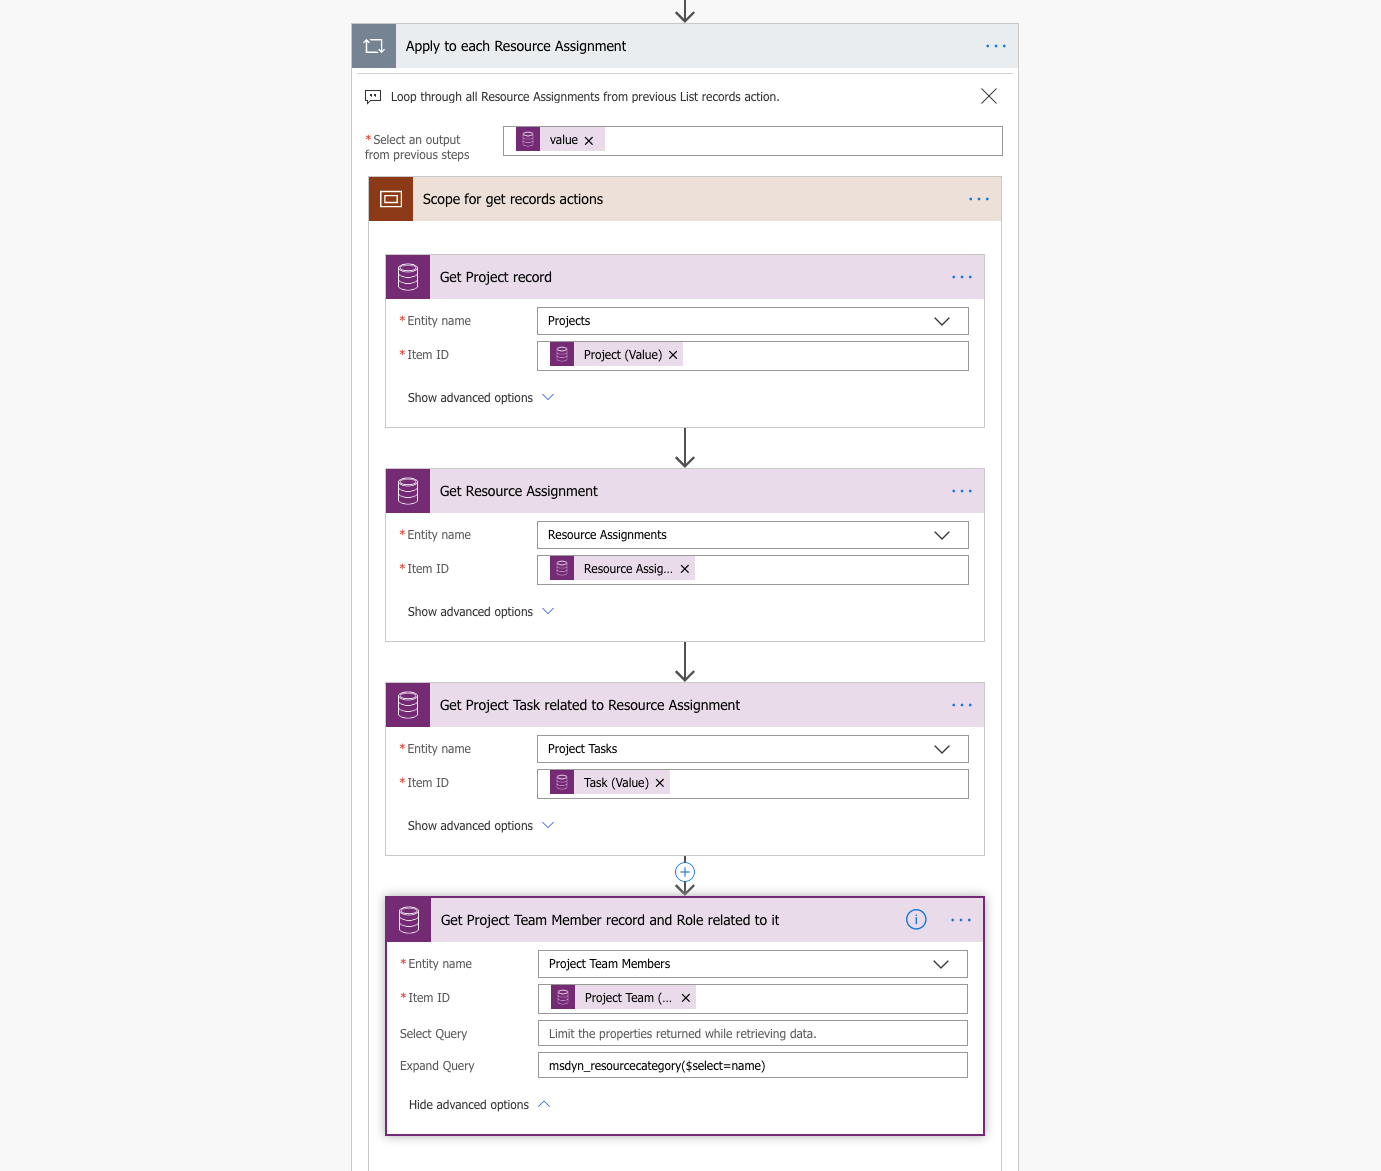
Scope for compose actions
I’ve used compose actions to simplify the values of the RA record’s Start and Finish fields. When an email of a user’s RAs is sent, there’s really no reason to include a time component in the table that we’re creating in the steps that follow. A time component only clutters the table and makes it harder to read. Both Start and Finish values are first composed as is. Another compose then follows and cuts the time component out with a first(split(last(split expression. A time component starts with a T so that and everything that follows it is cut out. See here for more on date and time formats. The expression used is:
first(split(last(split(outputs('Compose_RA_Start_in_full_format'),'')),'T'))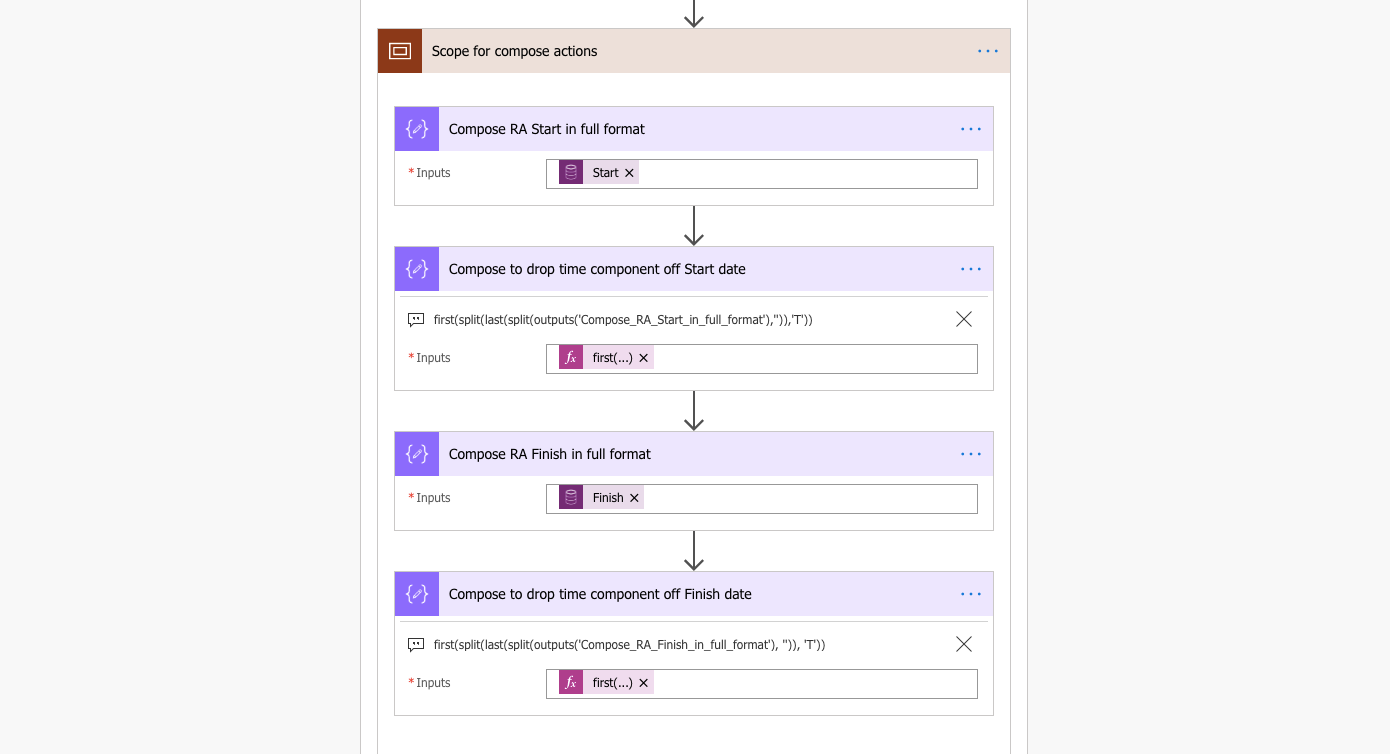
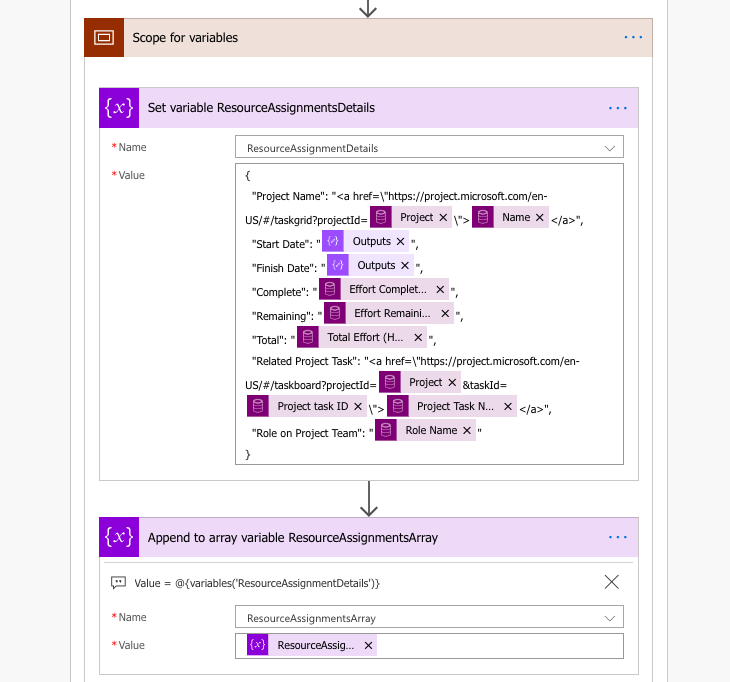
Scope for variables
This scope contains a lot of the magic that defines what will be seen in an email that lists RAs. A set variable action is used for ResourceAssignmentDetails. The JSON was set at the beginning of the Flow so all that needs to be done now is to set some fine details.
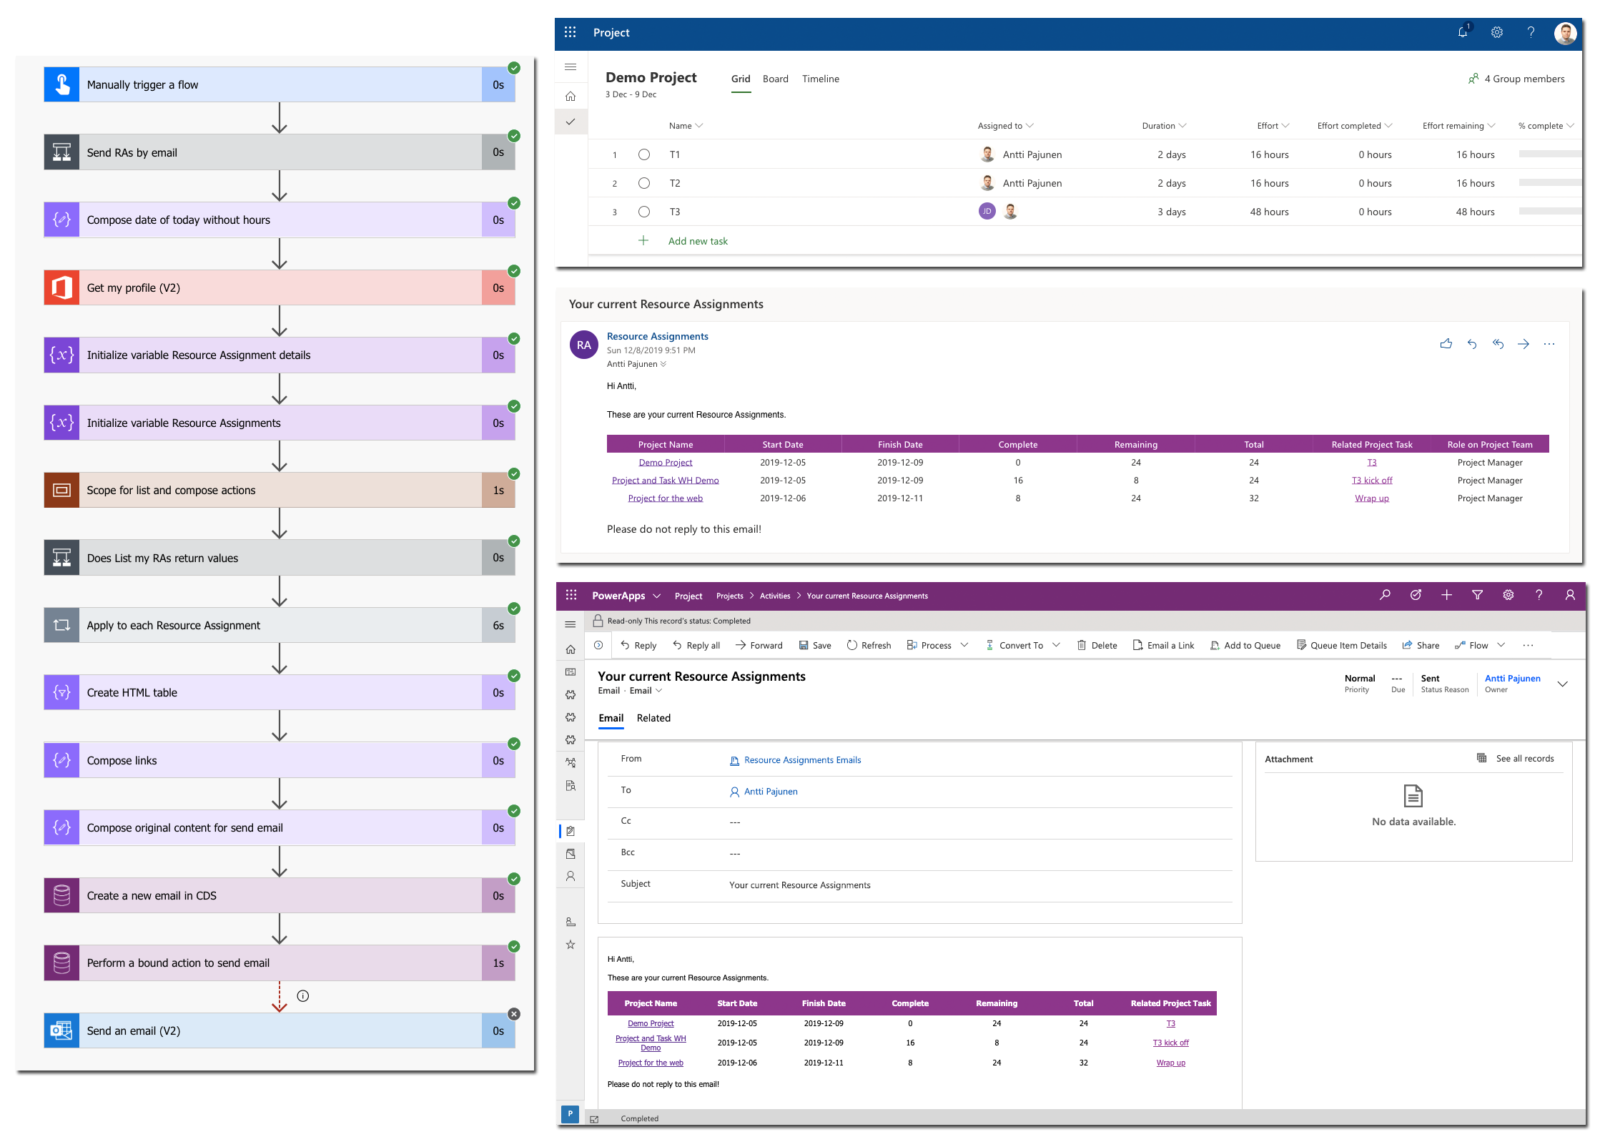
| Project Name | This points to a project’s id/GUID and its name. The URL points to a project’s Task Grid. |
| Start Date | This is the output of the compose from the previous step. The time component was dropped off. |
| Finish Date | Same as above but for finish date. |
| Complete | RAs Effort Completed (Hours). |
| Remaining | RAs Effort Remaining (Hours). |
| Total | RAs Total Effor (Hours). |
| Related Project Task | URL points to a project task’s Task Board. |
| Role on Project Team | Role defined on a Project Team Member record. OOTB Project Manager or Team Member in P4W. |
In the Append to array variable ResourceAssignmentsArray action, the values from the previous ResourceAssignmentDetails are appended to the ResourceAssignmentsArray. This way we have an array that we can build an HTML table from.
Flow’s final steps
We’re nearing the finish line. An HTML table is composed from the ResourceAssignmentsArray. A bit of magic is needed for the links to get them working. I picked this up from a sample Flow by Jackie Duong. Kudos to Jackie for making and sharing it. I also have to acknowledge MVP Megan Walker for explaining what the expression actually does. Long story short, you can read this post for an explanation. The expression used is:
replace(replace(replace(replace(body('Create_HTML_table'), '<', '<'), '>', '>'), '"', '"'), '&', '&')The Compose original content for send email action is nothing but a placeholder for the HTML that is used in the final actions. I’ve only included it for debugging purposes and it includes the same HTML that you’ll find in the next CDS action.
Now that an HTML table is composed and the links are cleaned up so that they work, a delivery method can be chosen. For example purposes, I’ve included two different means of sending out an RA summary email: CDS emails and Office 365 Outlook emails. For CDS emails, an email message first needs to be created and it then needs to be sent out using a bound Action.
For CDS emails, I wanted the sender to be a Queue instead of myself. There’s a bit of work that needs to be done to make that possible. As that would basically be a blog post of its own, I’ll simply list some of the steps that are required:
- Create a shared mailbox.
- Create a Queue.
- Set up server-side sync.
- Customize the P4W Model-driven app’s sitemap to include Activities.
Note that the value of Activity Party Attribute Value – 1 in the Create a new email in CDS action needs to include the recipient’s CDS id/GUID, which is composed in the Compose User GUID action at the beginning of the Flow. The email is then sent from your Queue of choice. In this example I’ve hard coded the Queue’s id/GUID to the action. The HTML is fairly lengthy. I’ve included it at the end of this blog post (kudos to Jackie Duong yet again for including the HTML in her sample Flow).
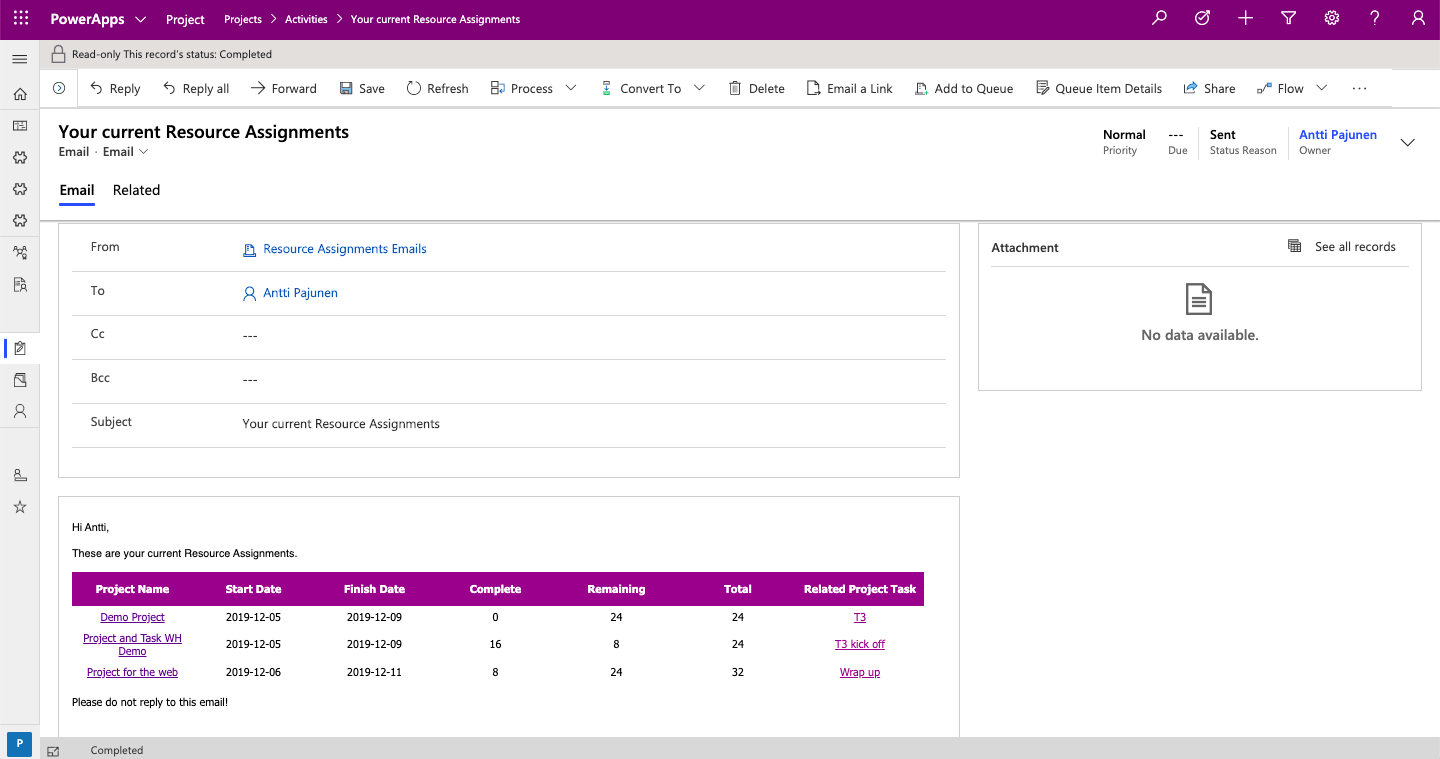
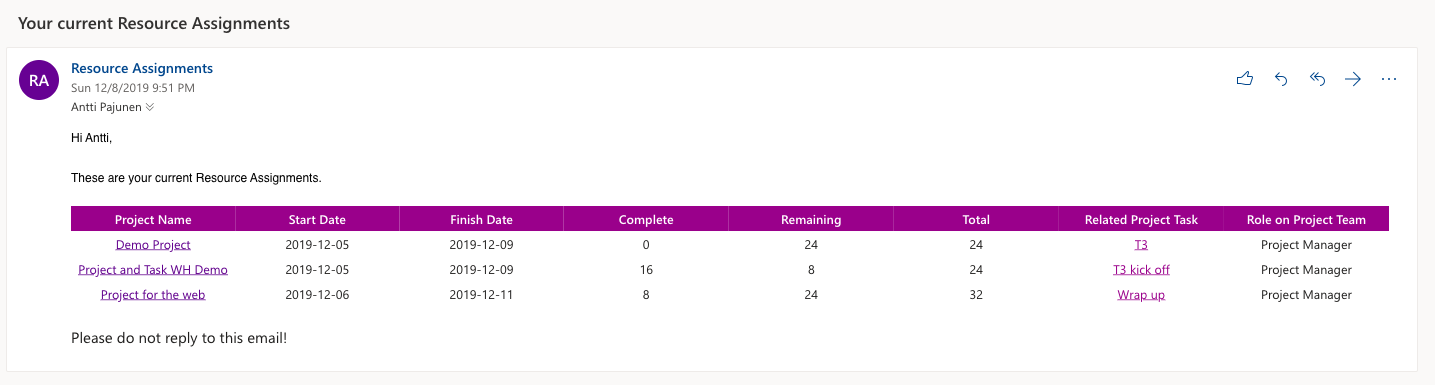
The bound Action and the final Send an email action are fairly straightforward so there’s not much to write about those. The photo below illustrates what is created in Activities when a email is sent out by this Flow. There’s also an image of an email with the created HTML table in it.
As always, the Flow can be downloaded from the TDG Power Platform Bank here.

<html>
<head>
<style>
a:link {
color: #077D3F;
}
table {
border-collapse: collapse;
width: 100%;
}
th, td {
text-align: left;
padding: 10px;
width:20%;
}
tr:nth-child(even){background-color: #f2f2f2}
th {
background-color: #077D3F;
color: white;
}
</style>
</head>
<body>
<div><span style="font-size:16px;font-family:"Segoe UI",sans-serif;color:#364147;font-style:regular"><td style="padding:0in 0in 8px 0in">
Hi @{outputs('Get_my_profile_(V2)')?['body/givenName']},
<br>
<br>
These are your daily Resource Assignments.
</td></span></div><br>
@{outputs('Compose_links')}
</body>
</html>